Basic Operations (Loading and Removing Discs)
Loading and Removing Discs
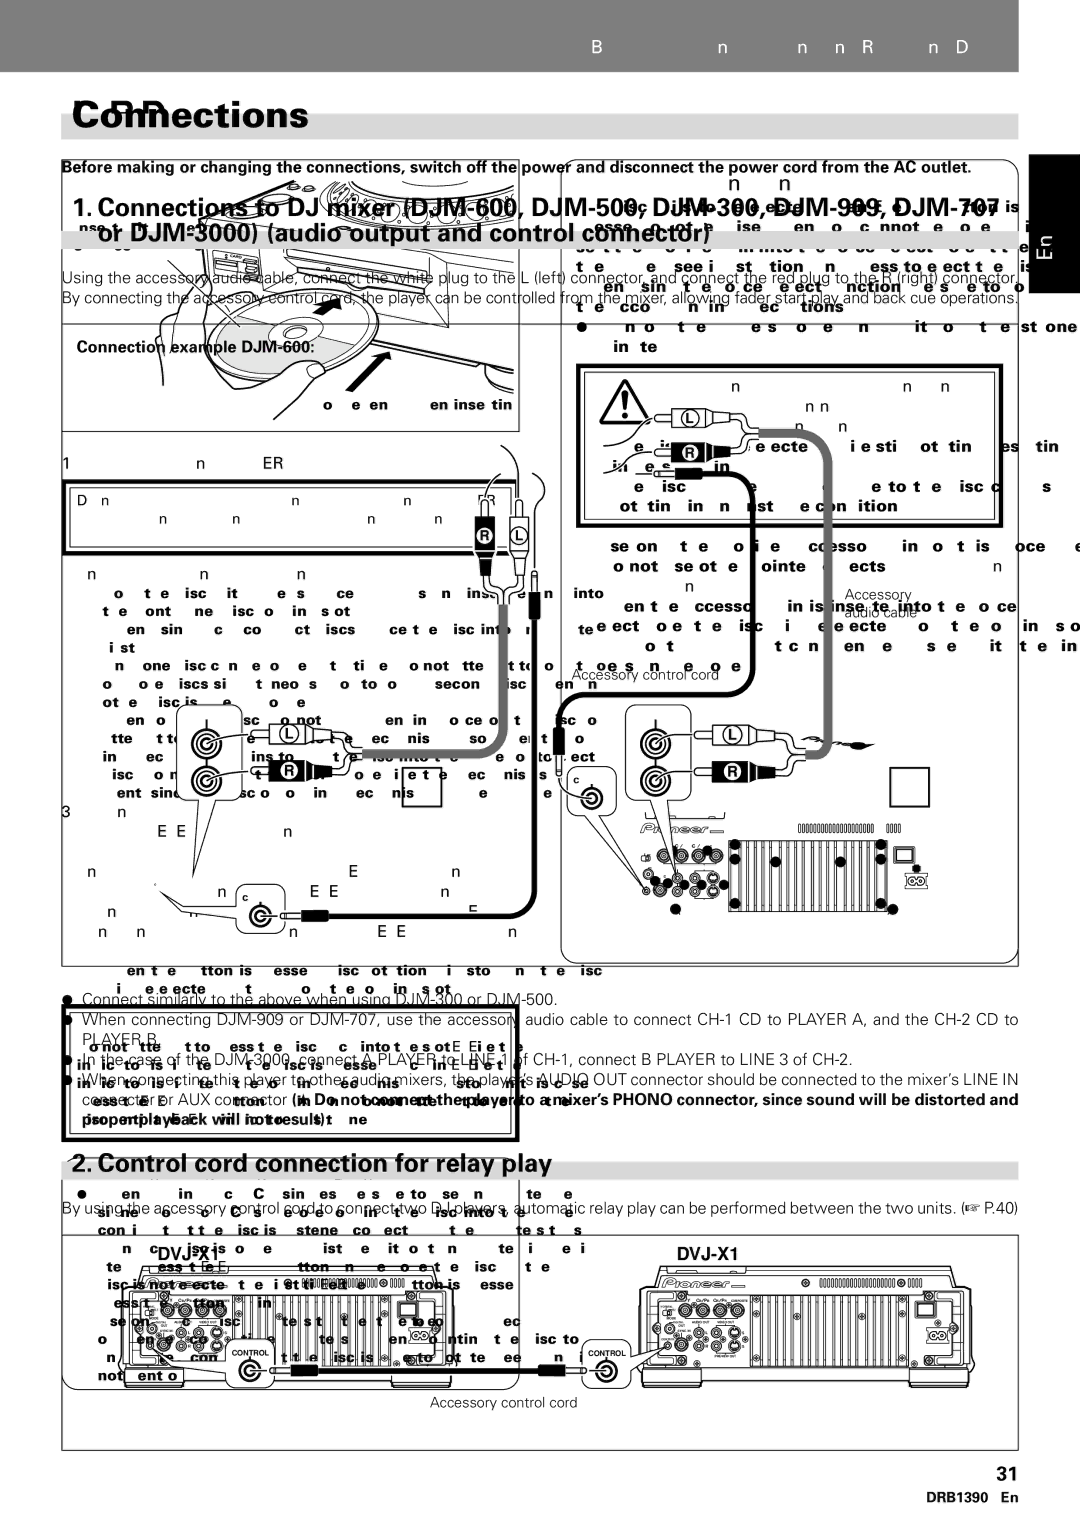
Insert with label |
surface upwards |
Hold evenly when inserting |
1. Set the rear panel POWER switch to ON.
Do not attempt to force a disc into the slot when the POWER switch is turned OFF, since the disc or loading mechanism may be damaged.
2.Insert the disc into the loading slot.
¶Hold the disc with label surface upwards and insert evenly into the
¶When using 8 cm compact discs, place the disc into an adapter first.
¶Only one disc can be loaded at a time. Do not attempt to load two or more discs simultaneously, or to load a second disc when an- other disc is already loaded.
¶When loading a disc, do not apply bending force on the disc, or attempt to force the disc into the mechanism. Also, when the load- ing mechanism begins to pull the disc into the player or to eject a disc, do not attempt to forcibly override the mechanism’s move- ment, since the disc or loading mechanism may be damaged.
3.When the eject/stop mode select switch is set to UNLOCK, press the EJECT (0) button to eject a loaded disc.
If the eject/stop mode select switch is set to LOCK, dur- ing playback press the PLAY/PAUSE (6) button to first stop the disc, then press the EJECT (0) button. If a cue point has been set, during playback press the CUE but- ton to initiate back cue, then press the EJECT (0) button to eject the disc.
¶When the button is pressed, disc rotation will stop and the disc will be ejected partway from the loading slot.
Forced eject function
If a disc fails to be ejected when the EJECT (0) button is pressed or otherwise when you cannot remove a disc, in- sert the provided pin into the forced eject hole at the front of the player (see illustration) and press to eject the disc.
When using the forced eject function, be sure to following the accompanying precautions.
1Turn off the player’s power and wait for at least one minute.
Attempting the forced eject function im- mediately after turning off the power may cause the following dangers:
¶The disc may be ejected while still rotating, resulting in personal injury.
¶The disc may be damaged due to the disc clamp’s rotating in an unstable condition.
2Use only the provided accessory pin for this procedure (do not use other pointed objects). The forced eject pin is located on the bottom surface of the player.
When the accessory pin is inserted fully into the forced eject hole, the disc will be ejected from the loading slot by about
Forced eject hole
English
|
|
|
|
|
|
|
| Note: |
|
|
| Note: |
|
| Do not attempt to press the disc back into the slot while the “EJECT” |
|
|
| This player does not support playback of 8 cm DVDs. Do not at- |
|
| indicator is lighted. If the disc is pressed back in while the “EJECT” |
|
|
| tempt to use adapters meant for 8 cm CDs, since the adapter may |
|
| indicator is lighted, the loading mechanism may stop. In this case, |
|
|
| come loose during rotation, causing damage to the disc or compo- |
|
| press the EJECT (0) button again, and do not attempt to reload the |
|
|
| nent. |
|
| disc until the “EJECT” indicator has turned OFF. |
|
|
|
|
|
|
|
|
|
|
| |
|
|
|
|
|
| |
|
|
|
|
|
|
|
|
|
|
|
|
|
|
Precautions when playing 8 cm CD singles
1When playing 8 cm CD singles, be sure to use an adapter de- signed for 8 cm CDs. Before loading the disc into the player, confirm that the disc is fastened correctly by the adapter’s tabs. If an 8 cm disc is loaded by mistake without an adapter, immedi-
ately press the EJECT (0) button and remove the disc. If the disc is not ejected the first time the EJECT (0) button is pressed, press the button again.
2Use only 8 cm disc adapters that feature the 'logo mark (rec- ommended compatible adapters). When mounting the disc to an adapter, confirm that the disc is able to rotate freely, and is not bent or warped.
31
<DRB1390> En
