PDP-436RXE
For USE in the United Kingdom
STANDBY/ON Indicator
STANDBY/ON Button
Ventilation Caution
Contents
Using the Teletext Functions
Enjoying through External Equipment
Appendix
Important User Guidance Information
Installation guidelines
Usage guidelines
Do not display Teletext for a prolonged period of time
Cleaning the cabinet
When not using the product for a long period of time
Plasma Display protection function
Information of pixel defect
Panel sticking and after-image lag
Cords. Overloading can cause fire or electric shock
Safety Precautions
When using other items
Installation Precautions
Rear view Side view
Mounting surface Plasma Mounting hole Display Median line
Power cord 2 m For Europe, except UK For UK and Eire
Supplied Accessories
Remote control unit
Cleaning cloth Warranty card Two operating instructions
Plasma Display
Part Names
Rear view
Input 2 terminals Component VIDEOY, P B, P R
Remote control unit
Preparation
Using the optional Pioneer stand Operating Environment
Stabilizing on a table or floor
Location
Basic connections
Connecting the power cord
Plasma Display rear view
Attaching the ferrite core
Connecting to an antenna
Preparing the remote control unit
Open the battery cover
Inserting batteries
Allowed operation range of the remote control unit
Plasma Display status indicators
Turning on/ off the power
Watching TV
Plasma Display
Example
Changing channels
Changing the volume and sound
Tuning to your favourite channels
Using i+/i- on the remote control unit
Using eon the remote control unit
Dual p
Using g on the remote control unit
Freezing images
Using the menu
Menu Setup
Menu operations
Home Menu
Setting up TV channels automatically
Basic Adjustment Settings
Setting up TV channels manually
Using Auto Installation
Reducing video noise
Setting Child Lock
Selecting a decoder input terminal
Select Store Select Yes, Yes Listed, or No
Clock setting
Sorting preset TV channels
Labelling TV channels
02/07/2004 FRI
AV Selection
Language setting
Advanced picture adjustments
Basic picture adjustments
Using PureCinema
Select the desired level
Using CTI
Using Colour Temp
Using Colour Management
Colour Temp
Using the Dynamic Range Expander DRE functions
Using the 3DYC and I-P Mode
Eliminating noise from images
Front Surround
Sound adjustments
No Signal off
Power Control
Energy Save
No Operation off
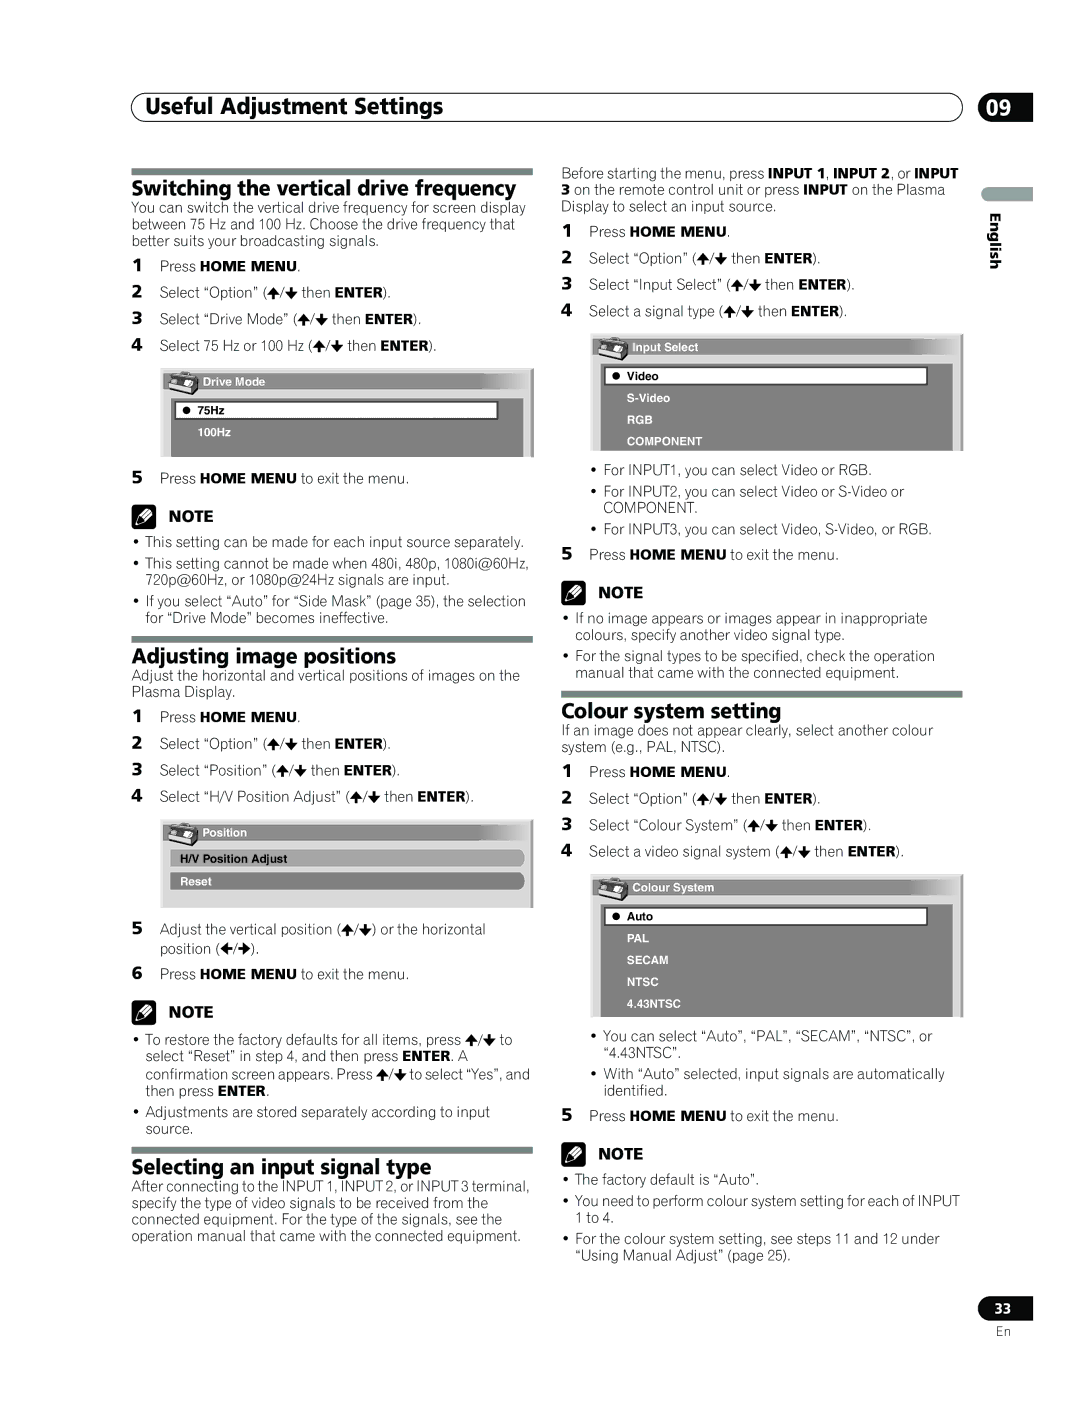
Display to select an input source
Colour system setting
Useful Adjustment Settings
Selecting a screen size manually
Selecting a screen size automatically
Sleep Timer
Using a password
Entering a password
Resetting the password function
Changing the password
Disabling the password function
If you forget the password
Enjoying through External Equipment
Watching a decoder image
Watching a VCR image
Connecting Hdmi equipment
Using Hdmi Input
To specify the type of digital video signals
To specify the type of audio signals
Connecting a DVD player
Using i/o Link.A
Watching a DVD image
Displaying a DVD image
Connecting audio equipment
Connecting a game console or camcorder
Enjoying a game console or watching camcorder images
Enjoying through audio equipment in connection
What is Teletext?
Using the Teletext Functions
Operating the Teletext basics
Turning on and off Teletext
Displaying TOP Over View
Displaying subpages
Displaying subtitle pages
Subpage screen
Problem Possible Solution
Troubleshooting
Appendix
Code Message Check
5 7 9
Connecting pin assignments for Scart
101214161820
Scart Input
Trademarks
Specifications
This conforms to HDMI1.1 and HDCP1.1
Plasma Display, Model PDP-436RXE
Page
Témoin STANDBY/ON
Touche STANDBY/ON
Avertissement
Précaution DE Ventilation
Table des matières
Emploi d’un appareil extérieur
Utilisation des fonctions télétexte
Annexe
Informations importantes pour l’utilisateur
Instructions d’installation
Instructions d’usage
Remarque
Fonction de protection de l’écran à plasma
Ne collez aucune étiquette ni aucun ruban sur l’appareil
Information sur les défauts de pixel
Rayonnement infrarouge
Rémanence d’image sur le panneau
Précautions de sécurité
Si vous utilisez d’autres accessoires
Précautions d’installation
02 Précautions de sécurité
Vue de dos Vue de côté
Boîtier de télécommande
Accessoires fournis
Chiffon de nettoyage
Carte de garantie Deux modes d’emploi
Écran plasma
Nomenclature
Touches Channel +
Vue de dos
Cette touche exécute une commande
Boîtier de télécommande
Elle affiche les caractères masqués
Ces touches règlent le niveau de sortie
05 Préparation
Emplacement
Utilisation du support Pioneer en option
Milieu de fonctionnement
Raccordements de base
Préparation
Raccordement du cordon d’alimentation
Écran plasma vue de dos
Raccordement à l’antenne
Préparation du boîtier de télécommande
Mise en place des piles
Précautions relatives aux piles
Précautions relatives au boîtier de télécommande
Portée du boîtier de télécommande
30º
Capteur de
Mise sous / hors tension
Pour regarder la télévision
Écran plasma
Témoins d’état de l’écran plasma
Exemple
Sélection des canaux
Utilisation de la touche edu boîtier de télécommande
Utilisation des touches i+/i- du boîtier de télécommande
Accord sur vos canaux favoris
Modification du niveau sonore
Utilisation de la touche g du boîtier de télécommande
Appuyez une nouvelle fois sur dpour annuler Image normale
Gel d’une image
Utilisation du menu
Configuration du menu
Opérations du menu
Home Menu Paramètre
08 Réglages de base
Utilisation d’Autoinstallation
Réglage automatique des canaux de télévision
Réglage manuel des canaux de télévision
Réduction de bruit vidéo
Définition de Verrouillage enfants
Sélection d’une entrée décodeur
Classement des canaux de télévision préréglés
Étiquetage des canaux de télévision
Réglage de l’horloge
Connecté tel que magnétoscope ou graveur de DVD
Choix de la langue
Réglages de base
Sélection AV
Paramètre Description
Réglages avancés de l’image
Réglages de base de l’image
Utilisation de PureCinema
Sélectionnez la valeur désirée
Utilisation de CTI
Utilisation de Temp. Couleur
Utilisation de Gestion coul
Puis Enter
Mode I-P
Utilisation de 3DYC et de Mode I-P
Elimination du bruit des images
Contraste Dynamique
’effet de cette fonction dépend du signal
Réglages du son
Surround avant
Mise hors service en l’absence de signal
Commande alimentation
Mise hors service en l’absence d’opération
Économie d’énergie
Réglages utiles
Choix du type de signal d’entrée
Sélection de la fréquence de balayage vertical
Réglage de la position de l’image
09 Réglages utiles
Sélection manuelle d’un format d’écran
Sélection automatique d’un format d’écran
Minuterie de mise en veille
Utilisation d’un mot de passe
Saisie du mot de passe
Effacement du mot de passe
Changement de mot de passe
Désactivation du mot de passe
Nous vous proposons d’écrire ici le mot de passe
Raccordement d’un magnétoscope
Emploi d’un appareil extérieur
Raccordement d’un décodeur
Affichage des images provenant d’un décodeur
Utilisation de l’entrée Hdmi
Appareil Hdmi Pour mettre en service la prise Hdmi
Raccordement d’un appareil Hdmi
Pour préciser le type des signaux vidéo numériques
Affichage des images d’un lecteur de DVD
Utilisation de l’entrée/sortie link.A
Raccordement d’un lecteur de DVD
Affichage des images provenant d’un lecteur de DVD
Raccordement d’une console de jeu ou d’un caméscope
Utilisation des appareils audio reliés
Raccordement d’un appareil audio
Affichage des images d’une console de jeu ou d’un caméscope
Utilisation des fonctions télétexte
Mise en service, ou hors service, du télétexte
Qu’est-ce que le télétexte ?
Utilisation de base du télétexte
Affichage des éléments TOP
Affichage d’une page secondaire
Affichage des pages de sous-titres
Secondaire
Guide de dépannage
Annexe
Anomalie Action corrective possible
Code Message Vérification
Prise péritel Input
Bornage de la prise péritel
Marques de commerce
Caractéristiques techniques
Tous droits de reproduction et de traduction réservés
Paramètre Écran à plasma 43 po., modèle PDP-436RXE
Page
Anzeige STANDBY/ON
Taste STANDBY/ON
Warnung
Vorsichtshinweis ZUR Belüftung
Inhalt
Einsatz externer Geräte
Videotext-Funktionen
Anhang
Grundregeln zur Benutzung
Wichtige Grundregeln
Grundregeln zur Aufstellung
ZUR Beachtung
Informationen zu Pixeldefekten
Plasma Display-Schutzfunktion
Infrarotstrahlen
Funkstörungen
Einbrenner und Nachbilder
Fremdkörper eingedrungen sind
Wichtige Sicherheitshinweise
Bei Gebrauch anderer Vorrichtungen
Beim Installieren zu beachten
Rückseite
Seitenansicht
Netzkabel 2 m Für Europa außer UK Für UK und Irland
Mitgeliefertes Zubehör
Fernbedienung
Reinigungstuch
Tasten Channel +
Teilebezeichnungen
Und befinden sich in der oberen Wand des Fachs
Anschlüsse Input 2 Component VIDEOY, P B, P R
Fernbedienung
Installieren des Plasma Displays
Vorbereitungen
Vermeiden eines Umkippens des Plasma Displays
Anschließen des Netzkabels
Basisanschlüsse
Plasma Display Rückseite
Anbringen des Ferritkerns
Anschließen einer Antenne
Vorbereiten der Fernbedienung
Einlegen der Batterien
Vorsichtsmaßregeln zu Batterien
Beim Umgang mit der Fernbedienung zu beachten
Wirkungsbereich der Fernbedienung
Fernsehempfang
Ein-/Ausschalten
Plasma Display-Statusanzeigen
Beispiel
Kanalwechsel
Lautstärke-und Toneinstellungen
Abrufen von Favoritenkanälen
Mit i+/i- an der Fernbedienung
Mit ean der Fernbedienung
1000
Mit g an der Fernbedienung
Standbild
Menü-Übersicht
Menü-Steuerung
Menü-Bedienung
Home Menu Gegenstand Seite
Grundeinstellungen
Verwendung der Autoinstallation
Automatisches Programmieren von Fernsehkanälen
Manuelles Programmieren von Fernsehkanälen
Reduzieren von Bildrauschen
Einstellen der Kindersicherung
Wählen des Decodereingangs
Eingeben von Fernsehkanalnamen
Sortieren programmierter Fernsehkanäle
Einstellen der Uhr
AV-Wahl
Einstellen der Sprache
Grundlegende Bildeinstellungen
Erweiterte Bildeinstellungen
Verwendung von PureCinema
Verwendung von CTI
Verwendung von Farbtemperatur
Verwendung von Farbmanagement
Farb-Temp
Beseitigen von Bildrauschen
Verwendung der Funktionen des Dynamikdehners DRE
Verwendung des 3DYC- und des I-P-Modus
Die Auswirkung dieser Funktion ist signalabhängig
Energiesparmodi
Kein Signal -aus
Energiesparmodus
Keine Bedienung -aus
Praktische Einstellmöglichkeiten
Wählen eines Eingangssignaltyps
Umschalten der vertikalen Ansteuerungsfrequenz
Bildlage
Automatisches Wählen einer Bildschirmgröße
Manuelles Wählen einer Bildschirmgröße
Kino
Zoom KINO149 Voll Breitbild ZUR Beachtung
Timer
Verwendung eines Passworts
Eingeben eines Passworts
Rückstellen des Passworts
Ändern des Passworts
Deaktivieren des Passworts
Wenn das Passwort nicht mehr verfügbar ist
Einsatz externer Geräte
Wiedergabe von einem Decoder
Wiedergabe von einem Videorecorder
Angeben des Typs der Audiosignale
Angeben des Typs der digitalen Videosignale
Verwendung des HDMI-Eingangs
Anschließen von HDMI-Ausrüstung
Anzeigen eines DVD-Bilds
Gebrauch von i/o Link.A
Anschließen eines DVD-Spielers
Anzeigen eines DVD-Bilds
Wiedergabe über angeschlossene Audio-Geräte
Wiedergabe von Spielekonsole oder Camcorder
Anschließen einer Spielekonsole oder eines Camcorders
Wiedergeben des Spielekonsolen- oder Camcorderbilds
Was ist Videotext?
Videotext-Funktionen
Grundlegender Videotext-Betrieb
Ein- und Ausschalten von Videotext
Anzeigen der TOP-Übersicht
Anzeigen von Unterseiten
Anzeigen von Untertitelseiten
Unterseiten-Bildschirm
Anhang
Problem Lösungsansätze
Fehlerdiagnose
Code Meldung Prüfen
Erde
SCART-Anschlussbelegung
Technische Daten
Warenzeichen
Gegenstand Plasma Display, Modell PDP-436RXE
Page
Page
Pioneer Europe NV
Pioneer Corporation