Connecting up

02

1Connect the display unit to the receiver subwoofer. Plug the display cable into the connector on the rear of the display unit, then plug the other end of the display cable into SYSTEM connector on the receiver subwoofer.

Caution

• Do not attempt to attach the display unit to the wall.

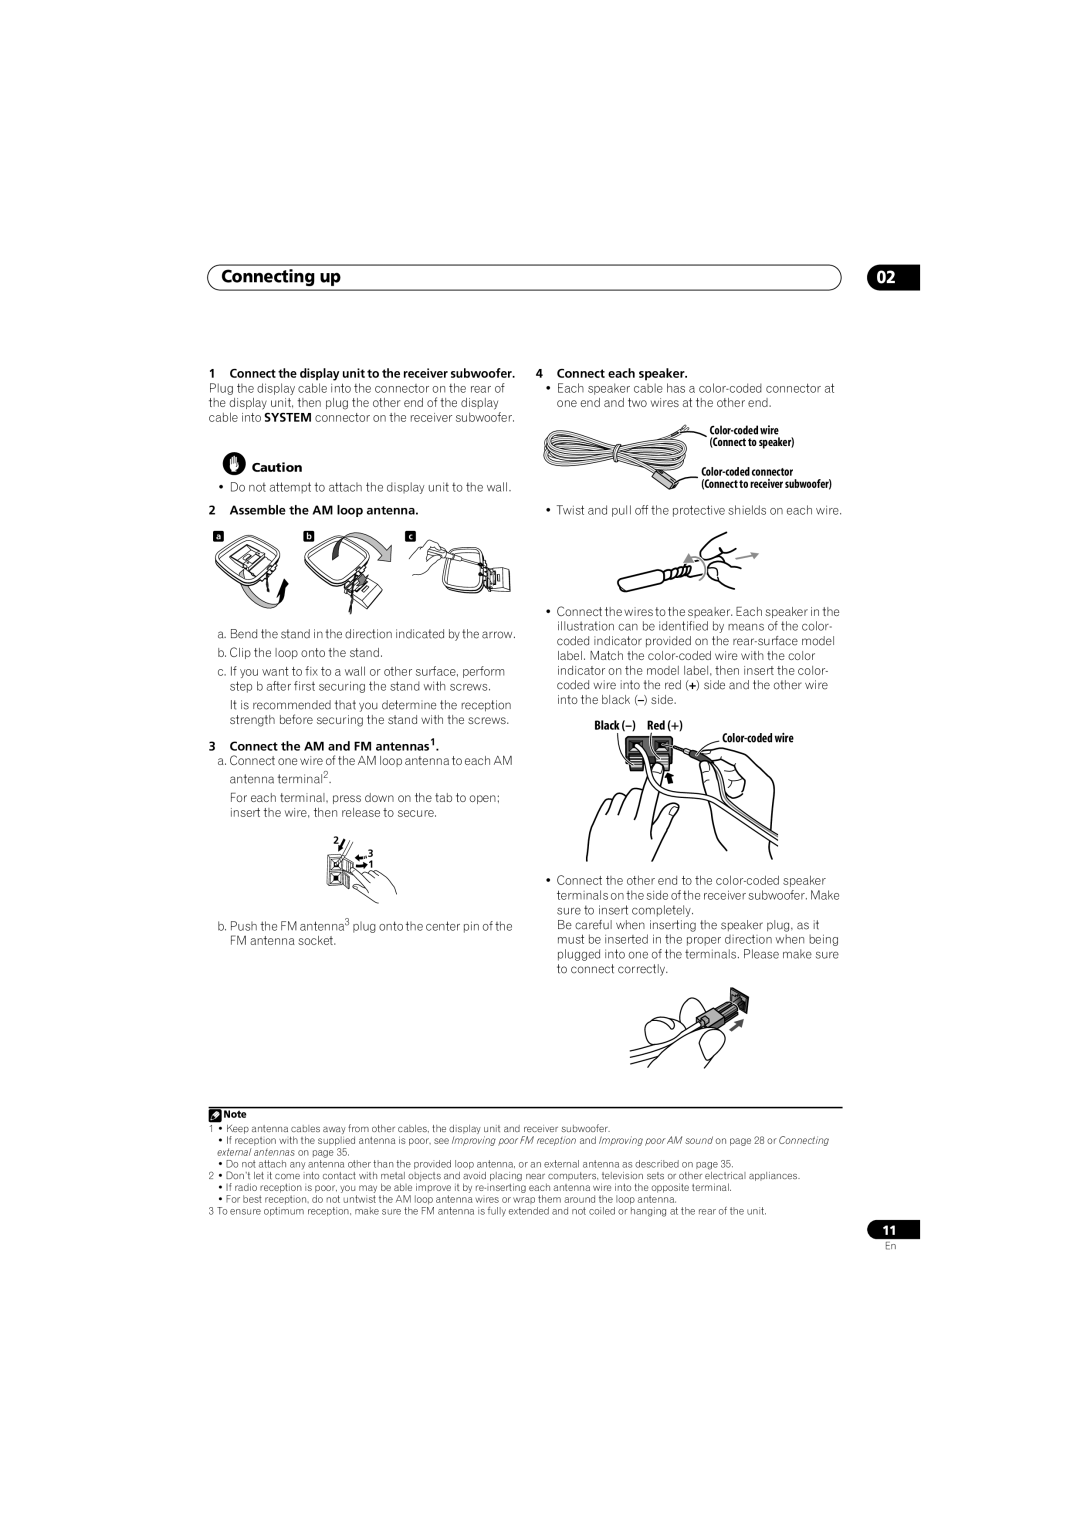
2 Assemble the AM loop antenna.

a

b

c

a. Bend the stand in the direction indicated by the arrow.

b. Clip the loop onto the stand.

c. If you want to fix to a wall or other surface, perform step b after first securing the stand with screws.

It is recommended that you determine the reception strength before securing the stand with the screws.

3Connect the AM and FM antennas1.

a.Connect one wire of the AM loop antenna to each AM antenna terminal2.

For each terminal, press down on the tab to open; insert the wire, then release to secure.

2

3

1

b. Push the FM antenna3 plug onto the center pin of the FM antenna socket.

4Connect each speaker.

Each speaker cable has a color-coded connector at one end and two wires at the other end.

Color-coded wire (Connect to speaker)

Color-coded connector (Connect to receiver subwoofer)

• Twist and pull off the protective shields on each wire.

Connect the wires to the speaker. Each speaker in the illustration can be identified by means of the color- coded indicator provided on the rear-surface model label. Match the color-coded wire with the color indicator on the model label, then insert the color- coded wire into the red (+) side and the other wire into the black () side.

Black (–) Red (+)

Color-coded wire

Connect the other end to the color-coded speaker terminals on the side of the receiver subwoofer. Make sure to insert completely.

Be careful when inserting the speaker plug, as it must be inserted in the proper direction when being plugged into one of the terminals. Please make sure to connect correctly.

Note

1 • Keep antenna cables away from other cables, the display unit and receiver subwoofer.

If reception with the supplied antenna is poor, see Improving poor FM reception and Improving poor AM sound on page 28 or Connecting external antennas on page 35.

Do not attach any antenna other than the provided loop antenna, or an external antenna as described on page 35.

2 • Don’t let it come into contact with metal objects and avoid placing near computers, television sets or other electrical appliances.

If radio reception is poor, you may be able improve it by re-inserting each antenna wire into the opposite terminal.

For best reception, do not untwist the AM loop antenna wires or wrap them around the loop antenna.

3 To ensure optimum reception, make sure the FM antenna is fully extended and not coiled or hanging at the rear of the unit.

11

En

Page 11
Image 11
Pioneer HTP-LX70, SSP-LX70ST Black Red + Color-coded wire, Assemble the AM loop antenna, Connect the AM and FM antennas1

HTP-LX70, AS-LX70, SX-LX70W, SSP-LX70ST specifications

The Pioneer HTP-LX70, SX-LX70W, SSP-LX70ST, and AS-LX70 represent a culmination of advanced audio technologies designed to deliver a premium home theater experience. Each component showcases an array of features that cater to audiophiles and casual listeners alike, ensuring versatility and high-quality sound.

The HTP-LX70 is an outstanding home theater package that includes a powerful AV receiver and a complete set of speakers. It supports the latest audio formats, including Dolby Atmos and DTS:X, creating an immersive surround sound environment. The receiver is equipped with Pioneer’s MCACC (Multi-Channel Acoustic Calibration System), which automatically adjusts the speaker settings to optimize sound quality based on the unique characteristics of the room.

The SX-LX70W is a powerful stereo amplifier designed for high-fidelity audio reproduction. It delivers a robust output with low distortion, ensuring clear sound across various frequency ranges. The amplifier features a sleek design, combining aesthetics with functionality. It supports multiple connectivity options, including Bluetooth and Wi-Fi, allowing users to stream their favorite music effortlessly from various devices.

Complementing the system is the SSP-LX70ST, a sophisticated processor-preamp that handles the decoding of high-resolution audio formats. It features advanced digital signal processing capabilities, making it suitable for both music and cinema applications. The SSP-LX70ST provides numerous audio and video inputs, accommodating various sources, from gaming consoles to Blu-ray players. Its user-friendly interface allows for easy navigation and adjustments.

Finally, the AS-LX70 is a compact yet powerful active subwoofer that enhances the low-frequency response of any audio setup. With its adjustable crossover and phase control, the subwoofer integrates seamlessly with the other speakers, delivering deep, rich bass that enhances the overall listening experience. Its sleek cabinet design reduces resonance and optimizes sound performance.

In conclusion, the Pioneer HTP-LX70, SX-LX70W, SSP-LX70ST, and AS-LX70 together form an exceptional home entertainment solution, incorporating cutting-edge technologies and thoughtful design to ensure audio fidelity and versatility. Whether for movie nights or music sessions, this lineup offers an unparalleled listening experience, highlighting Pioneer’s commitment to quality and innovation. Whether you are an audiophile seeking the best sound reproduction, or simply looking to enhance your home theater setup, these products are crafted to meet the diverse needs of today’s consumers, creating the perfect audio environment for any occasion.