Initial Set Up

On Screen Display

There are a number of possible ways to hook up the receiver to your video components, like a DVD player, and hook up to your receiver to your TV, but some of them won't allow you to use the on-screen display of this unit. To avoid this one simply needs to follow two rules.

1Always use the same type of video cords to hook up your video components to the receiver as you use to hook up the receiver and your TV. For example, if you use composite video cords to hook up your DVD and the receiver, use composite video cords to hook up the receiver to your TV. If you use S video cords to hook up your DVD and the receiver, use S video cords to hook up the receiver to your TV.

2Always make sure your TV is set to the appropriate input channel (for example, video 1). Your TV may have a number of input channels and if you don't select the proper one you won't be able to use this receiver's on-screen display, or, in fact, see any picture from this receiver at all. If you are unsure how to choose an input channel for your TV, refer to the manual which came with your TV.

You might, for example, use both composite and S video cords to hook up your video components with this receiver and then use composite video cords to hook up this receiver to your TV. This arrangement would still NOT let you see the on screen displays from this receiver on your TV. The best idea is just to use one type of video cord for all your video component and TV hook ups.

Setting Up the Remote Control

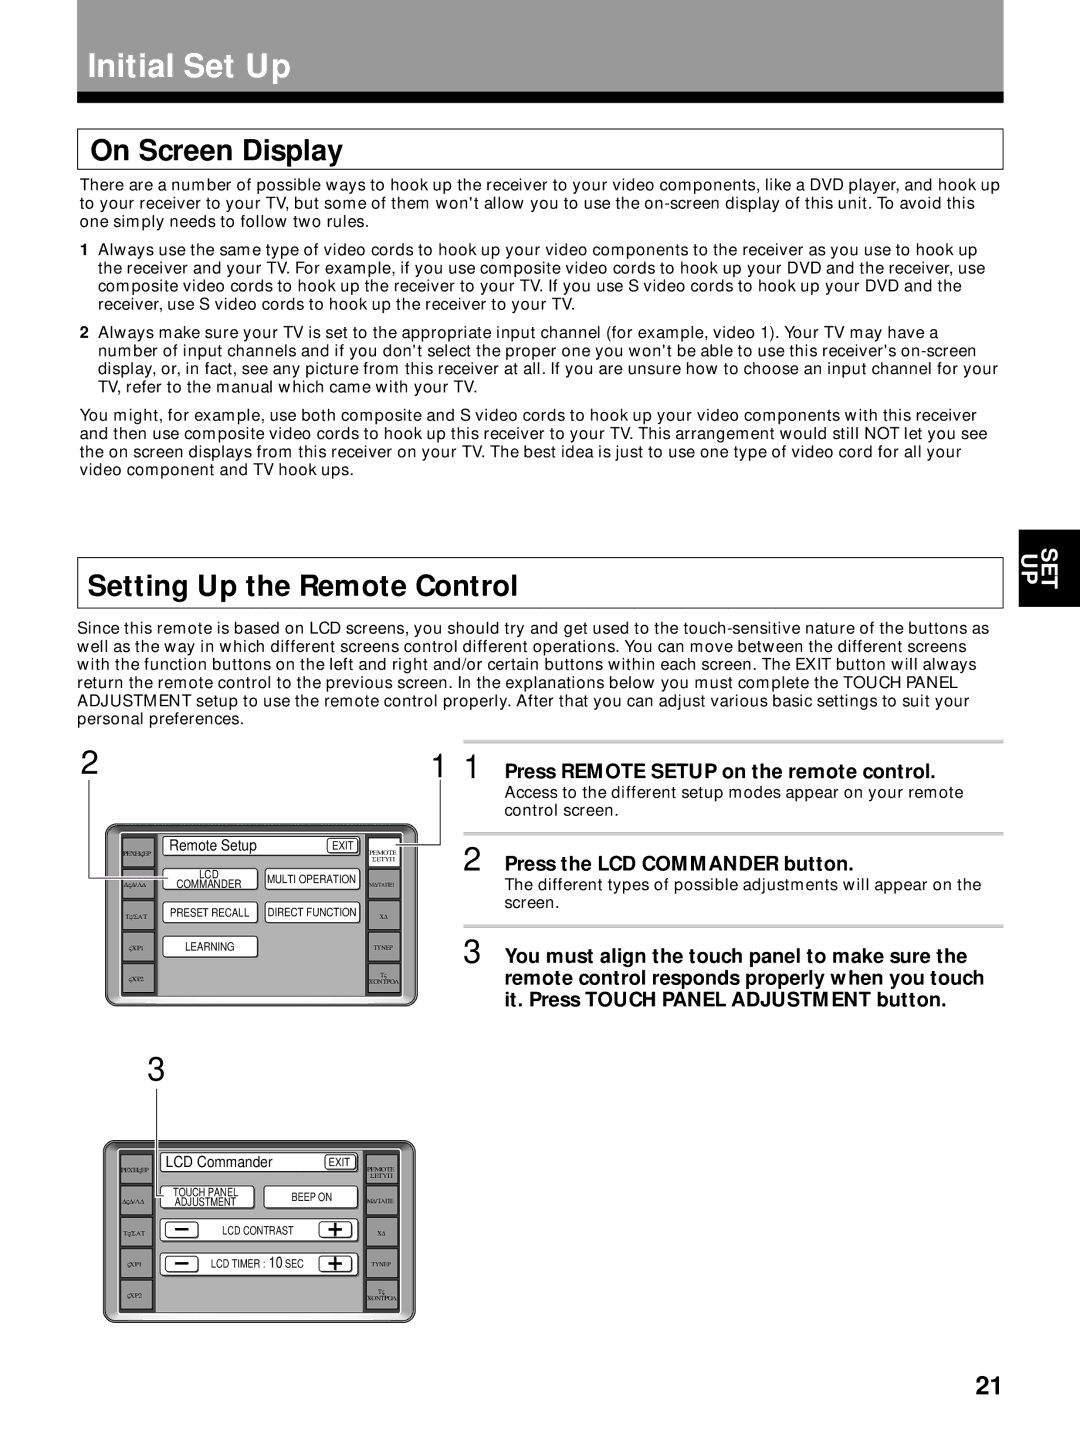
Since this remote is based on LCD screens, you should try and get used to the touch-sensitive nature of the buttons as well as the way in which different screens control different operations. You can move between the different screens with the function buttons on the left and right and/or certain buttons within each screen. The EXIT button will always return the remote control to the previous screen. In the explanations below you must complete the TOUCH PANEL ADJUSTMENT setup to use the remote control properly. After that you can adjust various basic settings to suit your personal preferences.

SET UP

2

RECEIVER

Remote Setup

EXIT

REMOTE


SETUP


LCD

MULTI OPERATION


DVD/LD

COMMANDER

MD/TAPE1


TV/SAT

PRESET RECALL

DIRECT FUNCTION

CD

VCR1

LEARNING


TUNER

VCR2


TV


CONTROL


11 Press REMOTE SETUP on the remote control.

Access to the different setup modes appear on your remote control screen.

2 Press the LCD COMMANDER button.

The different types of possible adjustments will appear on the screen.

3 You must align the touch panel to make sure the remote control responds properly when you touch it. Press TOUCH PANEL ADJUSTMENT button.

3

RECEIVER

DVD/LD

TV/SAT

VCR1

VCR2

LCD Commander EXIT


TOUCH PANEL

BEEP ON


ADJUSTMENT


LCD CONTRAST


LCD TIMER : 10 SEC


REMOTE

SETUP

MD/TAPE

CD

TUNER

TV

CONTROL

21

Page 21
Image 21
Pioneer VSX-29TX manual Initial Set Up, On Screen Display, Setting Up the Remote Control, Press the LCD Commander button

VSX-29TX specifications

The Pioneer VSX-29TX is a highly regarded audio-video receiver that combines advanced technology and robust performance, making it a popular choice among enthusiasts seeking immersive home theater experiences. Released as part of Pioneer's esteemed VSX series, this receiver is designed to deliver exceptional sound quality and versatility for all forms of media.

At the heart of the VSX-29TX is its powerful amplification system, which provides a robust output, ensuring that even the most demanding audio tracks are handled with ease. The receiver boasts a high current capability that allows it to drive larger speakers while maintaining clarity and precision. Thanks to its multi-channel processing, it can support various configurations, including 5.1 and 7.1 surround sound setups, enhancing the auditory experience for movies, music, and games.

One of the standout features of the VSX-29TX is its advanced surround sound processing technology. It incorporates Dolby Digital and DTS decoding, allowing for the playback of high-quality audio formats. The receiver also supports various sound modes that can be easily tailored to the specific content being enjoyed. Whether you're watching an action-packed film or listening to classical music, the VSX-29TX ensures that the audio is both dynamic and engaging.

Connectivity is a crucial aspect of any receiver, and the VSX-29TX excels in this area, featuring multiple inputs and outputs that cater to a wide range of devices. With several HDMI ports, digital optical and coaxial inputs, and analog connections, users can easily connect their Blu-ray players, gaming consoles, and streaming devices. This extensive compatibility allows for a seamless integration of various audio-visual components.

Additionally, the VSX-29TX is equipped with Pioneer's proprietary technologies, including the MCACC (Multi-Channel Acoustic Calibration System). This system automates the calibration of speaker settings by analyzing the room's acoustics, resulting in an optimized listening environment. This feature minimizes the hassle of manual configuration and provides an enhanced audio experience tailored to the unique characteristics of your space.

In terms of durability and design, the receiver sports a sturdy build with a sleek aesthetic, making it an attractive addition to any home entertainment setup. Its user-friendly interface and remote control allow for easy navigation through settings and inputs, ensuring that users can enjoy their favorite media without complications.

In summary, the Pioneer VSX-29TX is a versatile and powerful AV receiver that stands out for its advanced surround sound capabilities, robust amplification, and comprehensive connectivity options. With features like MCACC for room calibration, it truly elevates the home theater experience, making it a solid choice for audio enthusiasts and casual viewers alike. Its combination of technology, performance, and user-friendly design solidifies its place in the competitive landscape of home audio solutions.