08Other connections
![]() Important
Important
•If you connect to a Pioneer plasma display using an SR+ cable, you will need to point the remote control at the plasma display remote sensor to control the receiver. In this case, you won’t be able to control the receiver using the remote control if you switch the plasma display off.
•Before you can use the extra SR+ features, you need to make a few settings in the receiver. See The Input Setup menu on page 60 and SR+ Setup for Pioneer plasma displays on page 61 for detailed instructions.
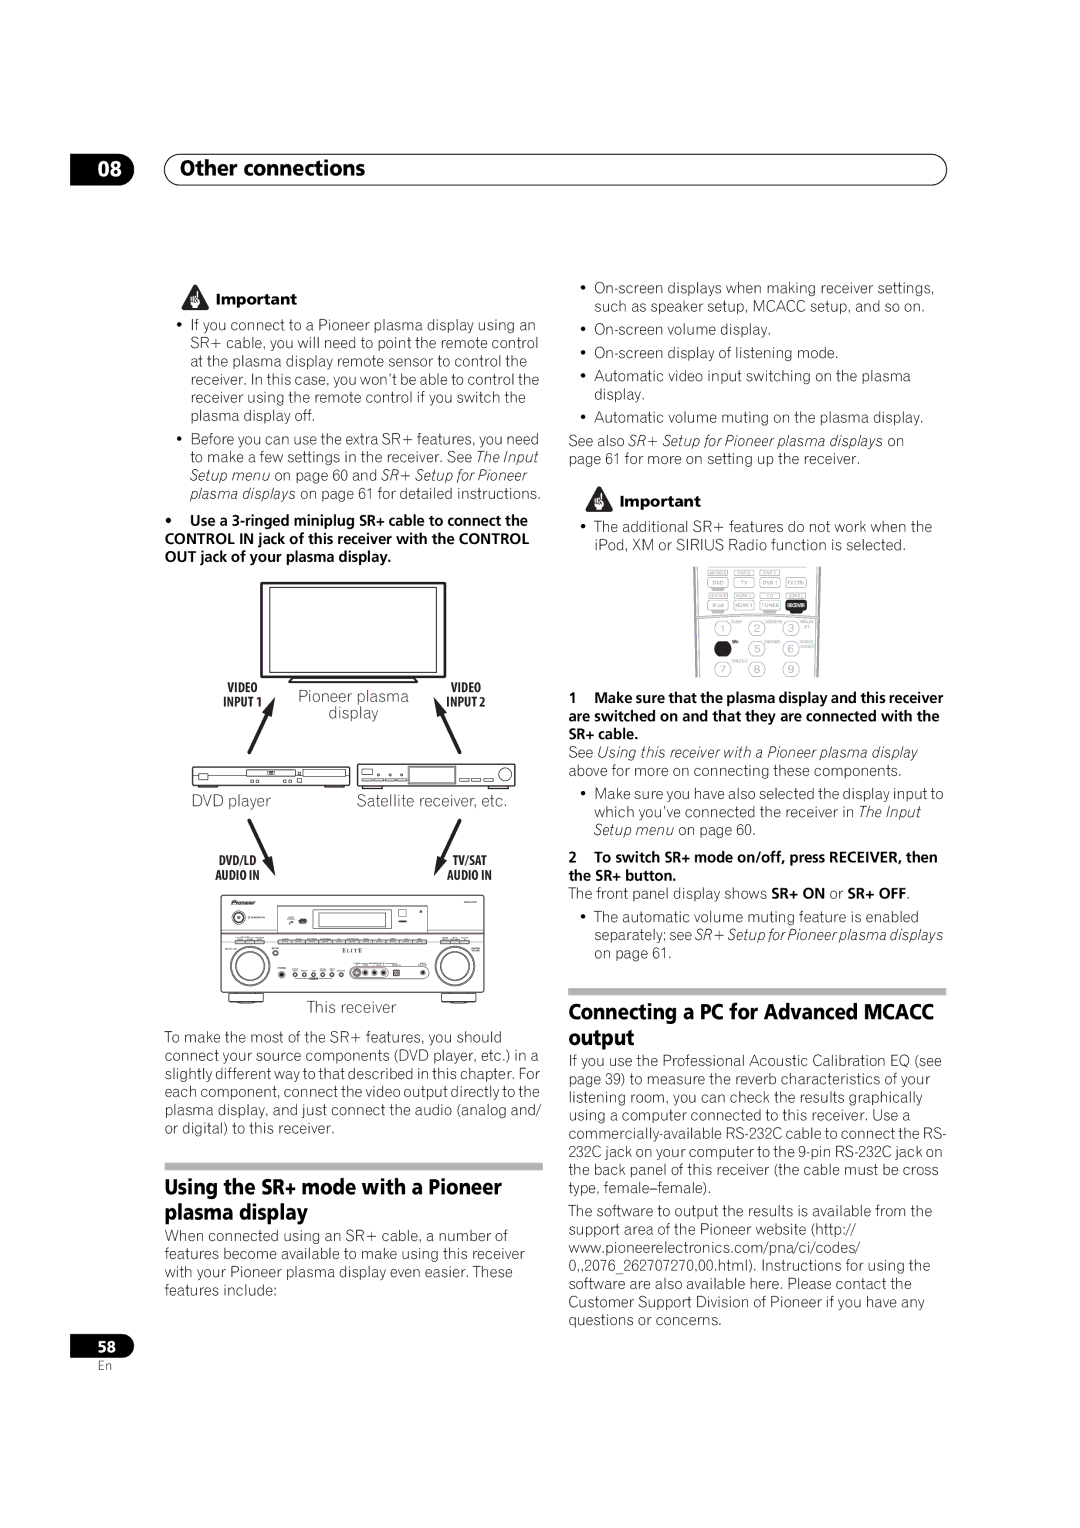
•Use a
VIDEO | Pioneer plasma | VIDEO | |
INPUT 1 | INPUT 2 | ||
display | |||
|
|
DVD player |
| Satellite receiver, etc. |
DVD/LD |
| TV/SAT |
AUDIO IN |
| AUDIO IN |
|
| |
STANDBY/ON |
|
|
MULTI JOG | ENTER | MASTER |
VOLUME | ||
| PHONES |
|
•
•
•
•Automatic video input switching on the plasma display.
•Automatic volume muting on the plasma display.
See also SR+ Setup for Pioneer plasma displays on page 61 for more on setting up the receiver.
![]() Important
Important
•The additional SR+ features do not work when the iPod, XM or SIRIUS Radio function is selected.
XM RADIO | SIRIUS | DVR 2 |
|
DVD | TV | DVR 1 | TVCTRL |
HDMI 2 | CD | ZONE 2 | |
iPod | HDMI 1 | TUNER | RECEIVER |
| SLEEP | S.RETRIEVER | ANALOG |
|
|
| ATT |
| SR+ | DIMMER | MIDNIGHT/ |
|
|
| LOUDNESS |
| DIALOG E |
|
|
1Make sure that the plasma display and this receiver are switched on and that they are connected with the SR+ cable.
See Using this receiver with a Pioneer plasma display above for more on connecting these components.
•Make sure you have also selected the display input to which you’ve connected the receiver in The Input Setup menu on page 60.
2To switch SR+ mode on/off, press RECEIVER, then the SR+ button.
The front panel display shows SR+ ON or SR+ OFF.
•The automatic volume muting feature is enabled separately; see SR+ Setup for Pioneer plasma displays on page 61.
This receiver
To make the most of the SR+ features, you should connect your source components (DVD player, etc.) in a slightly different way to that described in this chapter. For each component, connect the video output directly to the plasma display, and just connect the audio (analog and/ or digital) to this receiver.
Using the SR+ mode with a Pioneer plasma display
When connected using an SR+ cable, a number of features become available to make using this receiver with your Pioneer plasma display even easier. These features include:
58
Connecting a PC for Advanced MCACC output
If you use the Professional Acoustic Calibration EQ (see page 39) to measure the reverb characteristics of your listening room, you can check the results graphically using a computer connected to this receiver. Use a
The software to output the results is available from the support area of the Pioneer website (http:// www.pioneerelectronics.com/pna/ci/codes/
0,,2076_262707270,00.html). Instructions for using the software are also available here. Please contact the Customer Support Division of Pioneer if you have any questions or concerns.
En
