Connecting Your Equipment

Connecting Antennas

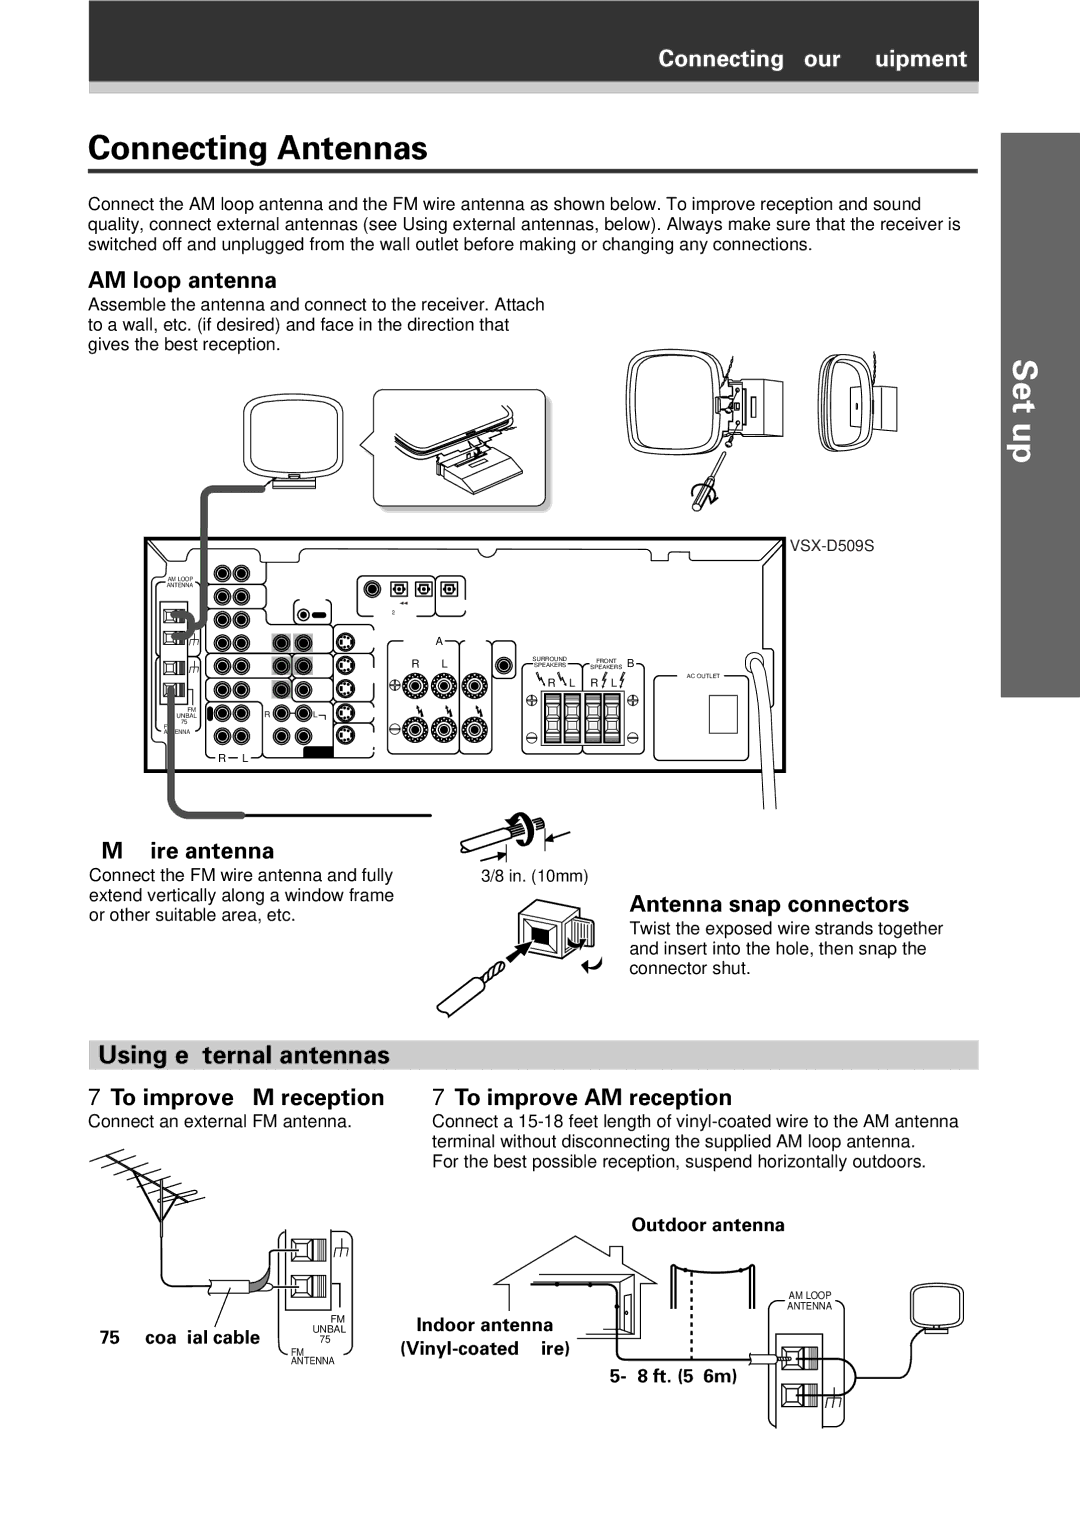
Connect the AM loop antenna and the FM wire antenna as shown below. To improve reception and sound quality, connect external antennas (see Using external antennas, below). Always make sure that the receiver is switched off and unplugged from the wall outlet before making or changing any connections.

AM loop antenna

Assemble the antenna and connect to the receiver. Attach to a wall, etc. (if desired) and face in the direction that gives the best reception.

Set up

AM LOOP

IN


AUX


ANTENNA


IN

CD


CONTROL


COAX

OPT1

OPT2

OPT

DIGITAL


PCM / 2/ DTS


OUT


O


OUT


DIGITAL IN


U


T

VCR /


DVR


S

TO


A


IN


IN

OUT

TVMONTOR


FRONT

CENTER


OUT


SPEAKERS

SPEAKERS

CENTER


PREOUT


TV /


TO

S


R

L


SURROUND


FRONT

B


IN

SAT

IN

MONTOR

OUT


SPEAKERS


SPEAKERS


TV


VCR /


S

DVR


R

L

R

L


IN

DVD

IN

SUB


/ LD

WOOFER

IN


PREOUT


FM

R

OUT R

L

S

TV /


UNBAL

E

SAT


C


IN


75Ω


CD-R


SURROUND


FM

L

/TAPE


S


ANTENNA

P

/MD


A

IN


IN

DVD


CENTER

/ LD


Y


SUB

DVD 5.1 CH

R

L

WOOFER


INPUT


VSX-D509S

AC OUTLET

FM wire antenna

Connect the FM wire antenna and fully

3/8 in. (10mm)

extend vertically along a window frame

Antenna snap connectors

or other suitable area, etc.

Twist the exposed wire strands together


and insert into the hole, then snap the


connector shut.

Using external antennas

7 To improve FM reception

7 To improve AM reception

Connect an external FM antenna.

Connect a 15-18 feet length of vinyl-coated wire to the AM antenna


terminal without disconnecting the supplied AM loop antenna.


For the best possible reception, suspend horizontally outdoors.


Outdoor antenna

AM LOOP

ANTENNA


FM

Indoor antenna

75 Ω coaxial cable

UNBAL

75Ω

(Vinyl-coated wire)


FM


ANTENNA


15-18 ft. (5–6m)

13

Page 13
Image 13
Pioneer VSX-D409, VSX-D509S manual Connecting Antennas, Using external antennas

VSX-D409, VSX-D509S specifications

The Pioneer VSX-D509S and VSX-D409 are two standout receivers from Pioneer's lineup, renowned for their robust performance and user-friendly features. Designed for home theater enthusiasts, both models offer a solid foundation for an immersive audio experience.

The VSX-D509S features a power output of 100 watts per channel at 8 ohms, ensuring ample power to drive a variety of speakers with clarity and depth. Its dual-zone capability allows users to enjoy two different audio sources in separate areas, making it an excellent choice for larger homes or multi-room audio setups. The receiver also includes Dolby Digital and DTS decoding, giving users access to high-quality surround sound for a more engaging movie and music experience.

Meanwhile, the VSX-D409 also offers a respectable 100 watts per channel, delivering dynamic range and sound fidelity that enhances any listening environment. Although it lacks some of the advanced features of the 509S, it still provides a solid surround sound experience through Dolby Digital and DTS processing capabilities.

Both models come equipped with Pioneer's innovative MCACC (Multi-Channel Acoustic Calibration System), allowing for automated speaker calibration. This technology automatically adjusts levels and delays, optimizing the sound for various room acoustics, and ensuring that users can enjoy their media in the best possible quality.

In terms of connectivity, the VSX-D509S and VSX-D409 come with multiple inputs, including optical and coaxial digital audio inputs, ensuring compatibility with a wide range of audio sources. They also feature composite and S-Video inputs for video devices, providing versatility for users with different systems.

The design of these receivers is sleek and functional, making them a stylish addition to any home entertainment setup. The user-friendly interface and remote control provide easy access to settings and features, allowing users to tailor their listening experience effortlessly.

In summary, the Pioneer VSX-D509S and VSX-D409 are excellent choices for anyone looking to enhance their home theater experience. With powerful amplification, advanced decoding technologies, speaker calibration, and versatile connectivity options, these receivers accommodate both audiophiles and casual listeners alike, making them valuable components in any audio system.