2100 Millennium Wood Stove (ACC) |
|
|
|
|
| R |
|
|
|
|
|
| |
D. Firebrick Replacement |
|
|
|
|
|
|
Replace the firebrick if they become crumbly and/or if |
| 3 |
|
| 3 |
|
there is a 1/4 inch (6.35mm) gap between the bricks. |
|
|
|
| ||
|
|
|
|
|
| |
Inspect the firebrick after each ash removal. | 1 |
|
|
|
| 1 |
The firebox is lined with high quality firebrick, which has |
|
|
|
| ||
|
|
|
|
|
| |
exceptional insulating properties. There is no need to |
|
|
|
|
| 1 |
use a grate; simply build a fire on the firebox floor. Do | 1 | 1 | 1 |
| 1 | |
not operate appliance without firebrick. |
|
|
|
|
|
|
1. After the coals have completely cooled, remove all | 1 |
|
|
|
| 1 |
old brick and ash from unit and vacuum firebox. |
| 2 |
|
|
|
|
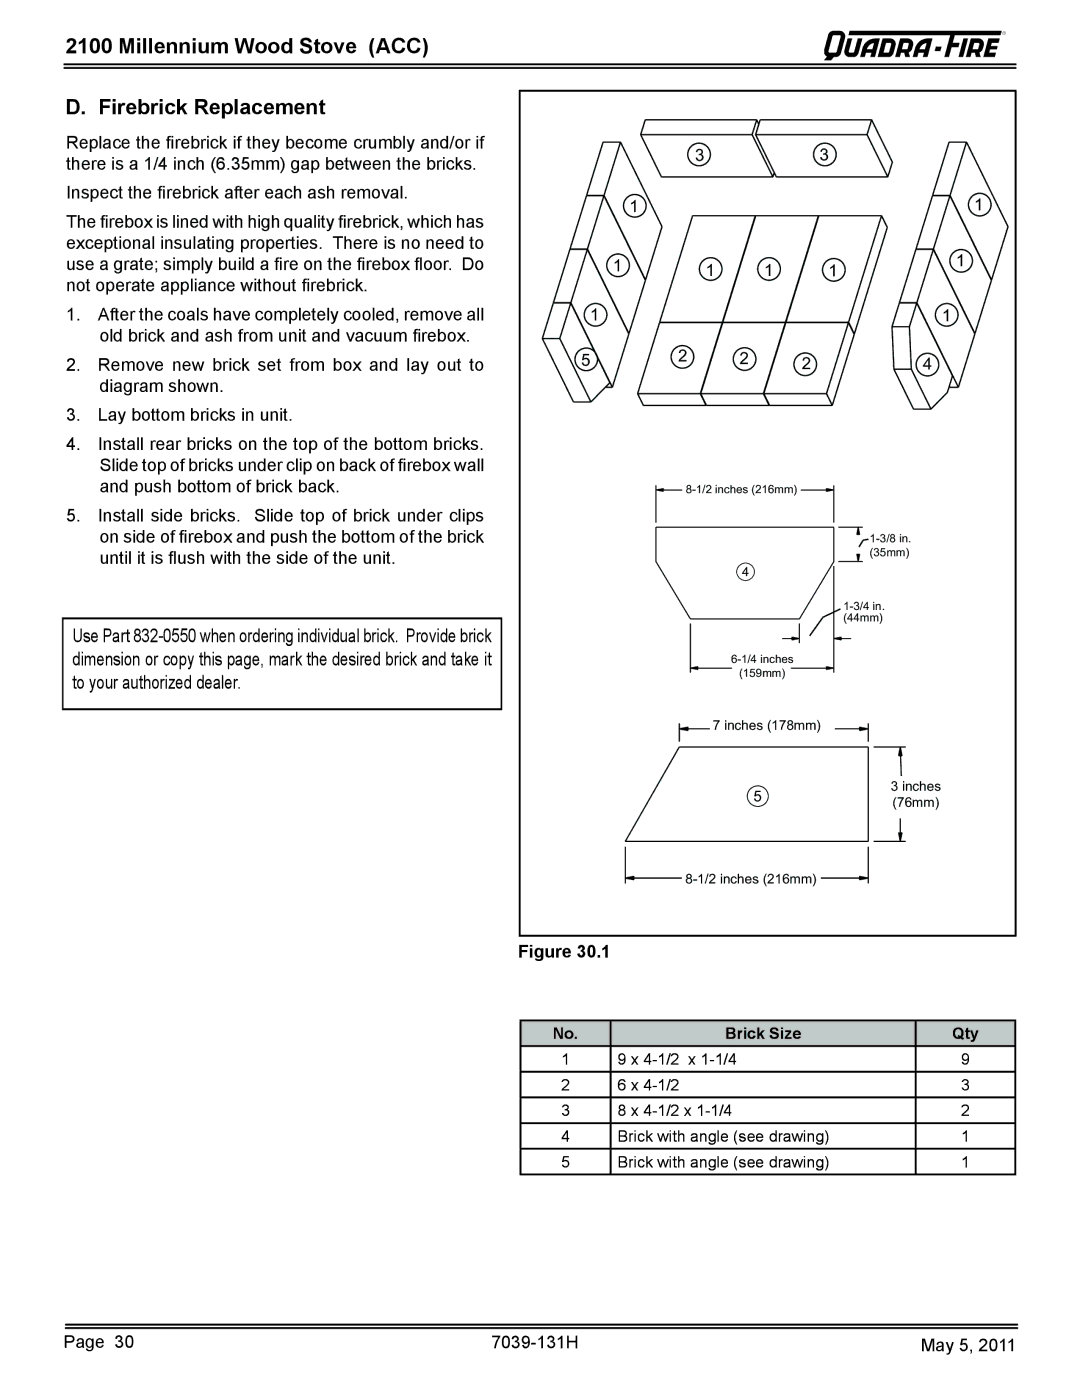
2. Remove new brick set from box and lay out to | 5 | 2 | 2 |
| 4 | |
diagram shown. |
|
|
|
|
|
|
3. Lay bottom bricks in unit. |
|
|
|
|
|
|
4. Install rear bricks on the top of the bottom bricks. |
|
|
|
|
|
|
Slide top of bricks under clip on back of firebox wall |
|
|
|
|
|
|
and push bottom of brick back. |
|
|
|
| ||
5. Install side bricks. Slide top of brick under clips |
|
|
|
|
|
|
on side of firebox and push the bottom of the brick |
|
|
|
|
| |
until it is flush with the side of the unit. |
|
|
|
|
| (35mm) |
|
| 4 |
|
|
| |
|
|
|
|
|
| |
|
|
|
|
|
| |
Use Part |
|
|
|
|
| (44mm) |
|
|
|
|
|
| |
dimension or copy this page, mark the desired brick and take it |
|
|
|
|
| |
to your authorized dealer. |
|
| (159mm) |
|
|
|
|
|
|
|
|
| |
|
| 7 inches (178mm) |
| |||
|
|
| 5 |
|
| 3 inches |
|
|
|
|
| (76mm) | |
|
|
|
|
|
| |
|
|
|
| |||
| Figure 30.1 |
|
|
|
|
|
No. | Brick Size | Qty |
1 | 9 x | 9 |
2 | 6 x | 3 |
3 | 8 x | 2 |
4 | Brick with angle (see drawing) | 1 |
5 | Brick with angle (see drawing) | 1 |
Page 30 |
| May 5, 2011 |