Initial Start-up

Required tools

(1) 12-0-12 (24” scale) U-tube manometer

(2) 6-0-6 (12” scale) U-tube manometer

Screwdrivers (assorted sizes and shapes)

(1) Crescent wrench (8” or 10”)

(1) Multi-meter

(1) Amp probe

(Metric Allen wrenches will be required for servicing the gas valve, but not during start-up)

NOTE: Digital manometers are not recommended.

Preparation

WARNING: Do not turn on gas at this time.

Check Power Supply

With multi-meter at incoming power, check voltage between:

Hot - Common (≈120 VAC)

Hot - Ground (≈120 VAC) Common - Ground (< 1 VAC)

WARNING: If Common - Ground is > 1 VAC,

STOP: Contact electrician to correct ground failure. Failure to do this may burn out 120V-24V transformer, or may cause other safety control damage or failure.

Attach Manometers to Measure Pressures

1.Turn off main gas valve.

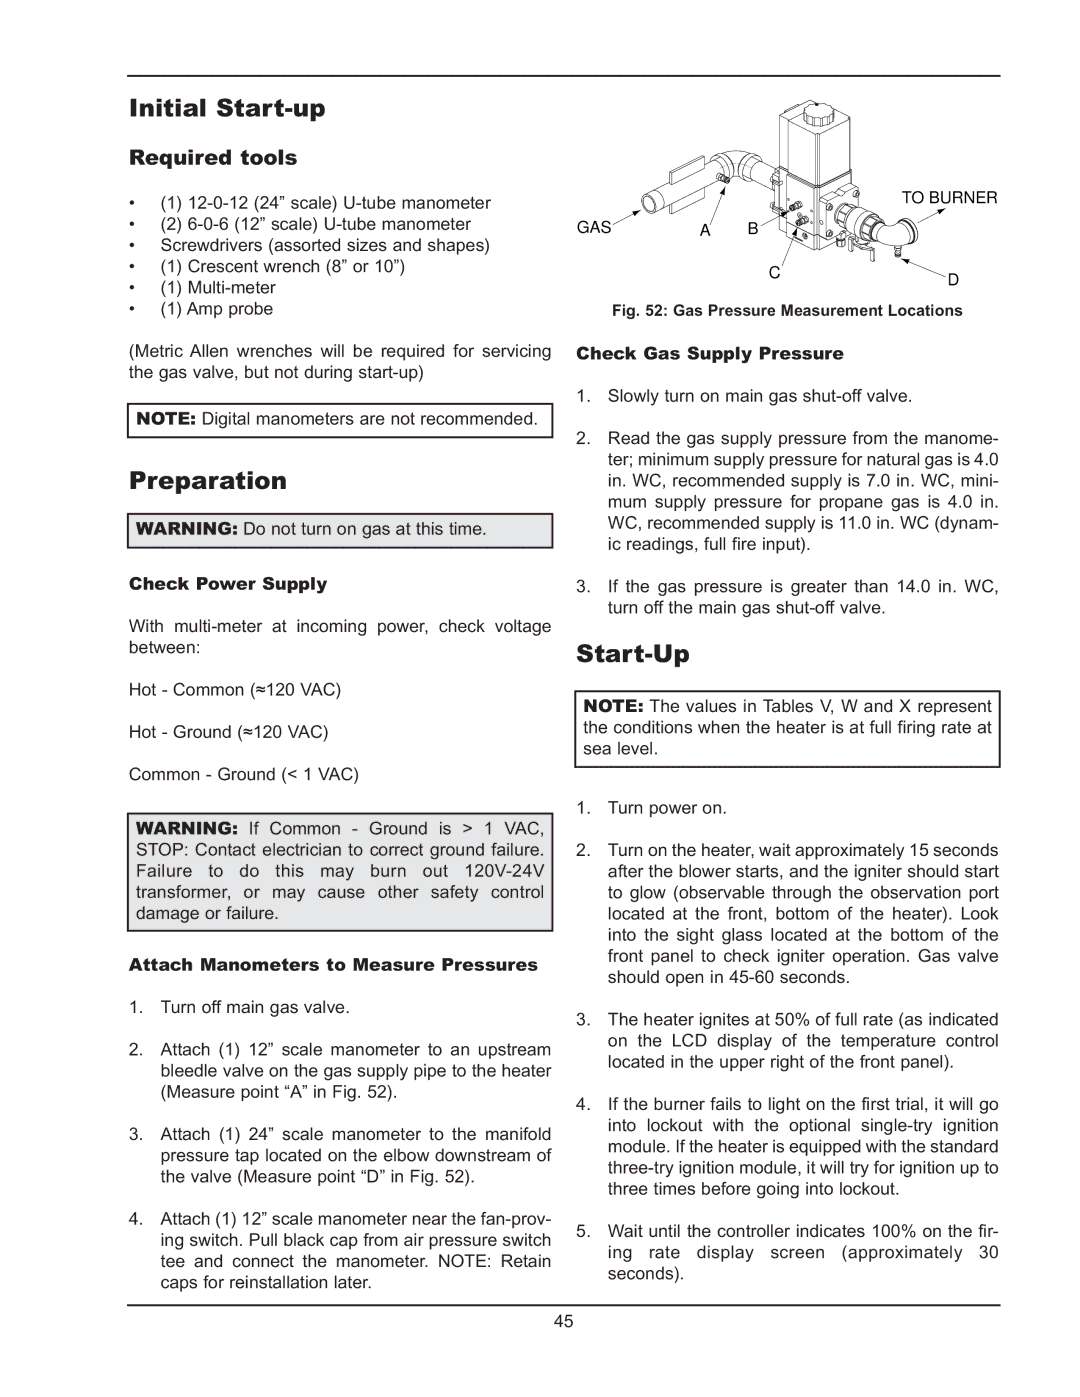
2.Attach (1) 12” scale manometer to an upstream bleedle valve on the gas supply pipe to the heater (Measure point “A” in Fig. 52).

3.Attach (1) 24” scale manometer to the manifold pressure tap located on the elbow downstream of the valve (Measure point “D” in Fig. 52).

4.Attach (1) 12” scale manometer near the fan-prov- ing switch. Pull black cap from air pressure switch tee and connect the manometer. NOTE: Retain caps for reinstallation later.


TO BURNER

GAS

A

B

CD

Fig. 52: Gas Pressure Measurement Locations

Check Gas Supply Pressure

1.Slowly turn on main gas shut-off valve.

2.Read the gas supply pressure from the manome- ter; minimum supply pressure for natural gas is 4.0 in. WC, recommended supply is 7.0 in. WC, mini- mum supply pressure for propane gas is 4.0 in. WC, recommended supply is 11.0 in. WC (dynam- ic readings, full fire input).

3.If the gas pressure is greater than 14.0 in. WC, turn off the main gas shut-off valve.

Start-Up

NOTE: The values in Tables V, W and X represent the conditions when the heater is at full firing rate at sea level.

1.Turn power on.

2.Turn on the heater, wait approximately 15 seconds after the blower starts, and the igniter should start to glow (observable through the observation port located at the front, bottom of the heater). Look into the sight glass located at the bottom of the front panel to check igniter operation. Gas valve should open in 45-60 seconds.

3.The heater ignites at 50% of full rate (as indicated on the LCD display of the temperature control located in the upper right of the front panel).

4.If the burner fails to light on the first trial, it will go into lockout with the optional single-try ignition module. If the heater is equipped with the standard three-try ignition module, it will try for ignition up to three times before going into lockout.

5.Wait until the controller indicates 100% on the fir- ing rate display screen (approximately 30 seconds).

45

Page 45
Image 45
Raypak 1005 operating instructions Initial Start-up, Preparation, Start-Up, Required tools

1005 specifications

Raypak is a prominent name in the heating industry, known for its innovative and efficient heating solutions for residential and commercial applications. The models 2005, 1005, and 1505 are notable offerings from Raypak, each designed to provide reliable performance, energy efficiency, and user-friendly operation.

The Raypak 2005 model stands out for its robust construction and high efficiency. It utilizes advanced technology to ensure consistent heating and reliability. With a high-capacity output, the 2005 is ideal for larger pools and spa applications, efficiently maintaining desired temperatures even during colder months. Its digital control system allows for precise temperature settings, enabling users to customize their heating needs effectively.

The 1005 model is an excellent choice for medium-sized pools and spas, offering a perfect balance of power and energy efficiency. One of its key features is the ability to operate quietly, making it suitable for residential areas where noise can be a concern. The 1005 employs a reliable gas burning system that maximizes fuel efficiency and provides fast heating. Its compact design also makes it easy to install, saving space while delivering exceptional performance.

The Raypak 1505 model is designed for versatility, catering to a wide range of heating requirements. One of its standout characteristics is its corrosion-resistant heat exchanger, which ensures long-lasting performance even in harsh environments. The 1505 also incorporates a user-friendly digital interface, allowing for easy operation and monitoring of temperature settings. It supports both natural gas and propane, providing flexibility to users based on their energy source preferences.

All three models—the 2005, 1005, and 1505—benefit from Raypak's commitment to energy efficiency. They are designed to meet stringent environmental standards while minimizing operational costs for the user. Additionally, their reliable safety features, such as pressure switches and safety valves, ensure safe operation across various conditions.

In summary, Raypak's 2005, 1005, and 1505 models exhibit a combination of efficiency, durability, and user-friendliness. With their advanced technologies and adaptable designs, these heaters are suitable for a wide array of heating applications, providing users with reliable solutions for their heating needs. Whether for residential or commercial use, Raypak's commitment to quality and innovation makes these models excellent choices for anyone seeking dependable heating solutions.