INSTALLATION
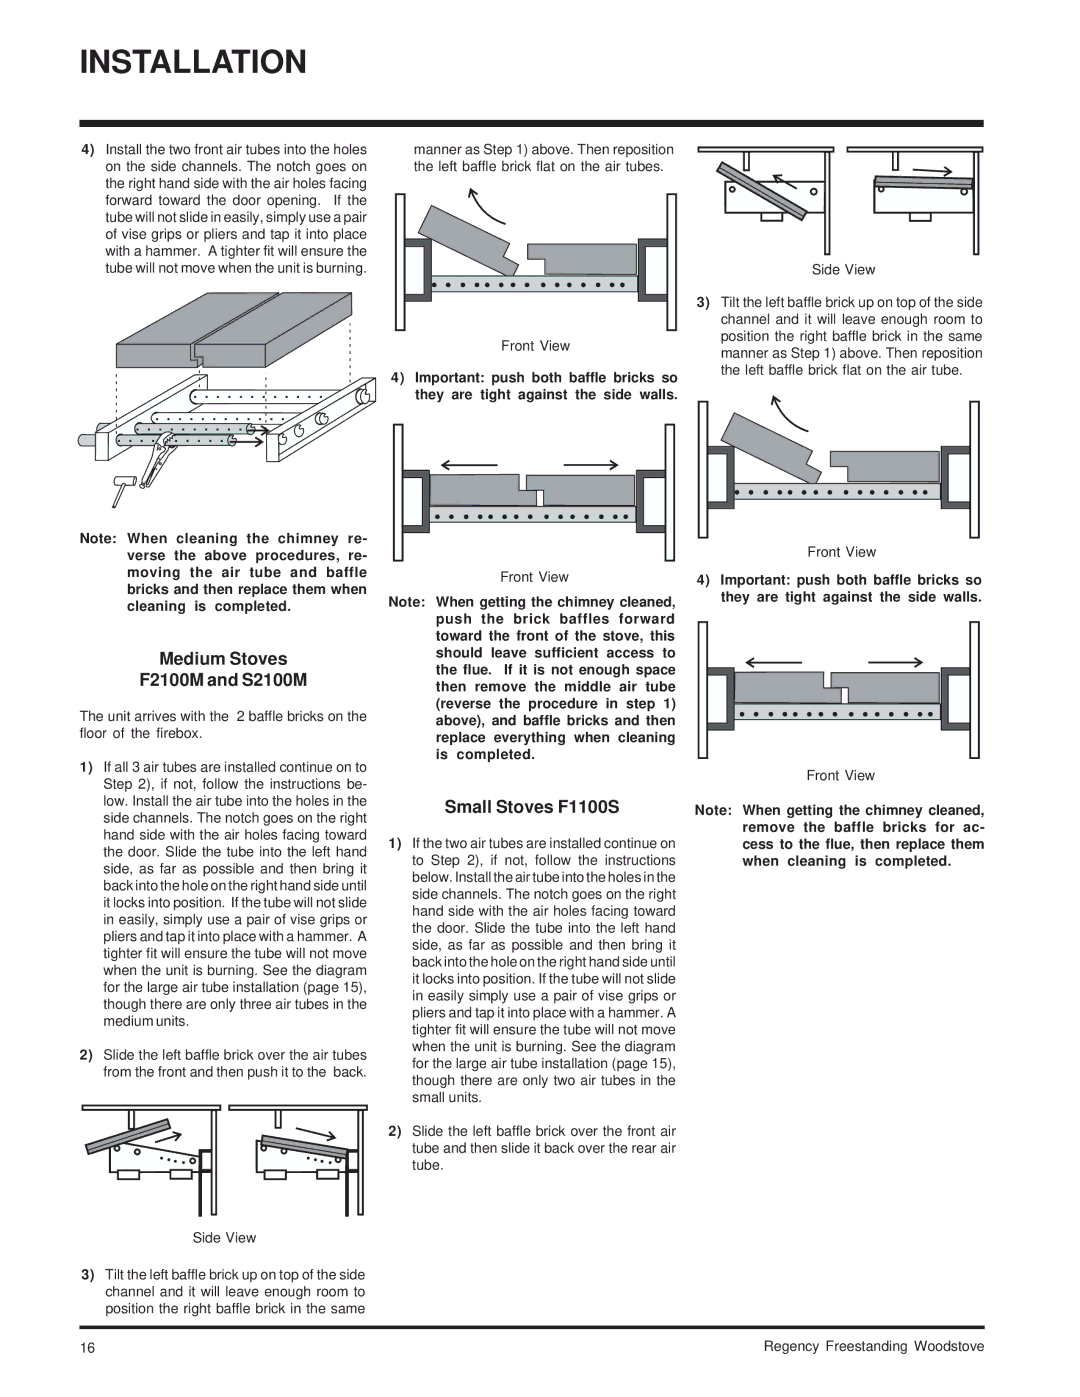
4)Install the two front air tubes into the holes on the side channels. The notch goes on the right hand side with the air holes facing forward toward the door opening. If the tube will not slide in easily, simply use a pair of vise grips or pliers and tap it into place with a hammer. A tighter fit will ensure the tube will not move when the unit is burning.
Note: When cleaning the chimney re- verse the above procedures, re- moving the air tube and baffle bricks and then replace them when cleaning is completed.
Medium Stoves
F2100M and S2100M
The unit arrives with the 2 baffle bricks on the floor of the firebox.
1) If all 3 air tubes are installed continue on to |
Step 2), if not, follow the instructions be- |
manner as Step 1) above. Then reposition the left baffle brick flat on the air tubes.
Front View
4)Important: push both baffle bricks so they are tight against the side walls.
Front View
Note: When getting the chimney cleaned, push the brick baffles forward toward the front of the stove, this should leave sufficient access to the flue. If it is not enough space then remove the middle air tube (reverse the procedure in step 1) above), and baffle bricks and then replace everything when cleaning is completed.
Side View
3)Tilt the left baffle brick up on top of the side channel and it will leave enough room to position the right baffle brick in the same manner as Step 1) above. Then reposition the left baffle brick flat on the air tube.
Front View
4)Important: push both baffle bricks so they are tight against the side walls.
Front View
low. Install the air tube into the holes in the |
side channels. The notch goes on the right |
hand side with the air holes facing toward |
the door. Slide the tube into the left hand |
side, as far as possible and then bring it |
back into the hole on the right hand side until |
it locks into position. If the tube will not slide |
in easily, simply use a pair of vise grips or |
pliers and tap it into place with a hammer. A |
tighter fit will ensure the tube will not move |
when the unit is burning. See the diagram |
for the large air tube installation (page 15), |
though there are only three air tubes in the |
medium units. |
2) Slide the left baffle brick over the air tubes |
from the front and then push it to the back. |
Small Stoves F1100S | Note: When getting the chimney cleaned, |
1) If the two air tubes are installed continue on | remove the baffle bricks for ac- |
cess to the flue, then replace them | |
to Step 2), if not, follow the instructions | when cleaning is completed. |
below. Install the air tube into the holes in the |
|
side channels. The notch goes on the right |
|
hand side with the air holes facing toward |
|
the door. Slide the tube into the left hand |
|
side, as far as possible and then bring it |
|
back into the hole on the right hand side until |
|
it locks into position. If the tube will not slide |
|
in easily simply use a pair of vise grips or |
|
pliers and tap it into place with a hammer. A |
|
tighter fit will ensure the tube will not move |
|
when the unit is burning. See the diagram |
|
for the large air tube installation (page 15), |
|
though there are only two air tubes in the |
|
small units. |
|
2) Slide the left baffle brick over the front air |
|
tube and then slide it back over the rear air |
|
tube. |
|
Side View
3)Tilt the left baffle brick up on top of the side channel and it will leave enough room to position the right baffle brick in the same
16 | Regency Freestanding Woodstove |