DVD-HR720
No rights are granted for commercial use
Getting Started
Handling Cautions
Precaution
Important Safety Instructions
Maintenance of Cabinet
Disc Handling
Disc Specifications
Disc Storage
JPEGphoto
Contents Copy Specifications
Disc Copy
Copy Once Title
Protection
Disc Format
Do not use the following discs
Contents
Changing Record Mode of All Titles
Selecting Record Mode of Each Title
Recording the current TV programme you are
General Features
Before Reading User’s Manual
How to use
Creating a playlist DVD-RAM/-RW in VR mode, HDD
When using a DVD-RW disc in VR Mode
When using a DVD-RW disc in Video Mode
When using a DVD-R disc
Unpacking
Accessories
Preparing the Remote Control
Setting the Remote Control
Various functions will not necessarily
If several codes are indicated for your
Controllable TV Codes
OPEN/CLOSE Button Opens and closes the disc tray
Description
Front Panel
Front Panel Display
Fan
Rear Panel
Tour of the Remote Control
Additional connections
Quick Overview
Antenna + HDD & DVD Recorder +
Quick Overview
RF cable connection of this product
Connecting
Set Input mode on AV2 TV mode
Additional connections
Antenna + HDD & DVD Recorder + External decoder box + TV
Other type of connecting the Video output cable
Video, Component video and Progressive Output Modes
You will enjoy high quality images
Case 2 Connecting to an S-Video output jack
Case 1 Connecting to a Video Composite output jack
See pages 22~23
Case 3 Component Video output jacks
Case 1 Connecting to your TV
RearL
FrontLFrontR Speakerspeaker
FrontL FrontR Subwoofer Centre
Case2 Connecting a DV Device to the DV in jack
Case 2 Connecting a Camcorder to the DV in jack
Use Input button to select proper input
On-Screen Menu Navigation
Ystem Setup
Plug & Auto Setup
Auto setup function can be performed by
Setting the Clock
Now, HDD & DVD Recorder is ready
Setup
Presetting Channels with the Auto Setup function
Auto clock set function, select Off
Refer to following table when selecting your country
System Setup
Press the OK or √ button
Press the …† buttons to select Install, then
Press the …† buttons to select Manual Setup
Select Edit, Delete or Swap
Press the …† buttons to select Language
Press the Return or œ button to return
Auto Power Off Setting
System
Button
With the unit in Stop mode, press the Menu
Press the …† buttons to select the desired item
Setting up the Front Display Options
Then press the OK or √ button
Automatic Chapter Creator
See page 126 and then press the Title Menu
Turn the power off System menu will be displayed
Press the Stop button to stop recording
To display the created titles, finalise the disc
Press the …† buttons to select Audio, then press
Setting up the Audio Options
OK or √ button Audio setup menu will be displayed
DivXR Registration
Dynamic Compression
Mode Compatibility
Output setting
Digital Output
To the previous menu Press the Menu button to exit the menu
Setting up the Video display Options
Ystem
TV Aspect
Available Video Output Jack
Setting up Video Output Options
Press the OK or √ button Video setup menu will be displayed
3D Noise Reduction motion adaptive noise reduction
If the P.SCAN button on the HDD & DVD
Setting up Progressive scan
Canceling
If you forgot your password
Setting up the Parental Control
Press the OK or √ button to select Password
Press the …† buttons to select Rating Level
About the Change Password
See page 44 if you forgot your password
About the Rating Level
Disc types that can be played
Before Playing
Playback
Region code DVD-Video only
Playing a Disc
Searching through a Chapter or Track For DVD-VIDEO Disc
Using the Search & Skip
Title Menu
Functions
Direction on MPEG4 discs
Slow Motion Play Step Motion Play
Skipping Chapters, a Tracks or Markers
Slow Motion Play
Press the Anykey button during playback
Moving to a scene directly using
About Anykey
Step Motion Play
Or Track
An audio CDCD-DA or an MP3 disc is
Inserted, according to a disc type,
Information display may not be appear
About Info button
Using the Title List button
Using the Menu button
Playing the Title List
Navigation Menu
VR mode
Scene Navigation
Selected title does not have Markers
Using the Anykey button
Time Navigation
Scene Navigation will not operate if a
An edited title may not display exact
Title is shorter than 1 minute
Device may not operates Navigation
Function
Using the Marker button
Using the Markers
Press the Marker button during playback
Press the Marker button during playback
Using the Anykey button
Press the …† buttons to select Marker
Mode
When the disc tray is opened and then
LaybackP
Closed, bookmarks will disappear
From the selected scene
Press the Cancel button to delete the selected bookmark
Language
Using the Subtitle button
Press the Subtitle button during playback
Soundtracks or Audio channel may be
Using the Audio button
Audio Channels
Selecting the Audio
Repeat Play
Using the Repeat button
Changing the Camera
Angle
Repeat A-B
Using the Repeat A-B button
HDD/DVD-RAM/-RWVR mode
RW V mode do not repeat a chapter
Press the …† buttons to select Repeat A-B
Zooming-In
To return to normal playback
Press the …† buttons to select Repeat, then
Audio CDCD-DA Screen Elements
Playing an Audio
Select Media
Playing an Audio CDCD-DA
If a disc contains only MP3 files or only
Layback
Playing an MP3 Disc
MP3 Screen Elements
Mode you want
Buttons on the Remote Control used for MP3 playback
Repeat CD CD-DA & MP3
Repeat Track CD CD-DA/MP3
New Playlist
Press the Anykey button during the Music List
Playback
Playlist, then press the OK button
Go To Playlist
To store the Playlist, press the Anykey button
Press the …† buttons to select the Go To
Playlist, then press the OK or √ button
Delete the Playlist
Go To Edit Playlist
Press the …† buttons to select the Delete
Playlist will be edited
Go To Music List
Press the …† buttons to select the Go To Edit
Press the Anykey button during the Playlist Playback
To see the next 8 pictures, press the Skip
Playing a Picture
Select Media MP3
Press the …† œ √ buttons to select a picture
To stop the Slide Show
Slide Show
Press the …† buttons to select Slide Show
To stop the Zoom
Rotate
Zoom
To stop the Rotate
Press the …† buttons to select Go To Photo
Using the Menu button
Playing an MPEG4
Go To Photo List
DivX Subtitle Encoding
This recorder can record on the following discs
Before Recording
Recordable Discs
DVD-R disc cannot be unfinalised
Recording Formats
Recording Mode
Concerning Copy Control Signals
Recording
OK button.See
To stop recording
To pause recording
Press the REC button
Before you start
PR Number AV1 AV2 AV3 DV
SP LP EP XP
Copying from a Camcorder
DVD Recorder stops recording
Timer counter decreases by
Making an One Touch Recording OTR
About Info button
Stopping Playback / Recording
Chasing Play
EcordingR
While Recording
List button
Simultaneous Recording and Playback
Press the …† / Skip
Using the Timer button
Making a Timer Recording
If the timer settings overlap
Mode Recording Mode
Set time depending on disc status
Flexible Recording
Editing the Timer Record List
Follow these directions to edit the timer record list
Timer button. The Programme screen is
Deleting a Timer Record List
Add, Edit, Delete and Go To History List
Go To History List
History List screen will disappear
Information about History List
Delete History List
Add and Go To History List items are displayed
Clears all History Lists at once Press the Anykey button
Go To Timer Rec List
Clear History List
Press the …† buttons to select Delete, then press
ShowView code
Press the OK button to confirm the setting
Button to activate the timer recording setting
Message is displayed to allow you to enter
Recorder instantly with the remote
ShowView Extended
Listing in the magazines or newspapers
You to programme your HDD & DVD
Title List
Editing
Play List
RenamingLabeling a Title
Cancel button
OK button. The key icon on the information window
Locking Protecting a Title
Protect from the Title List, then press the Anykey
Press the œ √ buttons to select On, then press
Press the …† buttons to select an entry you want to
Deleting a Title
You cannot delete a protected entry. If you
Splitting a Section of a Title Split
Want to delete a protected entry, select
Off in the Title Protection menu. See
Search
Section deletion starting point window
Deleting a Section of a Title Partial Delete
Edit Title List screen is display
Press the OK button at the starting point
Section deletion ending point window
Play , Search
Press the OK button at the end point
Image and end point time are displayed
Press the OK button at the start point
Creating a Playlist
Press the …† buttons to select New Playlist
Make Playlist screen is displayed
Playing Entries in the Playlist
Using the Play List button
Play List button Edit Playlist screen is displayed
Renaming a Playlist Entry
Edit Playlist , Go To Titlelist , Disc Manager
Edit Playlist menu is displayed Rename, Copy
Diting
Editing a Scene for the Playlist
Edit from the Playlist, then press the Anykey button
Press the OK button at the end point of the scene
To setup, follow steps 1 to 3
OK or √ button Modify Scene screen is displayed
Press the OK button at the start point of the scene
Before that position, which requires no
You cannot move the selected scene to
Position of the next scene, because
Selected scene should be inserted
OK or √ button Add Scene screen is displayed
Press the …† œ √ buttons to select the scene that
Press the OK button at the starting point of the scene
Press the …† œ √ buttons to select the scene you
Deleting a Playlist Entry from the Playlist
Want to delete, then press the Anykey button
Recorded Video Title Supported
About the Copy Screen
Delete operation has finished
You automatically returned to the Playlist screen after
Title List button
About Using Copy button
Remote control
Select the HDD by pressing the HDD button on
‘generation’. It also means that copying
Copying a Title that has been edited once before
Copying an Unedited title
High speed copy This means that you
Copying Multiple Titles at One Time
Changing the Record Mode
Cannot be copied at high speed, it performs
If copy list contains at least one title that
Described on
Press the …† buttons to select an additional title
Press the Anykey button. Press the …† buttons to
10Press the Return button to exit the Preview mode
Deleting an Undesired Title from the Copy List
Previewing a Selected Title from the Copy List
Changing Record Mode of All Titles from the Copy List
Selecting Record Mode of Each Title from the Copy List
Previous page of title list
Copy To move to other pages, press the Skip Buttons
Next page of title list
File Copy
Copying MP3 or Jpeg Files from a Disc to HDD
OK or √ button. Folder copy begins
Folder Copy
Press the …† buttons to select Copy, then press
Subfolders and files in the selected folder are copied
Files having an existing name
Contents
Disc Manager
Editing the Disc Name
Depending on the kind of disc,
Disc Protection
You may need to clear disc protect before Beginning editing
Then press the OK button
DVD-RW
Formatting a Disc
With the unit in Stop mode, press the Anykey
HDD/DVD-RAM
Music
Delete All Title Lists/Music Lists/Photo Lists
With the unit in Stop mode, press the Anykey
Title
Delete All Title Lists
Press the …† œ √ buttons to select Finalise, then
Finalising a Disc
Once a disc is finalised, you cannot delete
Entries from the record list
Press the œ √ buttons to select Unfinalise, then
Unfinalising a Disc V/VR mode
DVD-RW can be finalised or unfinalised Video mode
DVD-RW can be finalised or unfinalised in VR mode
Recording
Troubleshooting
Power
Reference
Discs. See pages 40~41
Playback
Video
Timer Recording
Sound
Other
Remote Control Unit
Remote control doesnt work Other problems
Forgot my password for parental supervision
Analog Audio Output
Specifications
20 Hz~20 kHz
Audio Output
United Kingdom Republic of Ireland
AK68-00819D-00
Instructiehandleiding
Belangrijke Opmerking
Waarschuwing
Aan de slag
Televisies, om elektromagnetische storingen te voorkomen
Onderhoud van behuizing
Waarschuwingen voor gebruik
Vaste schijf HDD
Schijven opslaan
Gebruik van schijven
Specificaties van schijven
Schijf kopiëren
Beveiliging
Schijfindelingen
Schijf
Gebruik de volgende schijven niet
Opmerking
Als de DVD-RW een illegale kopie is of een andere
Kanalen voordefiniëren met de functie
Inhoud
Audio-uitgangskabel
DVD-speler of camcorder op de AV3
Slag
Instelbare opnamemodus
Op vaste schijf HDD opnemen
Kopiëren van vaste schijf HDD naar DVD en vice versa
Gelijktijdig opnemen en afspelen
Bij gebruik van een DVD-R
Bij gebruik van een vaste schijf
Bij gebruik van een DVD-RAM
Bij gebruik van DVD-RW
Een DVD-RW-schijf in de videomodus gebruiken
Een DVD-RW-schijf in de VR-modus gebruiken
Een DVD-R-schijf gebruiken
TV STANDBY/ON, Prog
Accessoires
Uitpakken
De afstandsbediening voorbereiden
Afstandsbediening vervangt, moet u
Als er meerdere codes staan voor het
Uit totdat u de code vindt die werkt
Als u de batterijen van de
Display voorpaneel
De antenneaansluiting geeft geen
Achterpaneel
Ventilator
De ventilator wanneer het product wordt geïnstalleerd
Copy
De toetsen van de afstandsbediening
Decoderbox + TV
Overzicht
Uitgangskabel
DVD-modus
Extra aansluitingen
Sluit de RF-antennekabel aan zoals weergegeven
Op de
Sluit de FR-antennekabels aan zoals is weergegeven
Met onze klantenservice
Antenne +HDD & DVD- Recorder + externe decoderbox + TV
Video, componentvideo en progressieve uitvoermodi
Hiermee krijgt u een hogere weergavekwaliteit
Situatie 2 Aansluiten op een Video-uitgang
Hiermee krijgt u een normale weergavekwaliteit
Zie pagina
Situatie 3 Componentvideo- uitgangen
Situatie 1 Aansluiten op de TV
Voor L Voor R
Voorste
Speaker L
Achter L
Situatie 2 Een camcorder aansluiten op de DV IN-aansluiting
Aansluiten op AV 3 IN- of DV-IN-aansluitingen
Situatie
Box STB, DVD-speler of camcorder
Druk op deze toets op de afstandsbediening om
Toets Menu
…† , œ √ De toetsen
Nieuwe instellingen te bevestigen
Inschakelen en automatisch instellen
Cancel
Selecteren
De klok instellen
Aan
Automatisch de klok in,
Zie de onderstaande tabel bij het selecteren van uw land
Systeeminstallatie
Anykey
Sluiten
Toets
Op de toets
Om het
Klaar is
…† om Setup te selecteren
Selecteren en druk vervolgens op
Op de toetsen
Tijdinstelling voor CM Skip
Tijd EP-modus
REC Mode
Menu
Druk in de stopstand op de toets
REC
Uit
Gebruiken
Druk Toets
Title
Stop
Disc Menu
Raadpleeg voor meer informatie
De geluidsopties instellen
Om het Menu af te sluiten
Nicam
Moduscompatibiliteit
Digitale uitvoer
Dynamische compressie
Om het menu af
De video-beeldopties instellen
Video
Toets
De opties voor video- uitvoer instellen
Beschikbare video-uitgangen
Video
Beschikbaar in de stopstand
Als u tijdens het afspelen op de toets
Op het voorpaneel van de HDD
Bericht Deze functie is alleen
Scan
Progressief scannen
Een tv
Drukt
Kinderslot instellen
YsteeminstallatieS
Niveau
Het classificatieniveau
De toegangscode wijzigen
Bent vergeten
Schijven die niet kunnen worden afgespeeld
Afspelen
Regiocode alleen DVD-Video
Kunt de volgende typen schijven afspelen
OPEN/CLOSE
Een schijf afspelen
Mogelijk kunt u op bepaalde dvd-spelers
Raken
Zoeken in een hoofdstuk of track
Het schijfmenu en het titelmenu gebruiken
De functies Zoekenen Skip Overslaan gebruiken
Voor DVD-Video
Overslaan
Vertraagd afspelen en stap voor stap afspelen
Vertraagd afspelen
Afspeelsnelheid
Rechtstreeks naar een scène gaan met Anykey
Stap voor stap afspelen
Het scherm verdwijnt als u weer op de Toets Anykey
Bij sommige schijven werkt dit niet
Wanneer een audio-CD CD-DA of een
Mp3-schijf in de recorder is geplaatst
List
De titellijst afspelen
De toets Titellijst gebruiken
OK of √
Navigatie
Navigatiemenu
Scènenavigatie
De toets Menu gebruiken
Markeringen bevat
Time Tijdnavigatie
De toets Anykey gebruiken
VR-modus
Te selecteren Die u wilt afspelen en druk
Een minuut is
…† om uit de titellijst de titel
Tijdnavigatie
Te gaan
De markeringen gebruiken
FspelenA
De toets Markering gebruiken
Op de
Een markering afspelen
Een markering wissen
De toets Anykey gebruiken
Bladwijzers
De bladwijzers gebruiken
Favoriet
Om de geselecteerde
Druk tijdens het afspelen op de toets
Selecteren en druk vervolgens op Op de Toets
OK of op
Subtitle
Cancel Return
De toets Subtitle gebruiken
De ondertiteling te selecteren
De toets Audio gebruiken
Het geluid selecteren
Audio
De toets Repeat gebruiken
Afspelen herhalen
De camerahoek wijzigen
Herhaaldelijk afspelen Repeat
Geen hoofdstukken herhaald
Repeat A-B Herhalen A-B
De toets Repeat A-B gebruiken
Selecteren en
Zoom
Inzoomen
Kunt het normale afspelen ook activeren
Herhalen
Een Audio-CD/MP3 afspelen
Medium selecteren
Een Audio-CD CD-DA afspelen
Playlist
Een MP3-schijf afspelen
Als een schijf uitsluitend MP3-of jpeg
Geladen
Repeat
Repeat Cancel
CD CD-DA & MP3 herhalen
Het normale afspelen hervatten
Op de toets
New Playlist Nieuwe playlist
Slaan
Afseellijst
Opgenomen, drukt u op de toetsen √…† om de
Om de playlist op te
Ga naar playlist
De playlist verwijderen
Afspeellijst
Verwijderen
Verkeerde track te selecteren en vervolgens op
Druk tijdens het afspelen van de playlist op de
Toets Anykey
Toets Als u een verkeerde track in de playlist hebt
DVD
Schijf is geladen
Voor JPEG-bestanden
Toetsen
Druk op de toetsen …† om de snelheid
Diashow
Van de
Wordt gestart
De foto tot 4x uitvergroot vier keer de normale
Draaien
Zoomen
OK drukt, wordt
Naar fotolijst
Een MPEG4 afspelen
De toets Menu gebruiken
DivX-ondertitelingscodering
Sluiten Hiermee wordt de DVD-RW/-R gesloten
Voordat u begint
Opnemen
Opneembare DVD’s
DVD-RWV-modus/-R
Kopieerbeveiligingssignalen
Opname-indelingen
Opnamemodus
HDD
Opnamen meer worden uitgevoerd
Prog
De opname Opnemen
De opname tijdelijk onderbreken
Hervatten
Voordat u begint
Onderbreken
REC Pause
Om de opnamesnelheid kwaliteit te kiezen
Als u dvd hebt geselecteerd, drukt u op de toets
Schijflade
Sluiten
Info
Een OTR One Touch Recording maken
De toets Info
030 100 .. Uit
…† Overslaan
Tijdens de opname
De toets Title List gebruiken
Afspelen/Opnemen beëindigen
Selecteer met de toetsen
De toets Title List gebruiken
…†/OVERSLAAN
De geselecteerde titel wordt afgespeeld
Timer
Een timer-opname maken
Als u bijvoorbeeld een programma
Mogelijk geen 6 of 8 uur opgenomen
Omdat de eenheid het codeersysteem
VBR Variable Bit Rate gebruikt
Met deze functie wordt slechts één modus geselecteerd
Flexibele opnamemodus alleen voor timer- opnamen
De items
Timer-opnamen verwijderen
Te selecteren en
Selecteer met de toetsen …† in de lijst met timer
Ga naar de Geschiedenislijst
Historielijst
Info
Informatie over de geschiedenislijst
Geschiedenislijst die u wilt verwijderen en druk
Lijst met tijdgestuurde opnamen
Geschiedenislijst verwijderen
Ingesteld Een vooraf ingestelde opname wilt annuleren
Uw tv-gids naast het programma
Voer het juiste cijfer Druk op OK
Op OK Druk op
ShowView-nummers, waarmee u de
De toets Timer gebruiken
ShowView Verlengd
Staan in tijdschriften of kranten zijn
Naar HDD kopiëren
Bewerken
Titellijst
Een titel is een gedeelte van opgenomen video of audio
De naam van een titel wijzigen
Basisbewerking Titellijst
Verwijderen verwijdert het teken op de cursorpositie
Titel
Een titel vergrendelen beveiligen
…† om in de titellijst de titel te
…† om Titel te selecteren
Een titel verwijderen
Het scherm
Selecteren die u wilt verwijderen en druk vervolgens op
Verwijderen, selecteert u Off Uit in het
Een deel van een titel afsplitsen
Pagina
Verschijnt
Het menu
OK om Opspl
Het bericht Deze titel kan niet worden hersteld na
Het scherm Edit Titellijst bewerken verschijnt
101
Direct kiezen door op
Zoeken
De geelgekleurde selectiebalk gaat naar het einditem
Een playlist maken
103
Nieuwe playlist
Scherm iets verschillen
Titels in de playlist afspelen
De toets Play List gebruiken
Van het type schijf kan het
Druk op
105
De toets Playlist gebruiken
De naam van een playlist-item wijzigen
Te selecteren en
Een scène bewerken voor de playlist
…†œ √ om de scène te
De geselecteerde scène wordt afgespeeld
Wijzigte selecteren en
Voert instellingen in door stap 1-3 op pagina 106 te volgen
…† œ √ om de scène te selecteren
Geselecteerde scène dan ervoor wordt
Het is niet mogelijk de geselecteerde
Scène naar de positie van de volgende
Scène te verplaatsen, omdat de
Te volgen
109
Druk op œ √ om Annuleren te selecteren en druk
…† om Titel te
Een playlist-item uit de playlist verwijderen
Verw. te selecteren en
Die u wilt verwijderen en druk vervolgens op de toets
Niet ondersteundl
Van HDD naar DVD kopiëren
Het kopieerscherm
111
Load
Annul
113
Een titel kopiëren die al eerder is bewerkt
Een onbewerkte titel kopiëren
Kopiëren
Meerdere titels tegelijk
Kopiëren
De opnamemodus wijzigen
Beschreven op pagina
115
1uitgevoerd, zoals
Druk op …† om de titel te selecteren die u in het
Kopieerscherm wilt voorvertonen
Af te sluiten
Geselecteerde titel wordt verwijderd
Voor alle titels in de kopieerlijst de opnamemodus wijzigen
117
Opnamemodus te selecteren en druk vervolgens op
Druk vervolgens op
Van DVD naar HDD kopiëren
Te selecteren en
Bestand kopiëren
Een schijf naar HDD kopiëren
119
Plaats een schijf Jpeg of MP3 in de schijflade
Map kopiëren
…† de MP3- of Jpeg
Geannuleerd
De naam van de schijf bewerken
Schijven beheren
121
Het scherm Hernoemen verschijnt
Schijfbeveiliging
De schijf krijgt een schijfnaam
De schijf wordt geformatteerd
Een schijf formatteren
123
HDD /DVD-RAM
Muziek
Alle titellijsten/muzieklijsten/ fotolijsten verwijderen
OfFoto
Titel
125
Alle titellijsten verwijderen
Alle titellijsten worden verwijderd
Kunt u geen items uit de lijst van opnamen verwijderen
Een schijf sluiten
Wanneer een schijf eenmaal is voltooid
De schijf wordt voltooid
De VR-modus
127
Een DVD-RW kan worden voltooid of het
De videomodus
Opnemen
Problemen oplossen
Naslag
Stroomvoorziening
129
Afspelen
Aslag
Timer-opname
Geluid
Afstandsbediening
Andere problemen
131
Audio-uitgang
Specificaties
Informatielijn
Nederlandbelgië
La garantie ne couvre pas les points suivants
Pour la Belgique tel /201.24.18 Pour le Luxembourg tel
AK68-00819D-00
Manuel dinstructions
Avertissement
Ce symbole indique une tension électrique dangereuse
Premiers pas
Entretien du châssis
Précautions
Consignes de sécurité importantes
Précautions de manipulation
Stockage des disques
Manipulation des disques
Spécifications des disques
Pris en charge
Copie de disque
Spécifications de copie du contenu Contenu
Titre vidéo enregistré
Motion Jpeg et Jpeg progressif ne sont pas pris en charge
Format du disque
Nombre maximum d’enregistrements par type de disque
’utilisez pas les disques suivants
Support Disque
Panasonic Disque
Cas 1 Raccordement à une prise de sortie
Contenu
Avec prise de sortie numérique
Suppression de tous les titres/des fichiers
Sélection du mode denregistrement pour
Enregistrement du programme de télévision
Copie de fichiers MP3 ou Jpeg à partir d’un
Fonctions générales
Utilisation d’un DVD-R
Utilisation du disque dur
Utilisation d’un DVD-RAM
Utilisation d’un DVD-RW
Pas
Création d’une liste de lecture DVD-RAM/-RW en mode V, DD
Lorsque vous utilisez un disque DVD-RW en mode
Lorsque vous utilisez un disque DVD-RW en mode Vidéo
Si la télécommande ne fonctionne pas correctement
Préparation de la télécommande
Réglage de la télécommande
Insertion des piles dans la télécommande
Bouton Fonction
Si plusieurs codes correspondent à la
Il est possible qu’une partie de ses fonctions
Codes des téléviseurs pouvant être entrés à distance
Affichage en façade
Ventilateur
Panneau arrière
Le branchement de lantenne ne permet pas
Aperçu de la télécommande
Présentation rapide
Raccordement Configuration
Le câble RF de cet appareil ne transmet que des
Raccordement du Graveur Raccordements
Connectez le câble RF comme indiqué
Reliez le Graveur DE DVD Avec Disque DUR et le téléviseur
Graveur
Modes S-Vidéo, Vidéo composant et Sortie progressive
Si vous connectez un décodeur externe au
Graveur DE DVD Avec Disque DUR, vous
Profitez d’images de haute qualité
Cas 1 Raccordement à une prise de
Sortie Vidéo composite De sortie S-Vidéo
Cas 2 Raccordement à une prise
Cas 1 Raccordement au téléviseur
Cas 3 Prises de sortie Vidéo composant
Avant gauche Avant droite AvantL AvantR
Enceinte Arrière gauche
Centrale
La sélection de la prise AV 3 in s’effectue
Raccordement à la prise d’entrée DV, AV 3
Cas 2 Raccordement dun caméscope à la prise dentrée DV
Pour sélectionner lentrée appropriée
Bouton Return
Bouton Menu
Boutons …†, œ √
Bouton OK
Sélectionnez Pays à l’aide des boutons …† œ √
Branchez le câble RF comme indiqué
DUR au téléviseur à l’aide du câble RF et du câble
Péritel
Votre Graveur DE DVD Avec Disque
OnfigurationC
Système
…†œ √ pour sélectionner votre pays
Configuration du système
Installation Auto, puis appuyez sur le bouton OK
Appuyez sur le bouton OK, puis sur les boutons
Enreg., puis appuyez sur le bouton OK
Installation, puis appuyez sur le bouton OK ou √
Sélectionnez Editer, Supprimer ou Swap
Ou éditer les informations relatives au PR
Appuyez sur le bouton Return ou œ
Configuration des options de langue
Système, puis appuyez sur le bouton OK ou √
Réglage de la mise hors tension automatique
Extinct. auto, puis appuyez sur le bouton OK ou √
Réglage du CM Skip Temps
Heure du mode EP, puis appuyez sur le bouton
Mode EP
Un temps d’enregistrement de 6 ou 8 heures
Luminosité de l’affichage en façade
Affichage du Panneau, puis appuyez sur le
Réduit permet de réduire la luminosité de
Auto permet de réduire automatiquement la
Créateur de chapitre, puis appuyez sur le bouton
Création automatique des chapitres
Appuyez sur les boutons œ √ pour sélectionner
Oui, puis appuyez sur le bouton OK
Voir page 126 puis appuyez sur le bouton Title
Appuyez sur le bouton Arret pour arrêter
’enregistrement
Pour afficher les titres créés, finalisez le disque
OnfigurationC Système
Configuration des options audio
Sortie numérique
Compatibilité mode
Compression dynamique
’option vidéo souhaitée, puis appuyez sur le
Configuration des options d’affichage vidéo
Format écran
Appuyez sur les boutons …† pour sélectionner
Sortie S-Vidéo
Configuration des options de sortie vidéo
Mode Composant
Prise de sortie vidéo disponiblek
Qu’à l’arrêt s’affiche à l’écran
Configuration du balayage progressif
Disque DUR est en mode Stop
Si le bouton P.SCAN situé en façade de
Annulation du
Appuyez sur le bouton Menu pour quitter le menu
Configuration du contrôle parental
Si vous avez oublié votre code secret
Pour revenir au menu précédent
Propos du changement du code secret
Propos du Niveau de contrôle
Types de disque qui peuvent être lus
Avant la lecture
Lecture
Code régional DVD Vidéo uniquement
Le Graveur DE DVD Avec Disque DUR
Lecture d’un disque
Pour un disque dur/un disque DVD-RAM/-RW/-R
Utilisation des fonctions Recherche et Saut
Recherche dans un chapitre ou sur une piste
Pour un DVD Video
Saut de chapitres, de pistes ou de marqueurs
Lecture lente/Lecture par étape
Lecture lente
Vers l’avant sur les disques MPEG4
Propos de Anykey
Lecture par étape
Passage direct à une scène grâce à la fonction Anykey
Disque MP3 est inséré, l’affichage des
Il est possible que cette fonction ne soit
Pas compatible avec certains disques
Lorsqu’un CD CD-DA audio ou un
Utilisation du bouton Menu
Lecture de la liste de titres
Utilisation du bouton Title List
Propos du bouton Info
Utilisation du bouton Title List
Mode Stop ou Lecture ’écran liste de titres s’affiche
Menu Navigation
Navigation par Scène
La Navigation par Scène ne fonctionne
Mode VR
Navigation par Durée
Utilisation du bouton Anykey
Navigation par Durée, puis appuyez sur le
Navigation, puis appuyez sur le bouton OK ou √
Navigation par Durée, puis appuyez sur le
Utilisation du bouton Marker
EctureL
Appuyez sur le bouton Marker au cours de la
Appuyez sur le bouton Marker au cours de la Lecture
Utilisation du bouton Anykey
Une scène marquée
Disque est ouvert puis refermé
Utilisation des signets
Appuyez sur le bouton Marker au cours de la Lecture
Lecture d’un signet Effacement d’un signet
Utilisation du bouton Subtitle
Sélection de la langue des sous-titres
Appuyez sur le bouton Subtitle au cours de la lecture
Utilisation du bouton Anykey
Sélection des canaux de piste son & audio
Sélection du son
Utilisation du bouton Audio
Utilisation du bouton Repeat
Lecture répétée
Changement de l’angle de prise de vue
Lecture répétée Répéter la lecture
Utilisation du bouton Repeat A-B
Sur les HDD/DVD-RAM/-RW mode VR
Non-finalisés mode
Répétition A-B
Pour revenir à une lecture normale
Zoom avant
Lecture dun CD audio CD-DA
Lecture d’un fichier CD/MP3 audio
Eléments affichés à l’écran CD Audio CD-DA
Fois le disque chargé
Lecture d’un disque MP3
Eléments affichés à l’écran MP3
Si un disque contient uniquement des
Répéter la lecture d’un CD CD-DA et d’un fichier MP3
Boutons de la télécommande servant à la lecture MP3
Nouvelle liste de lecture, puis appuyez sur le
Nouvelle liste de lecture
Enregistrer la Liste de lecture
Liste de lecture
Si vous sélectionnez par erreur une piste qui ne
Appuyez sur le bouton Anykey pour
Aller dans Modifier liste de lecture
Supprimer la liste de lecture
Aller dans liste de fichiers musicaux, puis
Aller dans liste de fichiers musicaux
Aller dans Modifier liste de lecture, puis
Appuyez sur le bouton OK ou √
Le tiroir disque
Lecture dune Image
Sélectionner média MP3
Insérez un disque au format Jpeg ou un disque
Pour mettre fin au diaporama
Diaporama
Diaporama, puis appuyez sur le bouton OK ou √
Pour arrêter la rotation
Tourner
Pour arrêter le zoom
Aller dans liste de photos, puis appuyez sur
Lecture d’un fichier MPEG4
Aller dans liste de photos
Utilisation du bouton Menu
Codage des sous-titres DivX
Un disque DVD-R ne peut pas être non finalisé
Avant lenregistrement
Disques enregistrables
Cette fonction ferme le DVD-RW/-R et
Propos des signaux de contrôle de copie
Mode d’enregistrement
Formats d’enregistrement
Images non enregistrables
Avec Cprm
Mode VR
Réalisé
Support
Pour arrêter l’enregistrement
Pour suspendre l’enregistrement
Appuyez sur le bouton REC
Enregistrement
Appuyez sur le bouton HDD ou DVD
PR numéro AV1 AV2 AV3 DV
Sur le tiroir disque. Appuyez sur le bouton
Appuyez sur le bouton REC Mode à plusieurs
Si vous sélectionnez DVD, appuyez sur le bouton
OPEN/CLOSE et placez un disque enregistrable
030 100 .. Non
Propos du bouton Info
Pour arrêter l’enregistrement
En cours d’enregistrement
’enregistrement
Arrêt de la lecture / de l’enregistrement
Enregistrement et lecture simultanés
Utilisation du bouton Timer
Retour au menu précédent
Lorsque vous enregistrez en mode EP sur
Mode mode d’enregistrement
La durée dun enregistrement programmé
Modification de la liste d’enregistrements programmés
Pour de plus amples informations sur les
Réalisation dun enregistrement programmé
Éléments d’entrée d’enregistrement programmé
’entrée sélectionnée est supprimée de la liste
Aller dans la Liste d’historique
’écran Liste des historiques s’affiche
Informations concernant la Liste des historiques
Supprimer la Liste des historiques
Historique, puis appuyez sur le bouton OK ou √
Liste enregistrement par minuterie, puis
Effacer la Liste des historiques
Liste enregistrement par minuterie
1Appuyez sur le bouton Anykey
Show View, puis appuyez sur le bouton OK ou √
Utilisation de la fonction ShowView
ShowView Allongé
Liste de titres
Copie de fichiers MP3 ou Jpeg à partir d’un
Liste de lecture
Changement du nom étiquetage d’un titre
Verrouillage protection d’un titre
’écran Liste de Titres s’affiche
Suppression d’un titre
Vous souhaitez supprimer dans la liste des titres, puis
Vous pouvez supprimer une entrée
Partition d’une section d’un titre partage
Lecture , Recherche
Séparer
Ou √
Suppression d’une section d’un titre suppression partielle
Puis appuyez sur le bouton OK ou √
’écran Editer la liste de titres s’affiche
’affichent dans la fenêtre du point de fin de la
Eléments de l’écran Editer la liste de titres
Appuyez sur le bouton OK au point de fin
’image ainsi que l’heure du point de fin
Nouvelle Liste de Lecture, puis appuyez sur
Modification avancée Liste de lecture
Création d’une liste de lecture
Liste de lecture, puis appuyez sur le bouton OK
Liste de lecture
Lecture des entrées dans la liste de lecture
Utilisation du bouton Play List
Vous pouvez créer jusqu’à 99 entrées de
Gestionnaire de Disque
Changement du nom dune entrée dans la liste de lecture
’aide des boutons …†, sélectionnez le titre que
Modification d’une scène pour la liste de lecture
La scène sélectionnée est lue
Appuyez sur le bouton OK au point final de la scène
Boutons liés à la lecture Lecture
Recherche
’écran Modifier une Scène saffiche
Vous ne pouvez pas déplacer la scène
Lecture , Sauter
Des boutons liés à la lecture
Supprimer, puis appuyez sur le bouton OK ou √
Pour la configuration, suivez les étapes 1 à 3 de la
Modification
Stop ou Lecture ’écran Editer la liste de lecture saffiche
Une copie
Copie du disque dur sur un DVD
Propos de l’écran de copie
Titre valable pour
Sauter
Propos du bouton Copy
Copie à haut débit Cela signifie que vous
Copie d’un titre déjà modifié auparavant
Copie d’un titre non modifié
Pour copier un titre tout en visualisant le titre à l’écran
Changement du mode d’enregistrement
Titre ne pouvant pas être copié rapidement
’étape 9 décrite page 113 est effectuée
Appuyez sur les boutons …† pour sélectionner Ajout
Si la liste de copies contient au moins un
Suppression d’un titre non souhaité dans la liste de copie
Copier
Copie d’un DVD sur le disque dur
Mode Stop ou Lecture. L’écran Liste de Titres s’affiche
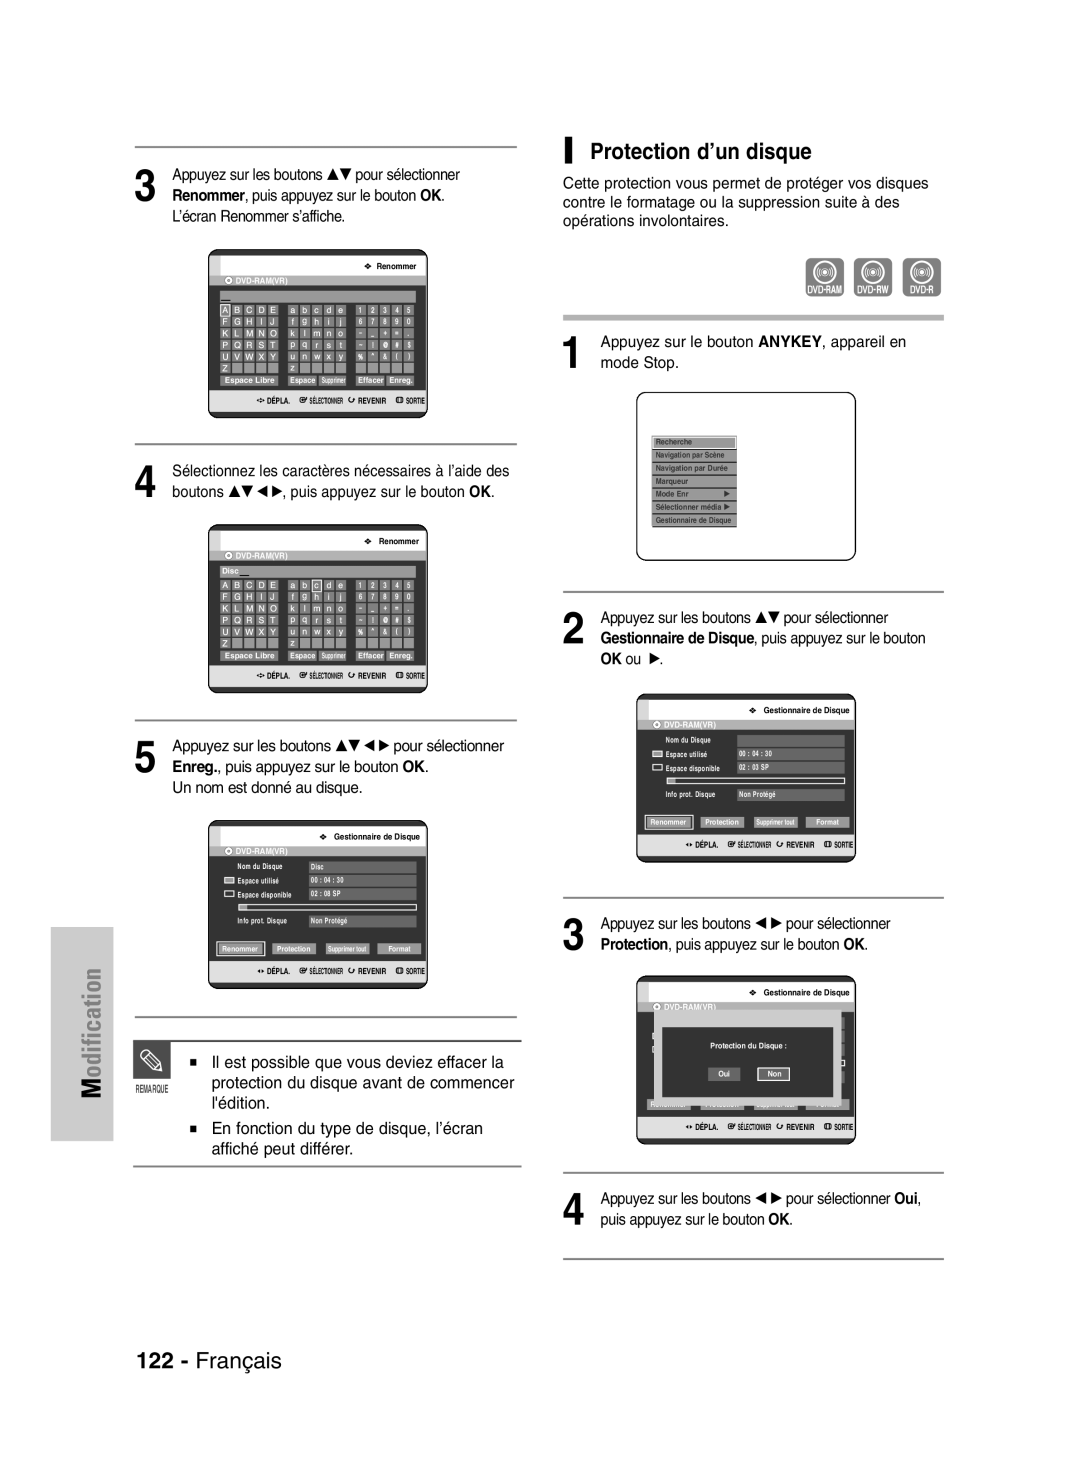
Appuyez sur les boutons …† pour sélectionner Copier
Copie de fichiers
Copie de dossiers
Modification du nom du disque
Lédition
Protection d’un disque
Disque dur/DVD-RAM
Formatage d’un disque
Stop
OK ou √
Photo
Supprimer tout, puis appuyez sur le bouton OK
Titre
Musique
Gestionnaire de Disque , puis appuyez sur le
Suppression de toutes les listes de titres
Vous serez sollicité par le message de confirmation
Finalisation d’un disque
Une fois le disque finalisé, vous ne pouvez
Plus supprimer des entrées dans la liste d’enregistrements
Un DVD-RW peut être finalisé ou non
Non finalisation d’un disque mode V/VR
Un DVD-RW peut être finalisé ou non finalisé en mode VR
Finalisé en mode vidéo Non finalisé
Enregistrement
Dépannage
Fiche technique
Alimentation
Lecture
Enregistrement programmé
Vidéo
Son
Autres
Télécommande
Sortie audio
Caractéristiques
Tél 08 25 08 65 65 / Fax 01 48 63 06
Paris Nord 66, rue des Vanesses BP 50116 Villepinte
Samsung Electronics France
Pour toute information ou tout
Cet appareil est distribué par