DVD-R145
Getting Started
FCC Note for U.S.A
Maintenance of Cabinet
Precaution
Important Safety Instructions
Handling Cautions
DVD-Video
Disc Specifications
Disc Storage
Audio CD
DVD-RAM Disc Playback and Recording
DVD-RW Disc Playback and Recording
DVD+RW Disc Playback and Recording
Do not use the following discs
Contents
Recording the current TV program you are Watching
Before Recording
Checking the available disc space
Before Playing
Copying data from a digital camcorder using
Create a DVD video title using a DVD±RW/DVD±R
High quality digital audio and video recording
Using a DVD-R
Using a DVD-RAM
Using a DVD±RW/+R
Before Reading
When using a DVD-RW disc in VR Mode
When using a DVD-RW disc in Video Mode
When using a DVD±R disc
Description
Front panel
Front Panel Display
Rear Panel
Check for the supplied accessories below
Unpacking
Antenna connection does not pass
Tour of the Remote Control
Step Connecting HDMI/ DVI to a TV
Quick Overview
Step
VHF/UHF ANT RF OUT jack of this
Connecting the Antenna Cable
Antenna + DVD Recorder + TV No Cable box
DVD playback
Getting Connected
Pages 103~105
Cable provider
Place the Cable Box Control Wand
English
Connecting the Video Cable
Connecting to a Video input jack
Video or Component video outputs are
Connecting to an S-Video input jack
Video input mode
Jacks on TVor AV amplifier
R jacks On your TV or AV amplifier
Connect Component video cablesnot supplied
R jacks on
RedP R
Select one of the Audio connections on the following pages
Connecting the Audio Cable
Connecting to your TV
This connection will use your TV’s speakers
Connecting to a stereo amplifier with analog input jacks
Connecting to an AV amplifier with a digital input jack
DTS and DTS Digital Out are trademarks of DTS, Inc
Connecting HDMI/DVI to a TV
Connecting to a TV with Hdmi Jack
Hdmi connection description Why does Samsung use HDMI?
Connecting to a TV with DVI Jack
To change Hdmi output resolution, see
What is the HDCP?
Connecting External Devices
Connecting a Camcorder to the AV 2 INjacks
Connecting a Camcorder to the DV in jack
Setting the Remote Control
Connecting Power Cord
Preparing Remote Control
Install Batteries in the Remote Control
49, 52
Used to switch the television on and off
06, 49
60, 72, 73
Enter or √ button
Clock Set
Initial Setup
OSD Language Setup
Auto Clock Set
Clock Data CH
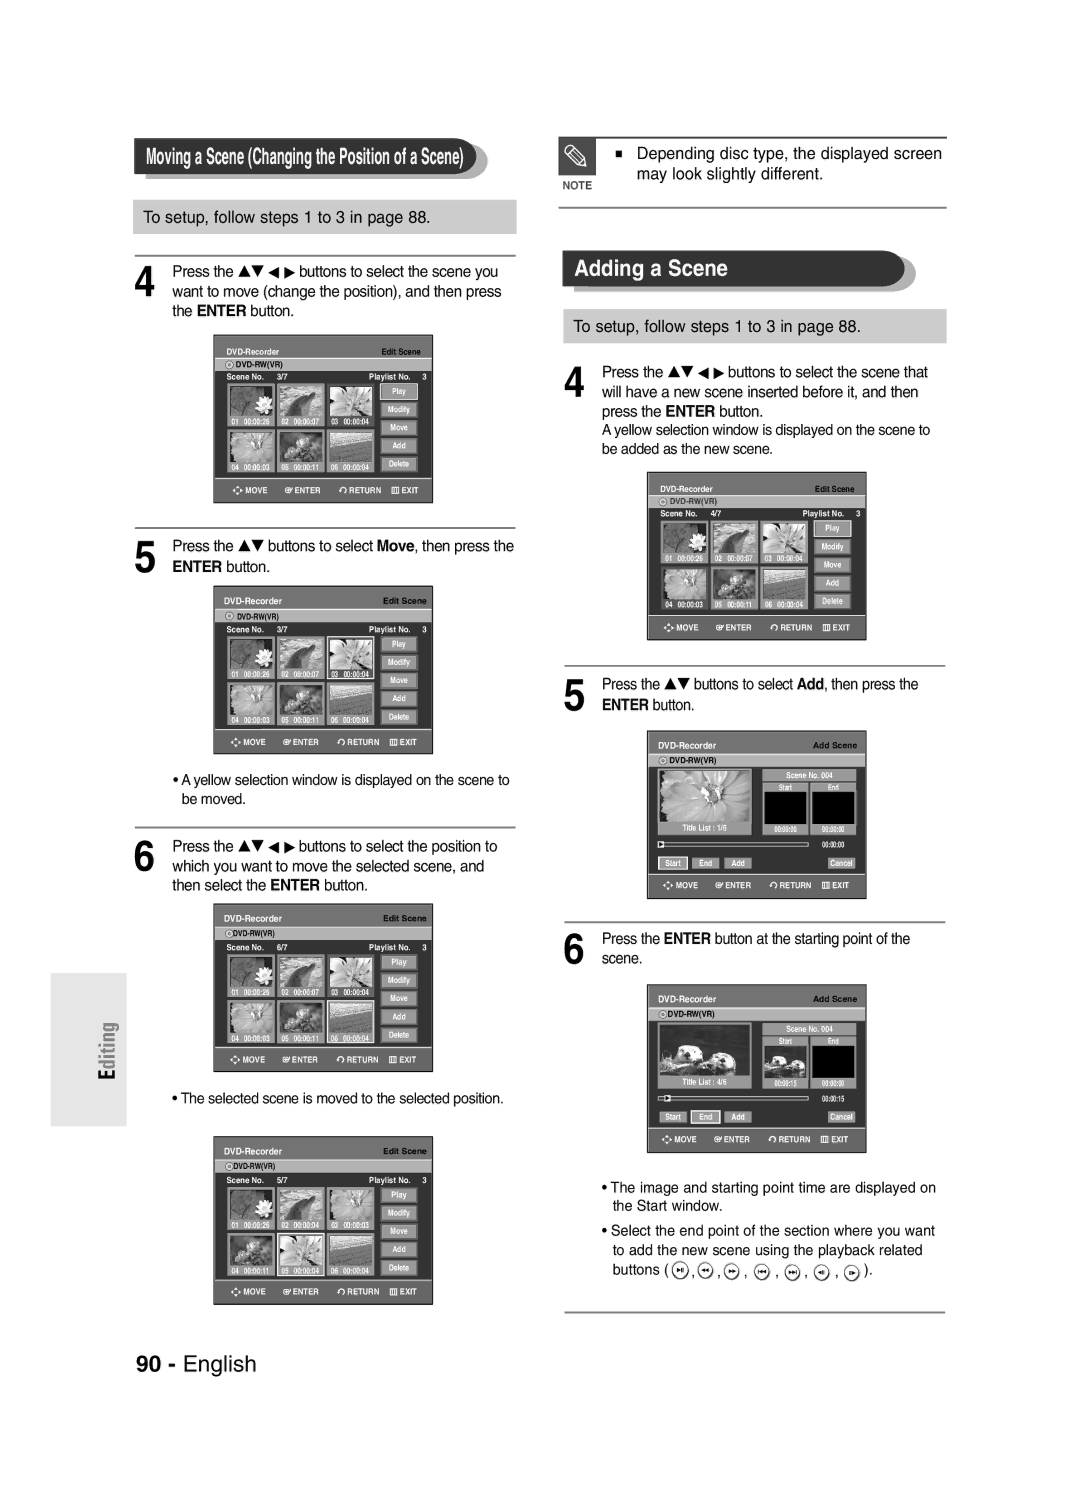
To setup, follow steps 1 to 3
Manual Clock Set
Time Zone
Auto Channel Memory
Channel Set using
Channel Set
…† buttons
Setting Up the Audio Options
Manual Channel Set
Select
Dynamic Compression-On using the …† buttons
Digital Output
Dynamic Compression
Setting Up the TV Aspect
If you have a 43 standard TV
Set Top Box Control
System Setting
Menu button on the remote control
Menu items differ depending on the disc type
Control
Mode for SET button
CH Digit Lock
Set Top Box Test
CM Skip Time Setting
…† buttons, then
Select System using the …† buttons, then press
EP Mode Time Setting
Select the desired time using the …† buttons, then
Automatic Chapter Creation
Quick Recording Setting
This function only works for normal recording
With a disc inserted and the unit in Stop mode, press
Quick Recording is set to Off as
Language Setting
Language setup menu will be displayed
Press the Return or œ button to return to the previous menu
Video option menu will be displayed
This allows you to set up the TV screen settings
Input Level Adjusts the level of the input signal
TV Aspect see
Press the Return or œ button to return
To the previous menu Press the Menu button to exit the menu
Output selection
Remote control
First time the Parental Control is accessed,
‘Create the Password’ message will be displayed
Password. Enter your password again
Setting the Rating Level
Changing the Password
See page 102 if you forgot your password
Before Recording
Recordable discs
Recording Formats
Recording Mode
Concerning Copy Control Signals
Unrecordable video
Before you start
About the Info button
Disc Information
Different
Most new discs are sold unformatted
Onto a DVD+RW/+R disc
Be formatted before starting to record
Do not use DVD-R authoring discs with This unit
Equipment
Input source during recording
Channel Number AV1 AV2 DV
Input source while recording
Onto a DVD+RW/+R disc DVD-RAM/DVD±RW/ DVD+R discs must
030 100 130 200 300 400off
DVD Recorder stops recording
After finishing recording, the DVD
To stop recording
VBRVariable Bit Rate Encoding system
Mode Record mode
Or 8 hours because the unit uses
Consumes more disc memory
If the timer settings overlap
To return to the previous menu
You will be prompted with the delete confirmation
List, and then press the Enter or √ button
Press the …† buttons to select Delete, and then press
Message, For example Do you want to delete
When you copy from a camcorder on
Power on TV using the TV remote control
Press the Time Slip button on the remote control
Enter button Selected entry will be deleted from the list
Region code DVD-Video only
Disc types that can be played
Some types of discs, or when specific
Ratio adjustment, are being performed
Discs that cannot be played
For DVD-VIDEO discs
Using the Disc Menu & Title Menu
Using the Search Functions
For DVD-RAM/DVD±RW/±R discs
Step Motion Play
Searching Chapters or Tracks
Slow Motion Play
About Anykey
Using the Repeat Function
Using the Repeat button
Playing RepeatedlyRepeat Playback
Using the Anykey button
Using the Anykey button
DVD-RW Video mode do not repeat a chapter
Selecting the Subtitle
Using the Audio button
VR mode
Selecting the Audio language
They are disc-specific
Changing the Camera Angle
Zooming-In
Language for the disc menu only
Clearing a Bookmark
Using Bookmarks
When the disc tray is opened and then
PlayingSelectingBack atheBookmarkAudio language
Using Markers
Playing Back a Marker
Clearing a Marker
Playing an Audio CD CD-DA/MP3
Play Mode icon
Playing an Audio
Playing an Audio CDCD-DA
Insert an MP3 disc into the disc tray
Playing an MP3 Disc
MP3 Screen Elements
Navigation, and then press the Enter or √ button
Play mode window appears
Play Option Mode
Cancel button
Selected track is played repeatedly
To Program Tracks
Select Play option using …† buttons
Playing a Picture CD
You can register a maximum of 30 tracks in the playlist
Normal 2X 4X 2X Normal
Press the …† buttons to select the DivX, and then
MPEG4 Function Description
Using the Title List button
Using the Menu button
Rename, Delete, Edit, Protection See pages 78~84
Pressing the Anykey button during
Playback
You can also play a recorded program by
This function is only available with DVD+RW discs
Free Space Function
Recording a title
Appear on the left side of the title list
Title List
Playlist
Renaming Labeling a Title
Or use the Menu button
Rename from the Title List, and then press
Or use the Menu button
Locking Protecting a Title
Deleting a Title
Protect from the Title List, and then press
Deleting a Section of a Title
Be at least 5 seconds long
Edit Title List screen will disappear
Editing a Chapter
Playback related buttons
Select a chapter you want to hide using
Follow steps 1 to 3
Playback related buttons
Dividing a Title
To make a new playlist
Advanced Editing Playlist
Creating a Playlist
To return to Edit Playlist menu
Playlist entries will be played
Playing Entries in the Playlist
Follow these instructions to play the playlist entries
Press the …† buttons to select Edit Playlist,
Enter the desired characters using the …† œ √ buttons
Renaming a Playlist Entry
Using the Menu button
Editing a Scene for the Playlist
Playing a Selected Scene
Press the Enter button at the start point of the scene
To setup, follow steps 1 to 3
Scene
Image and ending point time are displayed on the End window
Adding a Scene
Enter button
Selected scene is moved to the selected position
Copying a Playlist Entry to the Playlist
Using the Play List button
Deleting a Scene
Scene, Copy, Delete
Playlist can contain up to 99 playlist
Using the Playlist button
Deleting a Playlist Entry from the Playlist
After the deletion operation has finished
Editing the Disc Name
On the remote control
Disc Manager
Beginning editing.see
Disc Protection
Formatting a Disc
Menu items may differ depending on the disc
Button on the remote control
Deleting All Title Lists
Disc protection should be cleared first
Edit Compatible
Menu button
For DVD+RW discs, this function needs to be
Finalizing a Disc
Entries from the record list
Process
DVD-RW can be finalized or unfinalized in VR mode
Unfinalizing a Disc V/VR mode
Video mode
Finalize Unfinalize
Recording
Troubleshooting
Power
Recording is possible for
Playback
Video
Timer Recording
Timer lamp flickers
Sound
Remote Control Unit
Other
Your TV
Cable box brand
Cable box brand Code number
0044
0156, 0070, 0203, 0063
0012, 0618, 0022, 0637
0021, 0060, 0797,0047
1367 RadioShack 0869
Satellite receiver brand
0775 Gradiente 0856 Hitachi 0819 Houston Tracker
1333 Uniden 0724 Video Cipher II Plus 0361
Solutions to Error Message
Error Message Solution / Explanation
You can’t use the disc because it contains errors from
Specifications
Input
Output
Warranty
Limited Warranty to Original Purchaser
Region Country Customer Care Center Web Site
Challenger Road, Ridgefield Park, N.J.07660-0511
Valley Road, Suite Mount Arlington, NJ