DVD & VCR
Important Note
Connecting
Video Cable
Important Safety Instructions
Precaution
Handling Cautions
Getting Started
Disc Handling
Maintenance of Cabinet
Holding discs
DVD-RAM, DVD±RW and DVD±R
Disc Type
Disc Specifications
DVD-VR370
DVD-VR375
DVD+R Disc Playback and Recording
DVD-RW/-R Disc Playback and Recording
DVD-RAM Disc Playback and Recording
DVD+RW Disc Playback and Recording
Protection
Do not use the following discs
General Features
Precaution
How To Use The DVD Recorder & VCR
Tour of the Remote Control
Troubleshooting
Disc Setting
Playing the Title List
Basic Editing Title List
General Features
Icons that will be used in manual
Before Reading the USER’S Manual
About the use of this user’s manual
Copyright
Using a DVD-RAM/±RW/+R
HOW to USE the DVD Recorder & VCR
Using a DVD-R
Select the disc type
When using a DVD-RW/-R disc in VR Mode
Creating a playlist DVD-RAM/-RW/-R in VR mode
When using a DVD-RW/-R disc in Video Mode
When using a DVD+R disc
Unpacking
Accessories
Preparing the Remote Control
TV Mute
TV STANDBY/ON
Input SEL
Input SEL. Button
Tour of the Remote Control
Front Panel DVD-VR375
Description
Front Panel DVD-VR370
Rear Panel DVD-VR370 Rear Panel DVD-VR375
Aerial in Connector
Audio L, R OUT Jacks
AV2 EXT Scart
Front Panel Display
To RF To RF OUT To ANT Input
Connecting DVD Recorder & VCR to the TV Using the RF Cable
Connect the Aerial Cable
Connecting the Scart Cable
Connecting & Setting UP
Connecting & setting up
Connecting the AUDIO/VIDEO Cable
Component cable Not supplied
Connecting the Component Video Cable
Case 1 Connecting to a TV with Hdmi Jack
Connecting HDMI/DVI to a TV DVD-VR375 only
What is the HDCP?
Case 2 Connecting to a TV with DVI Jack
Why does Samsung use HDMI?
AV Receiver Connections
Case1 Connecting an external devices to the AV3 jacks
Connecting External Devices
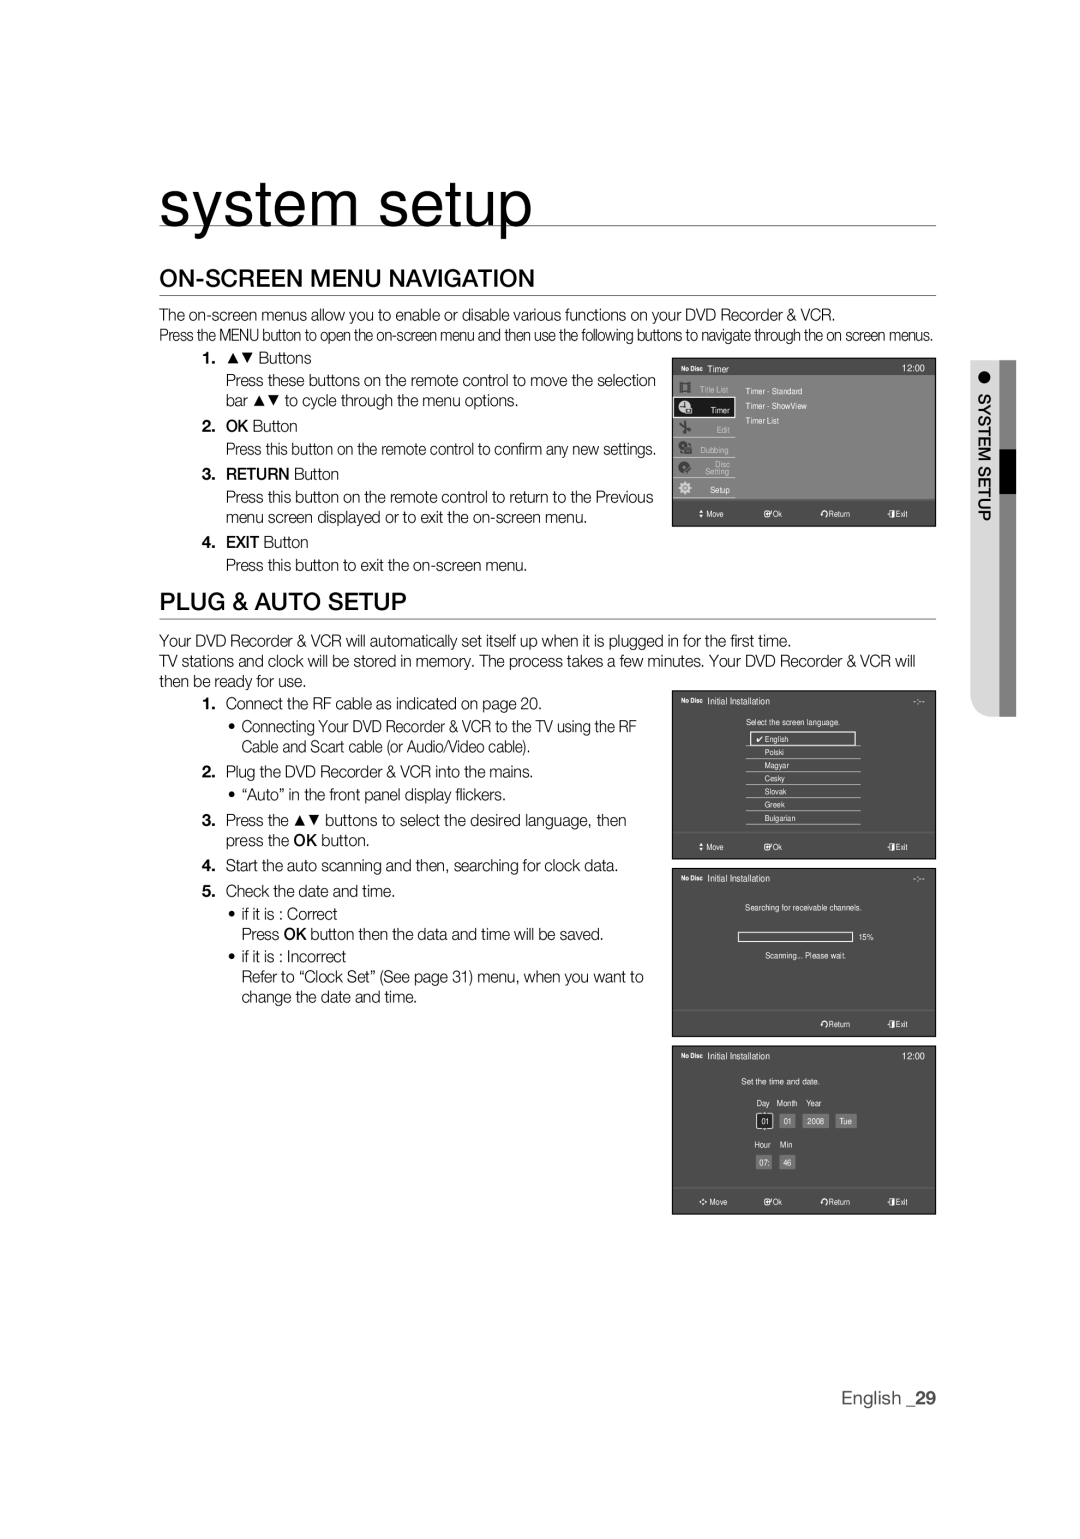
ON-SCREEN Menu Navigation
Plug & Auto Setup
Auto Preset
Tuner Preset
Manual Set
Button
Channel List
Clock SET
Present Time
OK button
TV Type
Setting UP the Video Options
Resolution Hdmi DVD-VR375 only
AV1 Output
Video Hdmi DVD-VR375 only
Progressive Scan
Setting UP the Audio Options
Dolby Digital DVDs only
Digital Out
DTS DVD VIDEOs only
Mpeg DVD VIDEOs only
Audio Hdmi DVD-VR375 only
Audio DRC Dynamic Range Control DVDs only
Scan Audio DVDs only
Surround
DV Audio Input DVD-VR375 only
Setting UP the Features
AV Audio Input
DVD Auto Chapter
EZ Record
Format DVD-RW
Anynet+HDMI CEC DVD-VR375 only
For using Anynet+HDMI CEC
Anynet+HDMI CEC items will be displayed
, buttons
Language Follow DVD-VR375 only
Setting UP the Options
DVD Bilingual Rec
DivX Registration Code
If you forgot your password
Setting up the Parental
Setting the Rating Level
Language
VCR Function Setting
Changing the Password
Front Display
Tape Length
Auto Repeat
Auto Play
Colour System
Mesecam
Logos of Discs That can be Played
Region Code DVD-VIDEO only
Dolby Digital
DTS
Audio
Disc Types That can be Played
Video
Playback
Discs that cannot be played
Playing a Disc
VCD/SVCD/CVD/CD-ROM/CDV/CD-G/CD-I BD, HD-DVD
Do not place foreign materials on or in the disc tray
Using the Playback Related Buttons
Using the Disc Menu & Title Menu
For DVD-VIDEO Disc
For DVD-RAM/±RW/±R Disc
Skipping Chapters, Titles or Markers
Using the Anykey Button
Slow Motion Play
Step Motion Play
Moving to a desired scene directly
Minutes, seconds using the number buttons
Selecting the Audio language
Remain
Changing the Camera Angle
Selecting the Subtitle Language
Press the OK button
Press the buttons to select Angle, then press
Playing an Audio CDCD-DA
Playing AN Audio CD/MP3
Audio CDCD-DA Screen Elements
OK button Plays the selected track song
Playing an MP3 Disc
Playing Back a Picture Disc
MP3 Screen Elements
Insert a Jpeg Disc into the disc tray
MPEG4 Function Description
Playing AN MPEG4 Disc
Music/Photo Simultaneous Playback
Playing Back a VHS Tape VCR
Variable Search System
Slow motion
Go to Zero
End search
Compatibility between Samsung and Other Company’s Recorder
Recordable Discs
DVD-RW
DVD-RW DVD+RW
Various editing options using a created Playlist
Recording Mode
Recording Formats
Whole title, partial deletion of a title, etc
With Cprm VR mode Mode
Concerning Copy Control Signals
Unrecordable Pictures
Copy-Free Copy-Once Copy-Never Media
Before you start
Recording Immediately
Recording the current programme you are watching
Recording from external equipment you are watching
Connect the DV output jack of your camcorder to the DV input
Recording Through the DV Input Jack DVD-VR375 only
Set timer recording option
Making a Timer Recording
Making a ONE Touch Recording OTR
With the unit in Stop mode, press the Menu button
31/01Sun 30/01 29/01Mon-Fri Mon-Sat 02/01Sun-Sat 01/01Today
Recording Mode DVD
Edit and Delete items are displayed
Editing the Timer List
Follow these directions to edit the timer record list
Using the Showview Feature
Deleting the Timer List
That you want to record in your television magazine
Enter the correct digit
Maximum Recording Time SP vs. LP
Basic VCR Recording
Before starting
Press the Stop button to stop a recording in progress
Special Recording Features
Check Remaining Time
Dubbing from DVD to VCR
Dubbing to DVD or Video
Direct dubbing DVD to Video
To VCR
Direct dubbing VCR to DVD
DV Dubbing DVD-VR375 only
Dubbing from VCR to DVD
DV One Touch Dubbing
DV Simple Dubbing
Title List Screen Elements
Playing the Title List
Playback screen for recorded titles
This may depend on the type of disc
Locking Protecting a Title
Basic Editing Title List
Renaming Labeling a Title Title Name
Erasing a chapter Chapter Erase
Erasing a Title Title Erase
Press the Title List button
You will be prompted with a confi rmation message
Erasing a section of a Title A-B Erase
Creating a Playlist
Advanced Editing Playlist
Dividing a title into two Divide Title
See
Playing Titles in the Playlist
To return to Edit Playlist menu
Follow these instructions to play the playlist titles
Deleting a Playlist Title from the Playlist
Renaming a Playlist Title
Editing the Disc Name
Disc Setting
Disc Protection
Follow these instructions to give a name to a disc
Formatting a Disc
Select VR mode only
Format this disc?
Disc is formatted
Finalising a Disc
Unfinalising a Disc V/VR mode
Erase All Titles
Disc Information
Reference
Troubleshooting DVD
Other problems
Remote control doesn’t work
Problem, and follow the directions given
Icon appears on
Troubleshooting VCR
MPEG-II
Specifications
PAL
Region Country Customer Care Centre Web Site
Code No. AK68-01669A