STBY 00:00:00 [55Min]

registrazione avanzata

GESTIONE DI MENU E DI MENU RAPIDI

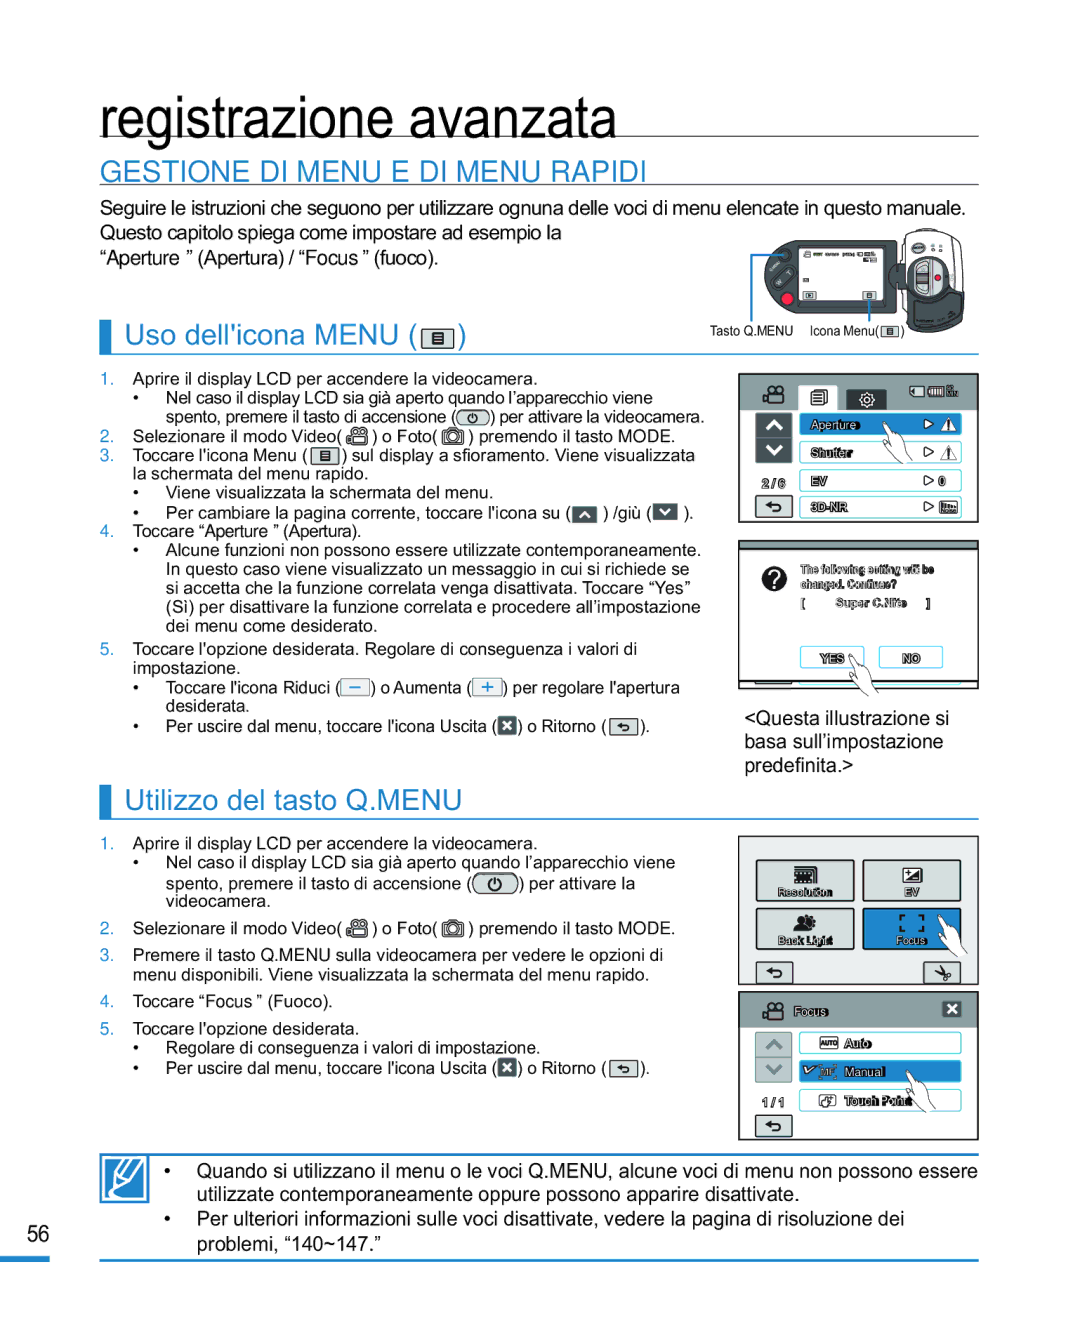
Seguire le istruzioni che seguono per utilizzare ognuna delle voci di menu elencate in questo manuale. Questo capitolo spiega come impostare ad esempio la

Aperture” (Apertura) / “Focus” (fuoco).


Uso dell'icona MENU (

)


Tasto Q.MENU


Icona Menu(

)

DC


1. Aprire il display LCD per accendere la videocamera.


90


• Nel caso il display LCD sia già aperto quando l’apparecchio viene


MIN


spento, premere il tasto di accensione (

) per attivare la videocamera.


Aperture


2.

Selezionare il modo Video(

) o Foto(

) premendo il tasto MODE.


3.

Toccare l'icona Menu (

) sul display a sfi oramento. Viene visualizzata


Shutter


la schermata del menu rapido.


2 / 6


EV


0


• Viene visualizzata la schermata del menu.


) /giù (

).


3D-NR


4.

Per cambiare la pagina corrente, toccare l'icona su (


Toccare “Aperture” (Apertura).


• Alcune funzioni non possono essere utilizzate contemporaneamente.


90


In questo caso viene visualizzato un messaggio in cui si richiede se


MIN


The following setting will be


si accetta che la funzione correlata venga disattivata. Toccare “Yes

changed. Continue?


조리개


(Sì) per disattivare la funzione correlata e procedere all’impostazione

[

Super C.Nite

]


dei menu come desiderato.


셔터


5.

Toccare l'opzione desiderata. Regolare di conseguenza i valori di


2 / 6


노출 보정

NO

0


impostazione.


YES


) o Aumenta (

) per regolare l'apertura


3D-NR


Toccare l'icona Riduci (


desiderata.


<Questa illustrazione si


Per uscire dal menu, toccare l'icona Uscita (

) o Ritorno (

).


basa sull’impostazione


predefi nita.>


Utilizzo del tasto Q.MENU

1.Aprire il display LCD per accendere la videocamera.

Nel caso il display LCD sia già aperto quando l’apparecchio viene

spento, premere il tasto di accensione () per attivare la videocamera.

2.Selezionare il modo Video( ) o Foto() premendo il tasto MODE.

3.Premere il tasto Q.MENU sulla videocamera per vedere le opzioni di menu disponibili. Viene visualizzata la schermata del menu rapido.

4.Toccare “Focus” (Fuoco).

5.Toccare l'opzione desiderata.

Regolare di conseguenza i valori di impostazione.

Per uscire dal menu, toccare l'icona Uscita () o Ritorno ().

Resolution

EV

Back Light

Focus


Focus


Auto


Manual

1 / 1

Touch Point

• Quando si utilizzano il menu o le voci Q.MENU, alcune voci di menu non possono essere utilizzate contemporaneamente oppure possono apparire disattivate.

Per ulteriori informazioni sulle voci disattivate, vedere la pagina di risoluzione dei

56problemi, “140~147.”

Page 56
Image 56
Samsung HMX-R10BP/EDC, HMX-R10SP/EDC manual Registrazione avanzata, Gestione DI Menu E DI Menu Rapidi, Uso dellicona Menu

HMX-R10SP/EDC, HMX-R10BP/EDC specifications

The Samsung HMX-R10BP/EDC and HMX-R10SP/EDC are compact camcorders designed to deliver high-quality video recording and user-friendly operation. These models emphasize portability and advanced technologies, making them suitable for both novice and experienced videographers.

One of the standout features of these camcorders is their 10x optical zoom lens, which allows users to capture sharp and clear images even at a distance. This zoom capability is complemented by a 2.7-inch LCD touchscreen that provides easy navigation through settings and playback of recorded videos.

The HMX-R10BP/EDC and HMX-R10SP/EDC utilize a 1/4-inch CCD sensor that ensures high-definition recording at 1920 x 1080 resolution. This allows for stunning image clarity and vibrant colors, making the camcorders ideal for both casual use and more serious filmmaking. The device supports various recording formats, including MP4, which is great for sharing videos online.

Another significant aspect of these camcorders is the built-in image stabilization technology. This feature helps reduce the effects of camera shake, resulting in smoother footage, especially when capturing action sequences or shooting while in motion.

Additionally, both models are equipped with advanced audio recording capabilities. Their integrated microphones capture clear audio, while also allowing users to connect external microphones for enhanced sound quality, which is particularly useful for interviews or events.

The HMX-R10BP/EDC and HMX-R10SP/EDC also support memory cards, allowing for flexible storage options. This feature is vital for videographers who may need to record lengthy sessions without worrying about running out of space.

When it comes to connectivity, these camcorders include HDMI and USB ports, making it easy to connect to other devices for playback or file transfers. They are also compatible with various editing software, facilitating a smooth post-production workflow.

Ultimately, the Samsung HMX-R10BP/EDC and HMX-R10SP/EDC are designed to provide users with a blend of compact design, advanced technology, and great performance. Whether for family events, travel vlogging, or budding filmmakers, these camcorders offer an array of features that cater to diverse recording needs while ensuring ease of use and high-quality output.