Main
BN68-00653A-01
LT-P326W
C
Chapter 1: Your New TV
Chapter 2: Installation
Chapter 3: Operation
Chapter 4: Special Features
C
Chapter 5: PC Display
Chapter 6: Troubleshooting
Appendix
List of Parts
Chapter One
List of Features
Familiarizing Yourself with Your New TV
Page
Remote Control
Page
Installing Batteries in the Remote Control
If remote control doesnt work
Connecting VHF and UHF Antennas
Chapter Two
Connecting Cable TV
To connect to a cable TV system, follow the instructions below.
Page
Page
Connecting HDMI
How to connect Core
Follow the instructions in Viewing a VCR or Camcorder Tape to view your VCR tape.
Acoaxial cable is usually included with a VCR. (If not, check your local electronics store).
Connecting a VCR
Connecting an S-VHS VCR
Connecting a DVI-D Cable
Note:If you are using a DVI-D cable to connect
Note: For an explanation of Component video, see your DVD player owner's manual.
Connecting a DVD Player
The rear panel jacks on your TV make it easy to connect a DVD player to your TV.
Note: For an explanation of Component video, see your Set-Top Box owner's manual.
Connecting a Digital TV Set-Top Box
The connections for a typical set-top box are shown below.
Connecting a PC
1.What is the Anynet?
Anynet
2.Anynet
3. Connecting TV + DVD/VCR Combo:
4. Connecting TV + DVD Receiver:
5. Connecting TV + DVD Combo + DVD Receiver:
Chapter Three
Changing Channels
At any time, you can temporarily cut off the sound using the Mute button.
Adjusting the Volume
Turning the TV On and Off
Viewing the Display
The display identifies the current channel and the status of certain audio-video settings.
Viewing the Menus
Setting Up Your Remote Control
Note
1 2
3 4
5
Page
Page
English-26
Remote Control Codes
BN68-00653A-01Eng.qxd 5/7/04 9:04 AM Page 26
VCR Codes
DVD Codes
Cable Box Codes
Chapter Four
SPECIAL FEATURES
Plug & Play Feature
to confirm your choice.
Memorizing the Channels
Page
Labeling Channels
Adding and Erasing Channels (Manual Method)
Alternate method:
To Set-up Your Channels
To Select Source
If Connector is not connected, Source cannot be selected except TV. (in both main and sub-screen)
To Edit the Input Source Name
Name the input device connected to the input jacks to make your input source selection easier.
Using Automatic Picture Settings
Customizing the Picture
Using Automatic Sound Settings
Customizing the Sound
Selecting a Menu Language
Setting the Blue Screen Mode
Pressing the UP/DOWN buttons will alternate between On and Off.
Fine Tuning Channels
Use fine tuning to manually adjust a particular channel for optimal reception.
LNA (Low Noise Amplifier)
English-41
Viewing Picture-in-Picture
BN68-00653A-01Eng.qxd 5/7/04 9:04 AM Page 41
AV
Activating Picture-in-Picture
Press the MENU button to display the menu.
Page
DNIe (Digital Natural Image engine)
MCC (My Color Control)
Page
I2C (Intelligent Image Control)
IBC (Intelligent Brightness Control)
Freezing the Picture
Changing the Screen Size
Adjusting the Color Tone
You can change the color of the entire screen according to your preference.
Setting the TruSurround XT(SRS TSXT)
Emphasizes midrange and bass and provides a simulated surround-sound experience.
TRADEMARK & LABEL LICENSE NOTICE
Automatic Volume Control
Reduces the differences in volume level among broadcasters.
Special Sound Options
Note :Headphones must be purchased separately.
Adjusting the Headphone Sound
Selecting the Main or Sub Sound
You can select to hear sound from either the Main or Sub picture when PIP is On.
Sub Woofer
Note :You can also set the time using the numeric buttons on the remote.
Setting the Clock
Setting the On/Off Timer
Page
Setting the Sleep Timer
Set the timer for the TV to turn off at the preset time automatically.
Sleep timer
Viewing Closed Captions
Page
Using the V-Chip
Setting Up Your Personal ID Number (PIN)
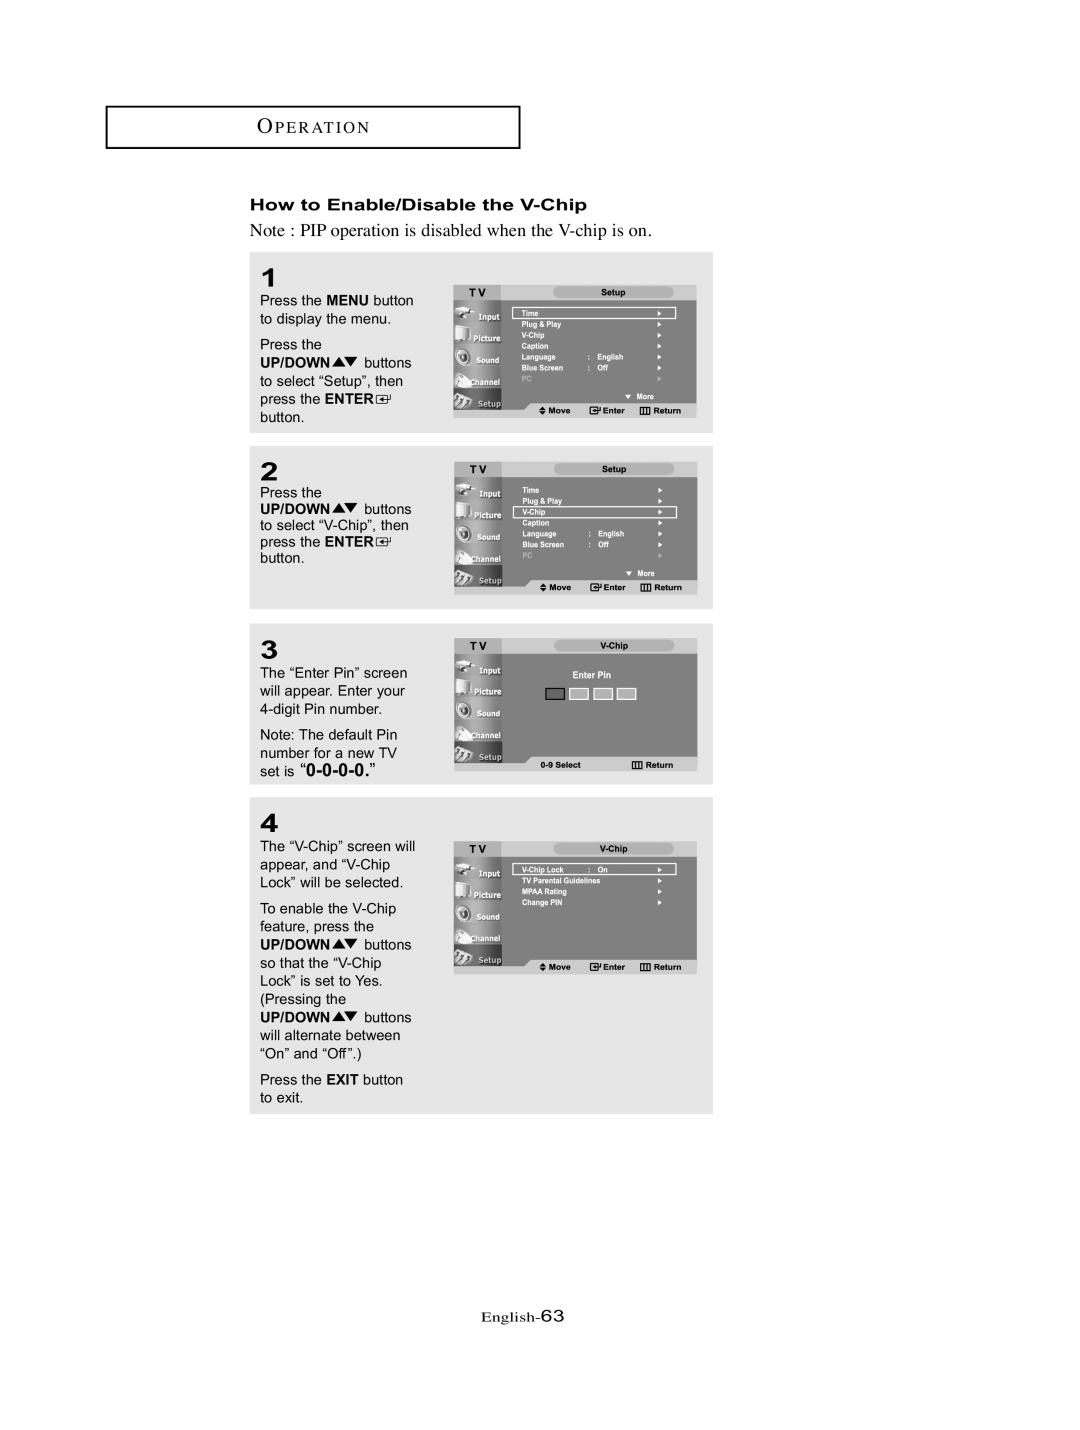
How to Enable/Disable the V-Chip
Note : PIP operation is disabled when the V-chip is on.
ol Off) the E ON.
Page
Page
How to Set up Restrictions Using the MPAA Ratings: G, PG, PG-13, R, NC-17, X
Page
Color Weakness
This function doesnt work when the Source is in PC mode, or DNIe is in off mode.
Selecting the Melody
You can hear a melody sound when the television is powered on or off.
Chapter Five
Using Your TV as a Computer (PC) Display
How to Auto Adjust
Page
Changing the Screen Position
To Initialize the Screen Position or Color Settings
Identifying Problems
Chapter Six
Page
Page
Page
Page
Page
Glossary Content
Installing the Stand
<1> <2>
Maintenance of Your LCD TV
English-83
Wall Mount Installation Guide
BN68-00653A-01Eng.qxd 5/7/04 9:07 AM Page 83
How to Assemble the Wall Mount
Parts
Screws
Page
Cleaning and Maintaining Your TV
Using Your TV in Another Country
Specifications
Model Name
Display Modes