Main
Digital Camcorder
SC-X105(L)/X110(L)
Safety Instructions
Page
Page
Page
Notices and Safety Precautions
Getting to Know Your CAM Location of Controls
How to Use the Battery Pack
Getting Started
Video Mode 36
Photo Mode
MP3/Voice Recorder Mode/Using File Browser
Voice Recorder Mode 78
Using File Browser Setting the CAM
Miscellaneous Information
Using the External Camera Module (SC-X105L/X110L only)
Page
Precautions on the CAM Care
Notes Regarding the CAM
Notes Regarding COPYRIGHT Notes Regarding Moisture Condensation
Notes Regarding the Battery Pack
Note Regarding a Trademark
Note Regarding the Lens Notes Regarding the LCD Display
Precautions Regarding Service Precautions Regarding Replacement Parts
Features
Getting to Know Your CAM
Accessories Supplied with the CAM
Rear & Left View
Right & Bottom View
External Camera Module View (SC-X105L/X110L only)
OSD (On Screen Display in Video Record Mode/ Video Play Mode)
Video Record Mode
Video Play Mode
OSD (On Screen Display in Photo Capture Mode/ Photo View Mode)
Photo Capture Mode
Photo View Mode
OSD (On Screen Display in MP3 Play Mode/ Voice Record/Play Mode)
MP3 Play Mode
Voice Record Mode
Voice Play Mode
Battery (Pack) Installation / Ejection
To insert the battery pack
To eject the battery pack
SB-P90A (900mAh) SB-P180A (1800mAh) (option)
To insert the batteries for External Camera Module (SC-X105L/X110L only)
Maintain the Battery Pack
Page
Video Play 100-0056
00:16 / 00:32
Charging the Battery Pack
The Color of the LED
Using Hardware Reset Function
2626
Before You Start Operating the CAM
For example:If you want to select Photo Mode
Using the Function Button
The Use of [Back] and [Menu] button
2828
Using the Display Button
Time/Date Dialog Help
Play Help
Select Mode
You can use various functions by pressing the [Display] button.
Adjusting the LCD Monitor
1. Slide the [Mode Selector ] down to turn on the CAM and slide it down again.
Structure of the Folders and Files
Warning
erasing a file or formatting the Memory Stick.
Memory Stick to avoid losing data.
Recording Time and Capacity
Page
Selecting the Memory Type
Using the Memory Stick (Optional Accessory)
Caution: This screen will appear if the Memory Stick is inserted with the power on.
Inserting a Memory Stick
Ejecting a Memory Stick
The Memory Stick View
Mode and Menu Selection
S PECIAL O
Video Mode
Recording
Playing
Selecting File Options
Setting Various Functions
Recording
2. Press [Record/Stop] button to start recording.
3. Press the [Record/Stop] button again to stop recording.
4. Slide [Mode Selector] up to turn off the CAM.
Zooming In and Out
1. Slide [Mode Selector] down to turn on the CAM.
2. Press the [Record/Stop] button to start recording.
Slide the [/] switch up to zoom out.
Slide the [/] switch down to zoom in.
Setting the Video In
1. Slide [Mode Selector] down to turn on the CAM.
Video Mode : Playing
Playing on the LCD Monitor
4. Press [OK ] button to play the video file you want.
5. Press the [OK] button again to pause.
Video Mode : Playing
Deleting Video files
4242
You can delete video files in <File Options>.
The Video Record screen appears.
You can select <File Options> only in Video Play mode.
Locking Video files
You can lock the important video file to prevent accidental deletion.
2. Press the [Menu ] button and slide the [/] switch.
3. Slide the [/] switch to select the video file you want to lock.
You can select <File Options> only in Video Play mode.
Copying Video files
2. Press the [Menu] button and slide the [/] switch.
3. Slide the [/] switch to select the video file you want to copy.
5. Slide the [/] switch to select <Copy To> and press the [OK] button.
6. Slide the [/] switch to select from the following and
Setting the PB(Play Back) Option
01 03
You can play all files continuously or play the selected file only.
2. Press the [Menu] button and slide the [/] switch.
3. Slide the [/] switch to select the video file you want to set.
Setting the Video file Size
00:00 / 21:54
2. Press the [Menu] button and slide the [/] switch.
3. Slide the [/] switch to select <Size> and press the [OK] button.
720: Selects 720 pixels. 352: Selects 352 pixels.
Setting the Video file Quality
00:00 / 16:25
2. Press the [Menu] button and slide the [/] switch.
3. Slide the [/] switch to select <Quality> and press the [OK] button.
4. Slide the [/] switch to select the video file quality and
Setting the Focus
2. Press the [Menu] button and slide the [/] switch.
3. Slide the [/] switch to select <Focus> and press the [OK] button.
Setting the EIS (Electronic Image Stabilizer)
2. Press the [Menu] button and slide the [/] switch.
3. Slide the [/] switch to select <EIS> and press the [OK] button.
5050
Setting the White Balance
1. Slide [Mode Selector ] down to turn on the CAM.
2. Press the [Menu] button and slide the [/] switch.
3. Slide the [/] switch to select <White Balance> and press the [OK] button.
If you select <Auto>, no icon is displayed.
Setting the Program AE (Programmed Auto Exposure)
2. Press the [Menu] button and slide the [/] switch.
3. Slide the [/] switch to select <Program AE> and press the [OK] button.
5252
Setting the BLC (Backlight Compensation)
The Video Record screen appears.
2. Press the [Menu] button and slide the [/] switch.
3. Slide the [/] switch to select <BLC> and press the [OK] button.
On( ): Set the BLC function. Off: Cancel the BLC function.
Setting the Effect
2. Press the [Menu] button and slide the [/] switch.
3. Slide the [/] switch to select <Effect> and press the [OK] button.
5454
Setting the Digital Zoom
The Video Record screen appears.
2. Press the [Menu] button and slide the [/] switch.
3. Slide the [/] switch to select <Digital Zoom> and press the [OK] button.
On: Sets the Digital Zoom. (X100) Off: Cancels the Digital Zoom.
Photo Mode
Photo Mode : Capturing
Capturing Images
3. Press [Record /Stop] button to take pictures.
Photo Mode : Capturing
Zooming In and Out
2. Slide the [/] switch to select Photo mode and press the [OK] button.
Slide the [/] switch up to zoom out.
Slide the [/] switch down to zoom in.
Photo Mode : Viewing
Viewing Photo files on the LCD Monitor
2. Slide the [/] switch to select Photo mode and press the [OK] button.
3. Press the [Menu] button and slide the [/] switch.
4. Slide the [/] switch to find the photo you want to view.
Deleting Photo files
2. Slide the [/] switch to select Photo mode and press the [OK] button.
3. Press the [Menu] button and slide the [/] switch.
4. Slide the [/] switch to select the photo file you want to delete.
6060
Locking Photo files
You can lock important photo files so they can not be deleted.
2. Slide the [/] switch to select Photo mode and press the [OK] button.
3. Press the [Menu] button and slide the [/] switch.
4. Slide the [/] switch to select the photo file you want to lock.
2. Slide the [/] switch to select Photo mode and press the [OK] button.
3. Press the [Menu] button and slide the [/] switch.
4. Slide the [/] switch to select the photo file you want to print.
6. Slide the [/] switch to select <DPOF> and press the [OK] button.
Setting DPOF (Digital Print Order Format) Function
Copying Photo files
2. Slide the [/] switch to select Photo mode and press the [OK] button.
3. Press the [Menu] button and slide the [/] switch.
4. Slide the [/] switch to select the photo file you want to copy.
6. Slide the [/] switch to select <Copy To> and press the [OK] button.
Setting the Photo file Size
2. Slide the [/] switch to select Photo mode and press the [OK] button.
3. Press the [Menu] button and slide the [/] switch.
4. Slide the [/] switch to select <Size> and press the [OK] button.
You can select 800x600 or 640x480 size.
Setting the Light
and light icon is set to off state.
2. Slide the [/] switch to select Photo mode and press the [OK] button.
3. Press the [Menu] button and slide the [/] switch.
Photo Mode: Setting Various Functions
6565
Setting the Focus
Manual Focus
2. Slide the [/] switch to select Photo mode and press the [OK] button.
Setting the EIS (Electronic Image Stabilizer)
2. Slide the [/] switch to select Photo mode and press the [OK] button.
3. Press the [Menu] button and slide the [/] switch.
5. Slide the [/] switch to select the desired setting and
The icon of selected function is displayed.
Setting the White Balance
2. Slide the [/] switch to select Photo mode and press the [OK] button.
3. Press the [Menu] button and slide the [/] switch.
5. Slide the [/] switch to select the desired setting and
If you select <Auto>, no icon is displayed.
Setting the Program AE (Programmed Auto Exposure)
2. Slide the [/] switch to select Photo mode and press the [OK] button.
3. Press the [Menu] button and slide the [/] switch.
5. Slide the [/] switch to select the desired setting and press the [OK] button.
4. Slide the [/] switch to select <Program AE> and press the [OK] button.
Setting the BLC (Backlight Compensation)
< > is displayed.
2. Slide the [/] switch to select Photo mode and press the [OK] button.
3. Press the [Menu] button and slide the [/] switch.
4. Slide the [/] switch to select <BLC> and press the [OK] button.
Page
MP3 / Voice Recorder Mode / Using File Browser
MP3 Mode : Storing Music in the CAM
MP3 Mode : Playing
Playing Music files
1. Connect the earphones to the CAM.
2. Slide [Mode Selector] down to turn on the CAM and slide it down again.
5. Press the [OK] button again to stop hearing music.
MP3 Mode : Selecting Play Options
Setting Repeat Play
1. Connect the earphones to the CAM.
2. Slide [Mode Selector] down to turn on the CAM and slide it down again.
3. Slide the [/] switch to select MP3 mode and press the [OK] button.
Deleting Music files
You can delete the music file you want.
1. Slide [Mode Selector] down to turn on the CAM and slide it down again.
2. Slide the [ /] switch to select MP3 mode and press the [OK] button.
Locking Music files
You can lock important music files so they can not be deleted.
7676
1. Slide [Mode Selector] down to turn on the CAM and slide it down again.
2. Slide the [ /] switch to select MP3 mode and press the [OK] button.
Copying Music files
You can copy the music file to the internal or external memory.
2. Slide the [ /] switch to select MP3 mode and press the [OK] button.
4. Slide the [/] switch to select <Copy To> and press the [OK] button.
5. Slide the [/] switch to select from the following and
Voice Recorder Mode : Recording
Recording Voice
2. Slide the [ /] switch to select Voice Recorder mode and
3. Press the [Record/Stop] button to record voice.
4. Press the [Record/Stop] button to stop recording voice.
Voice Recorder Mode : Playing
00:00:12 / 00:05:12
Playing Voice files
The button and switch you use when playing the recording
You can hear the voice file connecting earphones.
Deleting Voice files
8080
You can delete voice files you no longer want.
2. Slide the [/] switch to select Voice Recorder mode and press the [OK] button.
8181
Locking Voice files
You can lock important voice files so they can not be deleted.
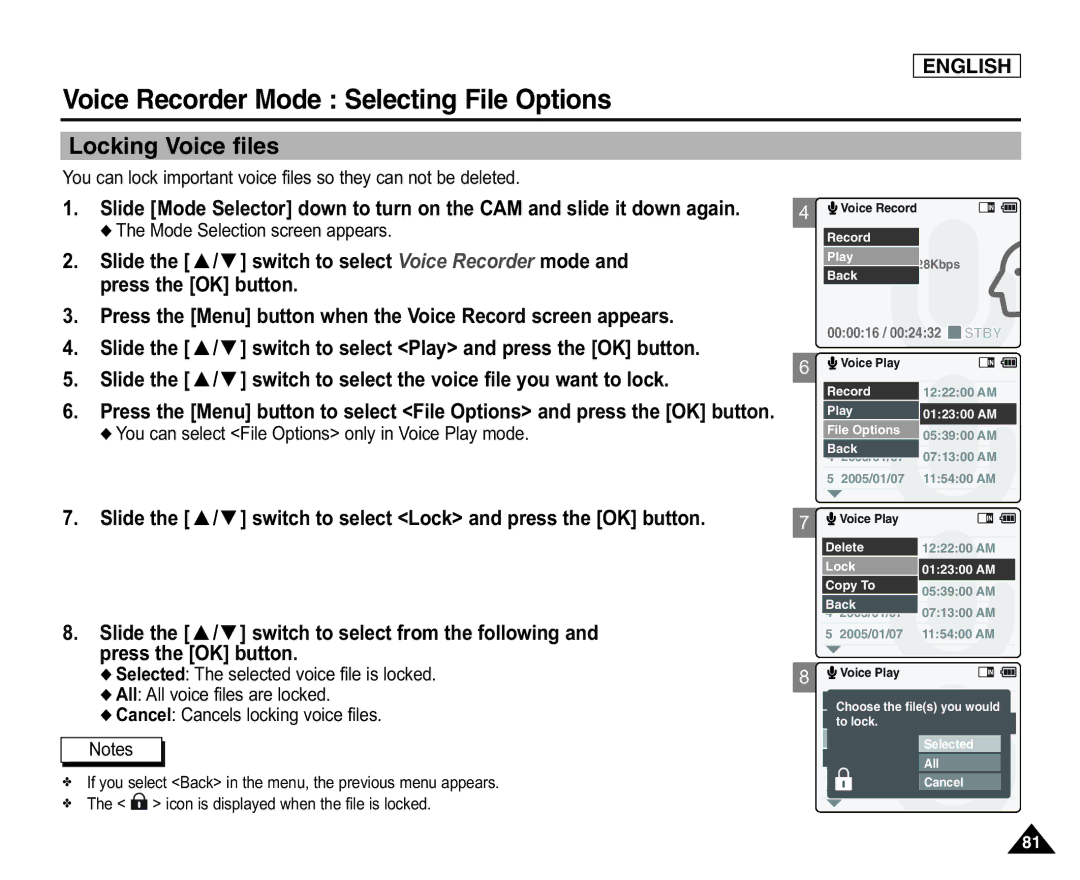
2. Slide the [/] switch to select Voice Recorder mode and press the [OK] button.
5. Slide the [/] switch to select the voice file you want to lock.
Copying Voice files
You can copy the voice file to the internal or external memory.
8282
2. Slide the [/] switch to select Voice Recorder mode and press the [OK] button.
5. Slide the [/] switch to select the voice file you want to copy.
Deleting Files or Folders
You can delete the file(AVI, MP3, JPEG, WAV) or folders you recorded.
8484
Locking Files
You can lock the important filesso they can not be deleted.
Perform these steps repeatedly until the file you want to lock appears.
8585
Copying Files or Folders
You can copy the file or folder to the internal or external memory.
3. Slide the [/] switch to select the folder to find the file you want to copy.
Slide the [/] switch to select <Copy To> and press the [OK] button.
5. Slide the [/] button to select from the following and
Viewing File Information
You can see the file name, format, size and date.
Perform these steps repeatedly until the file you want to see its file information appears.
5. Press the [OK] button to finish viewing file information.
If you select <Close> in the screen, the screen disappears.
Setting the CAM
Adjusting the LCD Monitor
8888
Setting the CAM : Adjusting the LCD Monitor
Adjusting the LCD Brightness
You can adjust the brightness of the LCD monitor to compensate for ambient lighting conditions.
You can adjust the LCD Brightness from 0%to 100%.
5. Slide the [/] switch to select the brightness you want.
Setting the CAM : Adjusting the LCD Monitor
Adjusting the LCD Color
If you select <Back> in the menu, the previous menu appears.
You can adjust the color of the LCD monitor depending on the situation.
You can adjust the LCD Color from 0%to 100%.
Setting Time
You can adjust the time.
9090
Slide the [/]switch to change the setting and press the [OK] button
to confirm selection and move to the next setting.
Setting Date
You can adjust the date.
Slide the [/]switch to change the setting and press the [OK] button
to confirm selection and move to the next setting.
Setting Date Format
You can select the date format to display.
Setting Time Format
You can select the time format to display.
9494
Setting the Auto Shut off
It can be only operated when you insert battery pack into the CAM.
To save battery power, you can set the Auto Shut off function.
2. Slide the [ /] switch to select System Settings and press the [OK] button.
9595
Setting the Demo Function
The Demo function allows you to view a demonstration of the functions that the CAM supports.
Setting Start-up Mode
You can select the start-up mode of the CAM.
Setting the File No. Function
2. Slide the [ /] switch to select System Settings and press the [OK] button.
9898
Setting the Beep Sound
the beep sound function does not operate.
You can set the beep sound on/off. When on, a beep will sound every time a button is pressed.
2. Slide the [ /] switch to select System Settings and press the [OK] button.
On: Turns the beep sound on. Off: Turns the beep sound off.
Viewing Version Information
You can view the firmware information.
2. Slide the [ /] switch to select System Settings and press the [OK] button.
4. Slide the [/] switch to select <Version Info> and press the [OK] button.
The version of the CAM is displayed.
Selecting the Storage Type
2. Slide the [ /] switch to select System Settings and press the [OK] button.
4. Slide the [/] switch to select <Storage Type> and press the [OK] button.
Formatting the Memory
2. Slide the [ /] switch to select System Settings and press the [OK] button.
4. Slide the [ /] switch to select <Format> and press the [OK] button.
5. Slide the [/] switch to select the desired setting and press the
6. Press the [OK] button to format.
Viewing Memory Space
You can view usable and total memory space of the CAM.
2. Slide the [ /] switch to select System Settings and press the [OK] button.
4. Slide the [/] switch to select <Memory Space>. 5. Press the [Back] button to finish setting.
Transferring Files from the CAM to your computer
1. Connect the CAM to the PC with the USB cable.
manually on Windows 98SE operating system.
4. Disconnect the USB cable if you finish transferring.
USB Speed depending on the System System Environment
Windows Environment Macintosh Environment
105105
Using PC Cam
1. Connect the CAM to the PC with the USB cable.
USB mode screen appears automatically.
3. Slide the [/] switch to select <PC-Cam> and press the [OK] button.
Software. Refer to the documentation of the respective software products.
Connecting the CAM to a Printer
1. Connect the CAM to the printer with PictBridge support with the USB cable.
8. Slide the [ /] switch to select <Print> and press the [OK] button.
Connecting the External Camera Module
Wearing the External Camera Module . . . . . . . . . . . 109
Using the External Camera Module (SC-X105L/X110L only)
Connecting the External Camera Module to CAM
Recording Video Using the External Camera Module
Using the External Camera Module : Connecting the External Camera
Connecting the extension cable while the set is in the Carrying Case
Mounting the External Camera Module on Rubber Mount
Using the External Camera Module : Wearing the External Camera
Using the Short and Long Mount Bands
Connecting the CAM with other Devices
Installing Programs
Printing Photos
Miscellaneous Information
Connecting the CAM to TV
Miscellaneous Information: Connecting the CAM with other Devices
Connecting the CAM to a VCR
Copying Video files to a VCR Tape
Recording unscramble contents from other digital devices
Connecting the CAM to a PC using the USB cable
Installing Image Mixer
Page
Installing software for using PC-Cam
Installing Windows98SE Driver (For Windows98SE only)
Miscellaneous Information: Connecting the CAM with other Devices
Disconnecting USB Connection
Miscellaneous Information: Printing Photos
122122
1. Connect the CAM to the PictBridge printer with the USB cable.
USB menu screen appears automatically.
You can select the number of copiesfrom 1 to 99.
Miscellaneous Information: Printing Photos
Printing Photos with DPOF Files
After using the CAM
Cleaning the Body
Using the Built-in Rechargeable Battery
Regarding the Battery
Using the CAM Abroad
Troubleshooting
Self Diagnosis Display
Troubleshooting
130130
Using the Menu
5. Back
3. Back
Video
1. Record 2. Video In 3. Play 4. File Options
Using the Menu
Voice Recorder File Browser System Settings USB Mode
Page
Specifications
Page
Index
Warranty (SEA users only)
SAMSUNG LIMITED WARRANTY
EXCLUSIONS (WHAT IS NOT COVERED)
Page
Page
Page
THE CAMCORDER IS MANUFACTURED BY: