Part Names and Functions

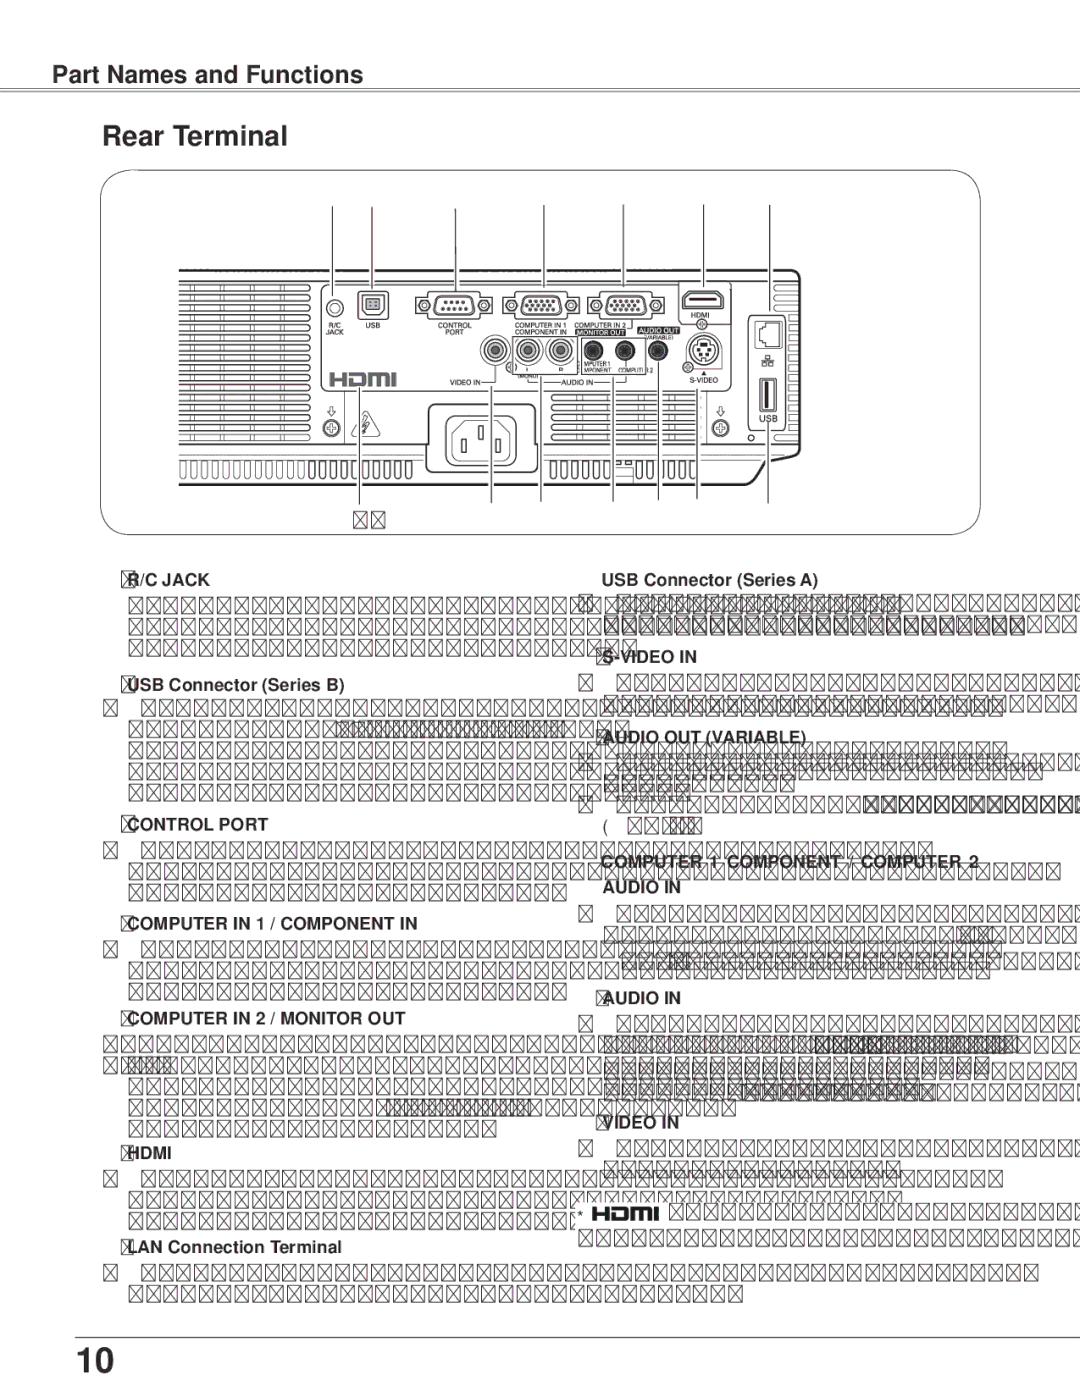
Rear Terminal


*

R/C JACK

When using the wired remote control, connect the wired remote control to this jack with a remote control cable (not supplied).

USB Connector (Series B)

In order to operate the computer with the remote control and use the PAGE ▲▼buttons on the remote control during a presentation, connect the USB port of the computer to the USB terminal with a USB cable (not supplied) (p.17).

CONTROL PORT

When controlling the projector with RS-232C, connect the control equipment to this connector with the serial control cable.

COMPUTER IN 1 / COMPONENT IN

Connect output signal from a computer, RGB scart 21-pin video output or component video output to this terminal (pp.17,19).

COMPUTER IN 2 / MONITOR OUT

Connect computer output to this terminal (p.17).

This terminal can be used to output the incoming analog RGB signal and component signals from COMPUTER IN 1/COMPONENT IN terminal to the other monitor (p.17).

HDMI

Connect the HDMI signal (including sound signal) from video equipment or the DVI signal from computer to this terminal (pp.17, 19).

LAN Connection Terminal

USB Connector (Series A)

Connect the USB menory (refer to the owner’s manual “Network Set-up and Operation”).

S-VIDEO IN

Connect the S-VIDEO output signal from video equipment to this jack (p.18).

AUDIO OUT (VARIABLE)

Connect an external audio amplifier to this jack (pp.17-19).

This terminal outputs sound from AUDIO IN terminal (or ).

COMPUTER 1 COMPONENT / COMPUTER 2 AUDIO IN

Connect the audio output (stereo) from a computer or video equipment connected to , or to this jack. (pp17, 19)

AUDIO IN

Connect the audio output signal from video equipment connected to or to this jack.

For a mono audio signal (a single audio jack), connect it to the L (MONO) jack (p.18).

VIDEO IN

Connect the composite video output signal to this jack (p.18).

* is registered trademarks of HDMI Licensing, LLC.

Connect the LAN cable (refer to the owner’s manual of “Network Set-up and Operation”).

10

Page 10
Image 10
Sanyo PLC-WXU700 Part Names and Functions, ② USB Connector Series B, ⑦ LAN Connection Terminal ⑧ USB Connector Series a

PLC-WXU700 specifications

The Sanyo PLC-WXU700 is a versatile and powerful projector designed to meet the demands of educational and corporate environments. As a high-performance device, it offers a blend of advanced features and technologies, making it suitable for various presentations, meetings, and classroom settings.

One of the main features of the PLC-WXU700 is its exceptional brightness, boasting an impressive 7000 lumens output. This enables the projector to deliver clear and vibrant images, even in well-lit rooms. Whether you are showcasing detailed presentations, video content, or intricate graphics, the high brightness ensures that your visuals remain sharp and easily viewable for all audiences.

The projector also supports WXGA resolution (1280 x 800 pixels), providing a clear and detailed image that enhances the viewing experience. The 16:10 aspect ratio is particularly beneficial for displaying widescreen content, making it a suitable choice for multimedia presentations. The PLC-WXU700 comes equipped with a high contrast ratio that helps in producing rich and vibrant colors, ensuring that images and videos appear lifelike and engaging.

Another significant aspect of the Sanyo PLC-WXU700 is its advanced lens technology, including a powerful zoom feature. The 1.6x optical zoom allows users to adjust the image size without sacrificing quality, making it easier to fit large images into various screen sizes or distances. This flexibility is invaluable in different room configurations, enabling seamless presentation setups.

Connectivity is another area where the PLC-WXU700 excels. It is equipped with multiple input options, including HDMI, VGA, and composite video connections. This variety allows users to connect various devices, such as laptops, DVD players, and document cameras, ensuring compatibility with a wide range of hardware.

The projector's durability and reliability are enhanced with features like a long-lasting lamp life, rated at up to 4000 hours in normal mode. This extends the time between lamp replacements, reducing maintenance costs and downtime. Additionally, its lightweight and compact design make it easy to transport between locations, ideal for professionals on the go.

In terms of user-friendliness, the PLC-WXU700 incorporates intuitive controls and an easy-to-navigate menu system, allowing users to quickly adjust settings and configurations according to their needs. This design focus ensures that both novice and experienced users can operate the projector with ease.

Overall, the Sanyo PLC-WXU700 stands out as a robust and reliable projector, with high brightness, excellent resolution, versatile connectivity, and user-friendly features. It is an ideal solution for anyone seeking top-notch presentation technology for educational and professional use.