USING THE REMOTE CONTROL UNIT

HOW TO INSTALL BATTERIES

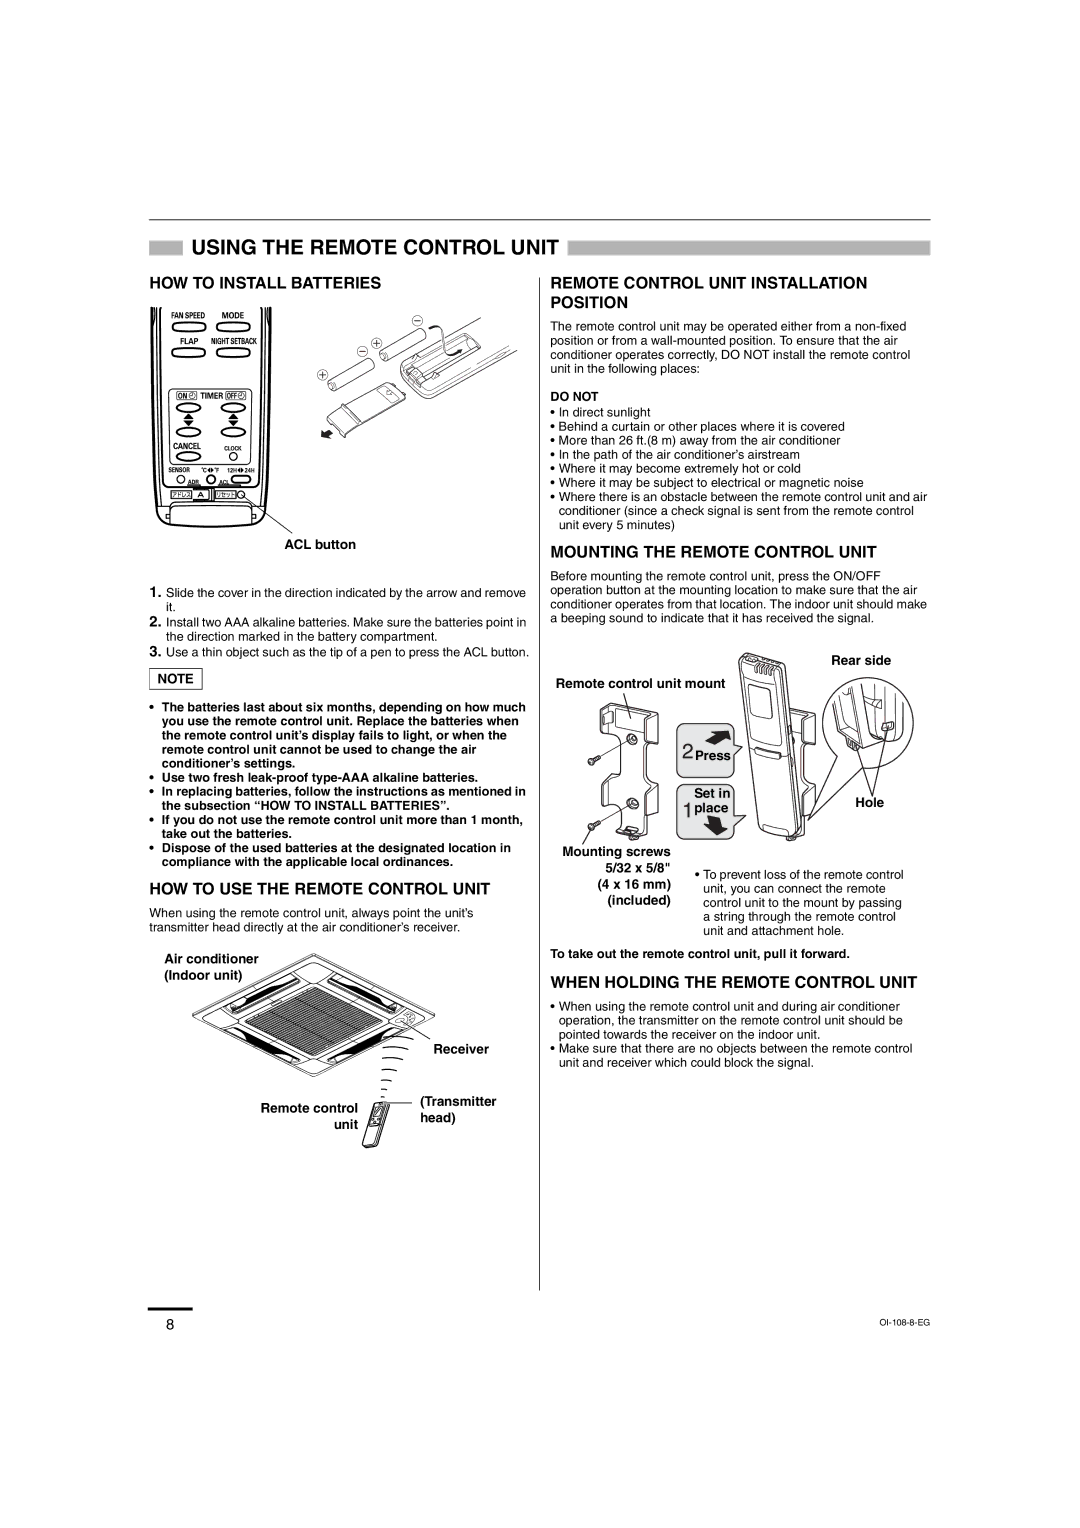
ACL button

1.Slide the cover in the direction indicated by the arrow and remove it.

2.Install two AAA alkaline batteries. Make sure the batteries point in the direction marked in the battery compartment.

3.Use a thin object such as the tip of a pen to press the ACL button.

NOTE

The batteries last about six months, depending on how much you use the remote control unit. Replace the batteries when the remote control unit’s display fails to light, or when the remote control unit cannot be used to change the air conditioner’s settings.

Use two fresh leak-proof type-AAA alkaline batteries.

In replacing batteries, follow the instructions as mentioned in the subsection “HOW TO INSTALL BATTERIES”.

If you do not use the remote control unit more than 1 month, take out the batteries.

Dispose of the used batteries at the designated location in compliance with the applicable local ordinances.

HOW TO USE THE REMOTE CONTROL UNIT

When using the remote control unit, always point the unit’s transmitter head directly at the air conditioner’s receiver.

Air conditioner (Indoor unit)


Receiver

Remote control

(Transmitter

head)

unit


REMOTE CONTROL UNIT INSTALLATION POSITION

The remote control unit may be operated either from a non-fixed position or from a wall-mounted position. To ensure that the air conditioner operates correctly, DO NOT install the remote control unit in the following places:

DO NOT

In direct sunlight

Behind a curtain or other places where it is covered

More than 26 ft.(8 m) away from the air conditioner

In the path of the air conditioner’s airstream

Where it may become extremely hot or cold

Where it may be subject to electrical or magnetic noise

Where there is an obstacle between the remote control unit and air conditioner (since a check signal is sent from the remote control unit every 5 minutes)

MOUNTING THE REMOTE CONTROL UNIT

Before mounting the remote control unit, press the ON/OFF operation button at the mounting location to make sure that the air conditioner operates from that location. The indoor unit should make a beeping sound to indicate that it has received the signal.

Rear side

Remote control unit mount


Press


Set in

Hole


place


Mounting screws


5/32 x 5/8"

• To prevent loss of the remote control

(4 x 16 mm)

unit, you can connect the remote

(included)

control unit to the mount by passing

a string through the remote control unit and attachment hole.

To take out the remote control unit, pull it forward.

WHEN HOLDING THE REMOTE CONTROL UNIT

When using the remote control unit and during air conditioner operation, the transmitter on the remote control unit should be pointed towards the receiver on the indoor unit.

Make sure that there are no objects between the remote control unit and receiver which could block the signal.

8

OI-108-8-EG


Page 63
Image 63
Sanyo XMS1272, XMS0972 service manual OI-108-8-EG

XMS1272, XMS0972 specifications

The Sanyo XMS0972 and XMS1272 are remarkable air conditioning units that blend efficiency with cutting-edge technology. Designed for residential and commercial spaces, these models promise comfort while optimizing energy consumption.

One of the standout features of both the XMS0972 and XMS1272 is their advanced inverter technology. This feature allows the units to adjust their cooling capacity based on the room's ambient temperature. As a result, the air conditioners can maintain a consistent temperature without the frequent on/off cycles associated with traditional units. This not only ensures a more stable climate but also significantly reduces energy consumption, making them eco-friendly options.

Another significant characteristic is the Quiet Operation mode. Both models are engineered with noise reduction technology, providing a tranquil environment for users. This is particularly beneficial for bedrooms, offices, or libraries where noise levels can be a concern. The XMS models operate at a whisper-quiet level, allowing users to focus on their tasks or enjoy a peaceful night's sleep without disruption.

The Sanyo XMS0972 and XMS1272 also feature a user-friendly digital interface. With an intuitive remote control and an easy-to-read display, setting your desired temperature or switching modes has never been easier. Moreover, the smart diagnostic capability allows for quick troubleshooting, helping to identify any issues to ensure peak performance throughout their lifespan.

Both models are equipped with a 24-hour timer, adding convenience for users who wish to come home to a pre-cooled or heated environment. This feature enhances comfort and saves energy when the unit is not in use.

In terms of design, the Sanyo XMS units boast a sleek and modern aesthetic that seamlessly integrates into various interior styles. Their compact size allows for flexible installation options, making them suitable for various living and working spaces.

The XMS line also emphasizes air purification, incorporating advanced filters that capture dust, allergens, and other pollutants. This results in not just temperature control but also improved air quality, contributing to a healthier living environment.

In conclusion, the Sanyo XMS0972 and XMS1272 air conditioning units stand out for their energy efficiency, quiet operation, user-friendly features, and air purification capabilities. These characteristics make them an ideal choice for individuals and businesses looking for reliable and sophisticated climate control solutions.