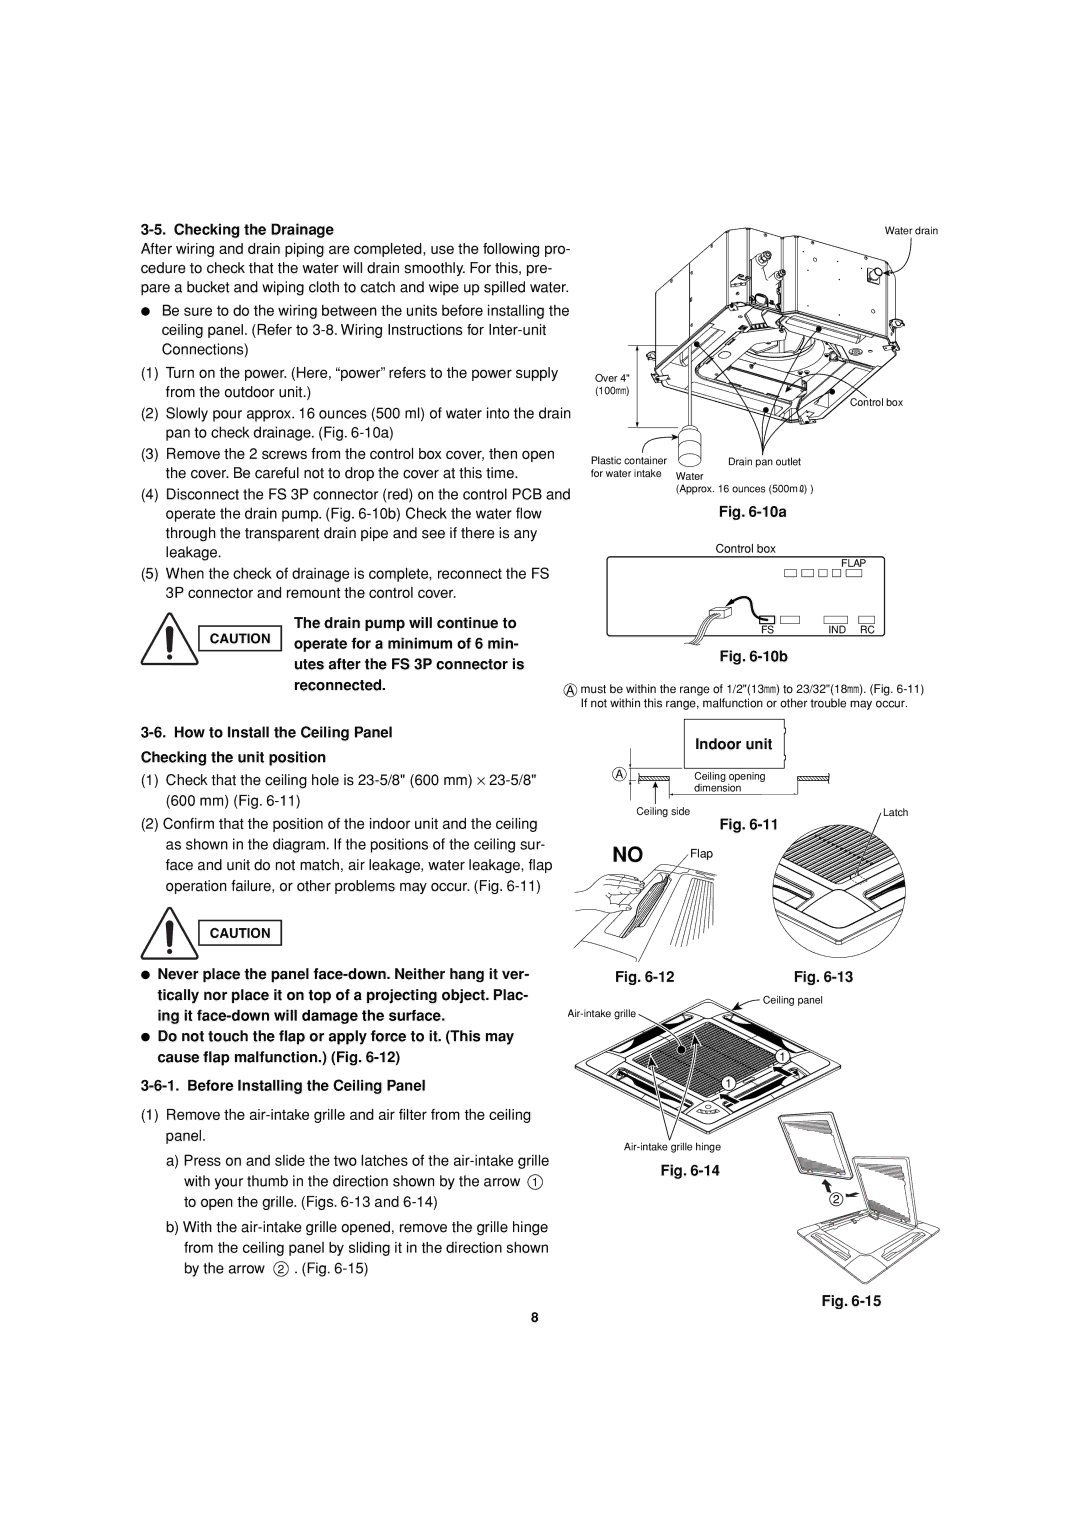
3-5. Checking the Drainage

After wiring and drain piping are completed, use the following pro- cedure to check that the water will drain smoothly. For this, pre- pare a bucket and wiping cloth to catch and wipe up spilled water.

Be sure to do the wiring between the units before installing the ceiling panel. (Refer to 3-8. Wiring Instructions for Inter-unit Connections)

(1)Turn on the power. (Here, “power” refers to the power supply from the outdoor unit.)

(2)Slowly pour approx. 16 ounces (500 ml) of water into the drain pan to check drainage. (Fig. 6-10a)

(3)Remove the 2 screws from the control box cover, then open the cover. Be careful not to drop the cover at this time.

(4)Disconnect the FS 3P connector (red) on the control PCB and operate the drain pump. (Fig. 6-10b) Check the water flow through the transparent drain pipe and see if there is any leakage.

(5)When the check of drainage is complete, reconnect the FS 3P connector and remount the control cover.

Water drain

Over 4"

(100mm)

Control box

Plastic container

Drain pan outlet

for water intake

Water


(Approx. 16 ounces (500m ) )

Fig. 6-10a

Control box

FLAP

CAUTION

The drain pump will continue to operate for a minimum of 6 min- utes after the FS 3P connector is reconnected.

FS

IND RC

Fig. 6-10b

Amust be within the range of 1/2"(13mm) to 23/32"(18mm). (Fig. 6-11) If not within this range, malfunction or other trouble may occur.

3-6. How to Install the Ceiling Panel

Checking the unit position

Indoor unit

(1)Check that the ceiling hole is 23-5/8" (600 mm) 23-5/8" (600 mm) (Fig. 6-11)

(2)Confirm that the position of the indoor unit and the ceiling as shown in the diagram. If the positions of the ceiling sur- face and unit do not match, air leakage, water leakage, flap operation failure, or other problems may occur. (Fig. 6-11)

ACeilingopening

dimension

Ceiling side

Latch

Fig. 6-11

NO Flap

CAUTION

Never place the panel face-down. Neither hang it ver- tically nor place it on top of a projecting object. Plac- ing it face-down will damage the surface.

Do not touch the flap or apply force to it. (This may cause flap malfunction.) (Fig. 6-12)

3-6-1. Before Installing the Ceiling Panel

(1)Remove the air-intake grille and air filter from the ceiling panel.

a)Press on and slide the two latches of the air-intake grille with your thumb in the direction shown by the arrow 1 to open the grille. (Figs. 6-13 and 6-14)

b)With the air-intake grille opened, remove the grille hinge from the ceiling panel by sliding it in the direction shown

by the arrow 2 . (Fig. 6-15)

Fig. 6-12

Fig. 6-13

Ceiling panel

Air-intake grille

1

1

Air-intake grille hinge

Fig. 6-14

2

Fig. 6-15

8

Page 79
Image 79
Sanyo XMS1272, XMS0972 service manual Checking the Drainage, 10a

XMS1272, XMS0972 specifications

The Sanyo XMS0972 and XMS1272 are remarkable air conditioning units that blend efficiency with cutting-edge technology. Designed for residential and commercial spaces, these models promise comfort while optimizing energy consumption.

One of the standout features of both the XMS0972 and XMS1272 is their advanced inverter technology. This feature allows the units to adjust their cooling capacity based on the room's ambient temperature. As a result, the air conditioners can maintain a consistent temperature without the frequent on/off cycles associated with traditional units. This not only ensures a more stable climate but also significantly reduces energy consumption, making them eco-friendly options.

Another significant characteristic is the Quiet Operation mode. Both models are engineered with noise reduction technology, providing a tranquil environment for users. This is particularly beneficial for bedrooms, offices, or libraries where noise levels can be a concern. The XMS models operate at a whisper-quiet level, allowing users to focus on their tasks or enjoy a peaceful night's sleep without disruption.

The Sanyo XMS0972 and XMS1272 also feature a user-friendly digital interface. With an intuitive remote control and an easy-to-read display, setting your desired temperature or switching modes has never been easier. Moreover, the smart diagnostic capability allows for quick troubleshooting, helping to identify any issues to ensure peak performance throughout their lifespan.

Both models are equipped with a 24-hour timer, adding convenience for users who wish to come home to a pre-cooled or heated environment. This feature enhances comfort and saves energy when the unit is not in use.

In terms of design, the Sanyo XMS units boast a sleek and modern aesthetic that seamlessly integrates into various interior styles. Their compact size allows for flexible installation options, making them suitable for various living and working spaces.

The XMS line also emphasizes air purification, incorporating advanced filters that capture dust, allergens, and other pollutants. This results in not just temperature control but also improved air quality, contributing to a healthier living environment.

In conclusion, the Sanyo XMS0972 and XMS1272 air conditioning units stand out for their energy efficiency, quiet operation, user-friendly features, and air purification capabilities. These characteristics make them an ideal choice for individuals and businesses looking for reliable and sophisticated climate control solutions.