3-6-5. Checking After Installation

Check that there are no gaps between the unit and the ceiling panel, or between the ceiling panel and the ceiling sur- face. Gaps may cause water leakage and condensation.

Check that the wiring is securely connected.

If it is not securely connected, the auto flap will not operate. In addition, water leakage and condensation may occur.

3-6-6. When Removing the Ceiling Panel for Servicing

When removing the ceiling panel for servicing, remove the air-intake grille and air filter, disconnect the flap and the indi- cator wiring connectors inside the control box, and then remove the 4 mounting screws.

3-6-7. Adjusting the Auto Flap

The air-direction flap on the ceiling panel outlet can be adjusted as follows.

Adjust the flap to the desired angle using the remote controller. The flap also has an automatic air-sweeping mecha- nism.

NOTE

Never attempt to move the flap by hand.

Proper air flow depends on the location of the air conditioner, the layout of the room and furniture, etc. If cooling or heating seems inadequate, try changing the direction of the air flow.

3-7. Wiring Instructions

General precautions on wiring

(1)Before wiring, confirm the rated voltage of the unit as shown on its nameplate, then carry out the wiring closely fol- lowing the wiring diagram.

(2)Provide a power outlet to be used exclusively for each unit, with a power supply disconnect and circuit breaker for overcurrent protection provided in the exclusive line.

(3)To prevent possible hazards due to insulation failure, the unit must be grounded.

(4)Each wiring connection must be done tightly and in accordance with the wiring system diagram. Wrong wiring may cause the unit to misoperate or become damaged.

(5)Do not allow wiring to touch the refrigerant tubing, compressor, or any moving parts of the fan.

(6)Unauthorized changes in the internal wiring can be very dangerous. The manufacturer will accept no responsibility for any damage or misoperation that occurs as a result of such unauthorized changes.

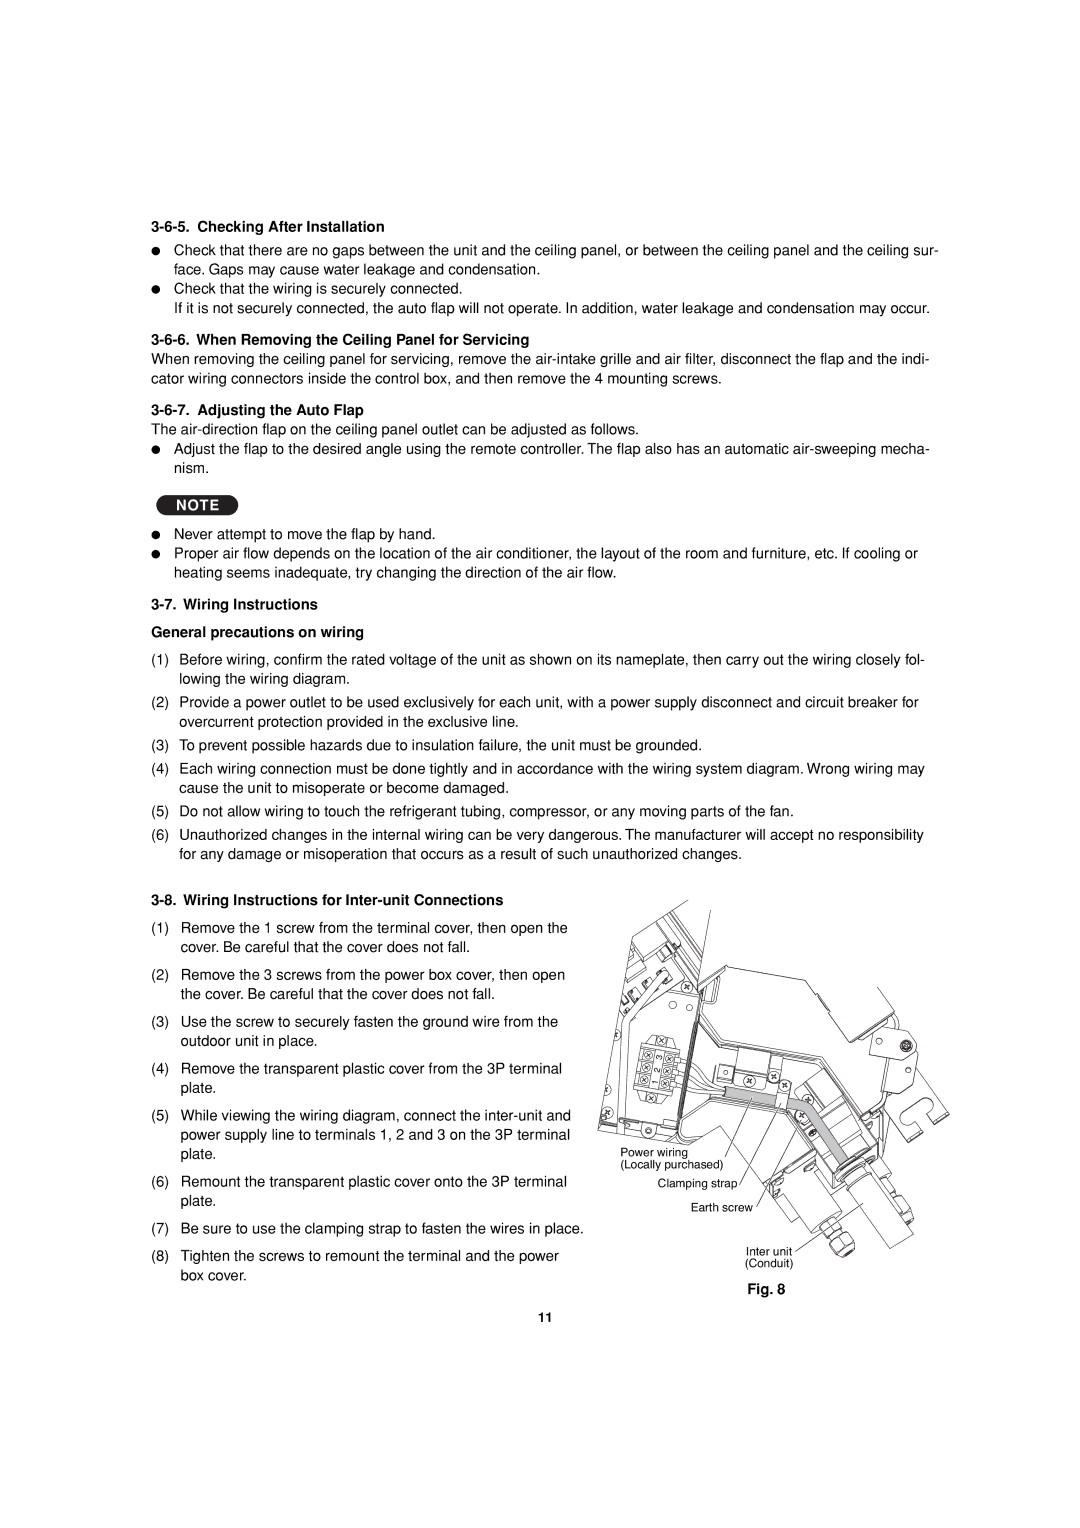
3-8. Wiring Instructions for Inter-unit Connections

(1)Remove the 1 screw from the terminal cover, then open the cover. Be careful that the cover does not fall.

(2)Remove the 3 screws from the power box cover, then open the cover. Be careful that the cover does not fall.

(3)Use the screw to securely fasten the ground wire from the outdoor unit in place.

(4)Remove the transparent plastic cover from the 3P terminal plate.

(5)While viewing the wiring diagram, connect the inter-unit and power supply line to terminals 1, 2 and 3 on the 3P terminal plate.

(6)Remount the transparent plastic cover onto the 3P terminal plate.

(7)Be sure to use the clamping strap to fasten the wires in place.

(8)Tighten the screws to remount the terminal and the power box cover.

Power wiring (Locally purchased)

Clamping strap

Earth screw

Inter unit (Conduit)

Fig. 8

11

Page 82
Image 82
Sanyo XMS0972, XMS1272 Checking After Installation, When Removing the Ceiling Panel for Servicing, Adjusting the Auto Flap

XMS1272, XMS0972 specifications

The Sanyo XMS0972 and XMS1272 are remarkable air conditioning units that blend efficiency with cutting-edge technology. Designed for residential and commercial spaces, these models promise comfort while optimizing energy consumption.

One of the standout features of both the XMS0972 and XMS1272 is their advanced inverter technology. This feature allows the units to adjust their cooling capacity based on the room's ambient temperature. As a result, the air conditioners can maintain a consistent temperature without the frequent on/off cycles associated with traditional units. This not only ensures a more stable climate but also significantly reduces energy consumption, making them eco-friendly options.

Another significant characteristic is the Quiet Operation mode. Both models are engineered with noise reduction technology, providing a tranquil environment for users. This is particularly beneficial for bedrooms, offices, or libraries where noise levels can be a concern. The XMS models operate at a whisper-quiet level, allowing users to focus on their tasks or enjoy a peaceful night's sleep without disruption.

The Sanyo XMS0972 and XMS1272 also feature a user-friendly digital interface. With an intuitive remote control and an easy-to-read display, setting your desired temperature or switching modes has never been easier. Moreover, the smart diagnostic capability allows for quick troubleshooting, helping to identify any issues to ensure peak performance throughout their lifespan.

Both models are equipped with a 24-hour timer, adding convenience for users who wish to come home to a pre-cooled or heated environment. This feature enhances comfort and saves energy when the unit is not in use.

In terms of design, the Sanyo XMS units boast a sleek and modern aesthetic that seamlessly integrates into various interior styles. Their compact size allows for flexible installation options, making them suitable for various living and working spaces.

The XMS line also emphasizes air purification, incorporating advanced filters that capture dust, allergens, and other pollutants. This results in not just temperature control but also improved air quality, contributing to a healthier living environment.

In conclusion, the Sanyo XMS0972 and XMS1272 air conditioning units stand out for their energy efficiency, quiet operation, user-friendly features, and air purification capabilities. These characteristics make them an ideal choice for individuals and businesses looking for reliable and sophisticated climate control solutions.