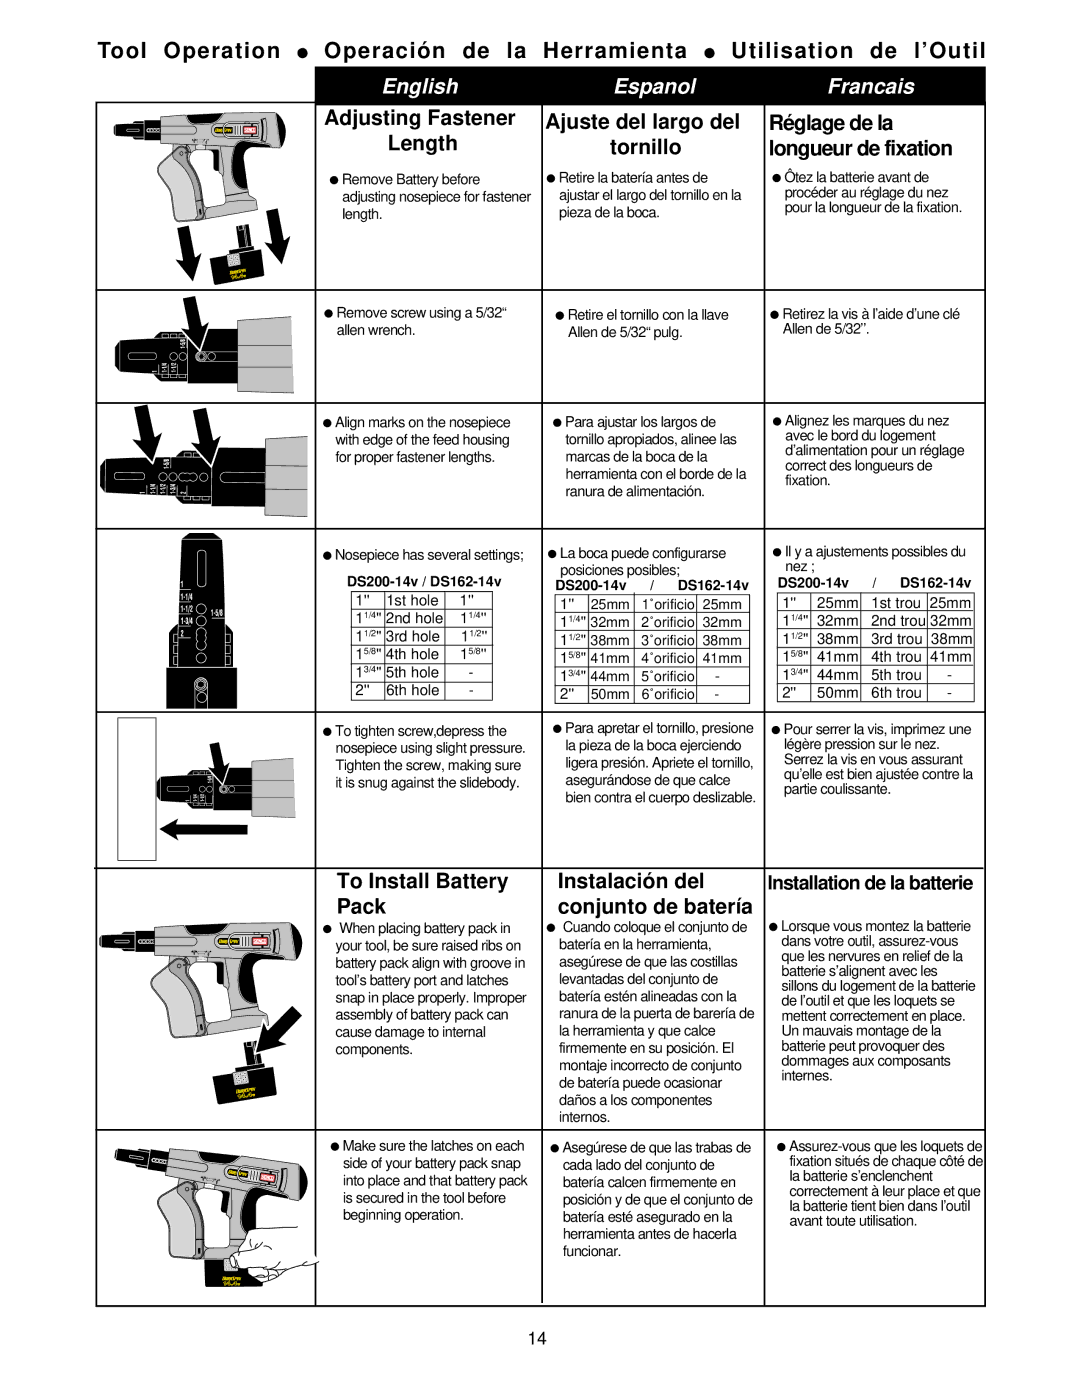
Tool Operation Operació n de la Herramienta Utilisation de l’Outil


English

Espanol

Francais


Adjusting Fastener

Ajuste del largo del

Ré glage de la


Length

tornillo

longueur de fixation


Remove Battery before

Retire la batería antes de

Ôtez la batterie avant de


adjusting nosepiece for fastener

ajustar el largo del tornillo en la

procéder au réglage du nez


length.

pieza de la boca.

pour la longueur de la fixation.


Remove screw using a 5/32“

Retire el tornillo con la llave

Retirez la vis à l’aide d’une clé

allen wrench.

Allen de 5/32“ pulg.

Allen de 5/32’’.


Align marks on the nosepiece

Para ajustar los largos de

Alignez les marques du nez


with edge of the feed housing


tornillo apropiados, alinee las


avec le bord du logement


for proper fastener lengths.


marcas de la boca de la


d’alimentation pour un réglage


correct des longueurs de


herramienta con el borde de la


fixation.


ranura de alimentación.


Nosepiece has several settings;

La boca puede configurarse

Il y a ajustements possibles du


DS200-14v / DS162-14v


posiciones posibles;


nez ;


DS200-14v

/ DS162-14v


DS200-14v

/ DS162-14v


1''

1st hole

1''


1''


25mm

1st trou

25mm


1''

25mm

1˚orificio

25mm


11/4''

2nd hole

11/4''


11/4''

32mm

2˚orificio

32mm


11/4''


32mm

2nd trou

32mm


11/2''

3rd hole

11/2''


11/2''

38mm

3˚orificio

38mm


11/2''


38mm

3rd trou

38mm


15/8''

4th hole

15/8''


15/8''

41mm

4˚orificio

41mm


15/8''


41mm

4th trou

41mm


13/4''

5th hole

-


13/4''

44mm

5˚orificio


-


13/4''


44mm

5th trou

-


2''

6th hole

-


2''


50mm

6th trou

-


2''

50mm

6˚orificio


-


To tighten screw,depress the

Para apretar el tornillo, presione

Pour serrer la vis, imprimez une


nosepiece using slight pressure.


la pieza de la boca ejerciendo


légère pression sur le nez.


Tighten the screw, making sure


ligera presión. Apriete el tornillo,


Serrez la vis en vous assurant


it is snug against the slidebody.


asegurándose de que calce


qu’elle est bien ajustée contre la


partie coulissante.


bien contra el cuerpo deslizable.


To Install Battery

Instalació n del

Installation de la batterie


Pack

conjunto de batería

Lorsque vous montez la batterie


When placing battery pack in

Cuando coloque el conjunto de


your tool, be sure raised ribs on

batería en la herramienta,

dans votre outil, assurez-vous


battery pack align with groove in

asegúrese de que las costillas

que les nervures en relief de la


batterie s’alignent avec les


tool’s battery port and latches

levantadas del conjunto de


sillons du logement de la batterie


snap in place properly. Improper

batería estén alineadas con la


de l’outil et que les loquets se


assembly of battery pack can

ranura de la puerta de barería de

mettent correctement en place.


cause damage to internal

la herramienta y que calce

Un mauvais montage de la


components.

firmemente en su posición. El

batterie peut provoquer des


montaje incorrecto de conjunto

dommages aux composants


internes.


de batería puede ocasionar


daños a los componentes


internos.


Make sure the latches on each

Asegúrese de que las trabas de

Assurez-vous que les loquets de


side of your battery pack snap

cada lado del conjunto de

fixation situés de chaque côté de


into place and that battery pack

batería calcen firmemente en

la batterie s’enclenchent


is secured in the tool before

posición y de que el conjunto de

correctement à leur place et que


la batterie tient bien dans l’outil


beginning operation.

batería esté asegurado en la


avant toute utilisation.


herramienta antes de hacerla


funcionar.


14

Page 14
Image 14
Senco NFD880 operating instructions Installation de la batterie, DS200-14v / DS162-14v, DS200-14v DS162-14v

NFD880 specifications

The Senco NFD880 is an innovative pneumatic nail gun designed to enhance productivity and efficiency for professionals in the construction and woodworking industries. With its combination of advanced features, cutting-edge technologies, and robust design, the NFD880 stands out as a reliable tool for tackling various framing, sheathing, and other nailing tasks.

One of the key features of the Senco NFD880 is its lightweight yet durable construction. Weighing just over 6 pounds, this nail gun is easy to maneuver, allowing users to work for extended periods without experiencing significant fatigue. Its balanced design contributes to a natural feel in the hand, aiding precision during operation.

The NFD880 is compatible with 21-degree plastic collated framing nails ranging from 2 to 3-1/4 inches, making it versatile enough for various applications. This capability allows professionals to tackle everything from building frames to installing sheathing quickly and efficiently.

Equipped with Senco’s patented Dual Technology, the NFD880 offers both sequential and bump fire modes. This feature enables users to switch between precise nailing and rapid-fire nailing with ease, providing the flexibility needed for different project requirements. The adjustable depth-of-drive setting further enhances control, allowing for consistent nail placement regardless of material thickness.

The tool’s durable magazine is designed for efficient loading and can hold up to 75 nails. This reduces downtime during projects, as users can maintain a smooth workflow with fewer interruptions for reloading. Additionally, the NFD880 includes a unique rear-loading mechanism that simplifies the reloading process.

Another noteworthy characteristic of the Senco NFD880 is its integrated air duster, which can blow away debris from the work surface. This feature not only improves visibility for precision work but also contributes to overall safety. The tool is engineered with an ergonomic grip that minimizes vibrations and provides a secure hold, enhancing user comfort during long hours of use.

Finally, the Senco NFD880 boasts a robust safety mechanism, including a fully enclosed trigger guard and a safety tip that prevents accidental firing, ensuring safe operation even in demanding environments. This combination of features, technologies, and thoughtful design positions the Senco NFD880 as a top choice among professional contractors and DIY enthusiasts alike, showcasing its ability to deliver exceptional performance and reliability on the job.