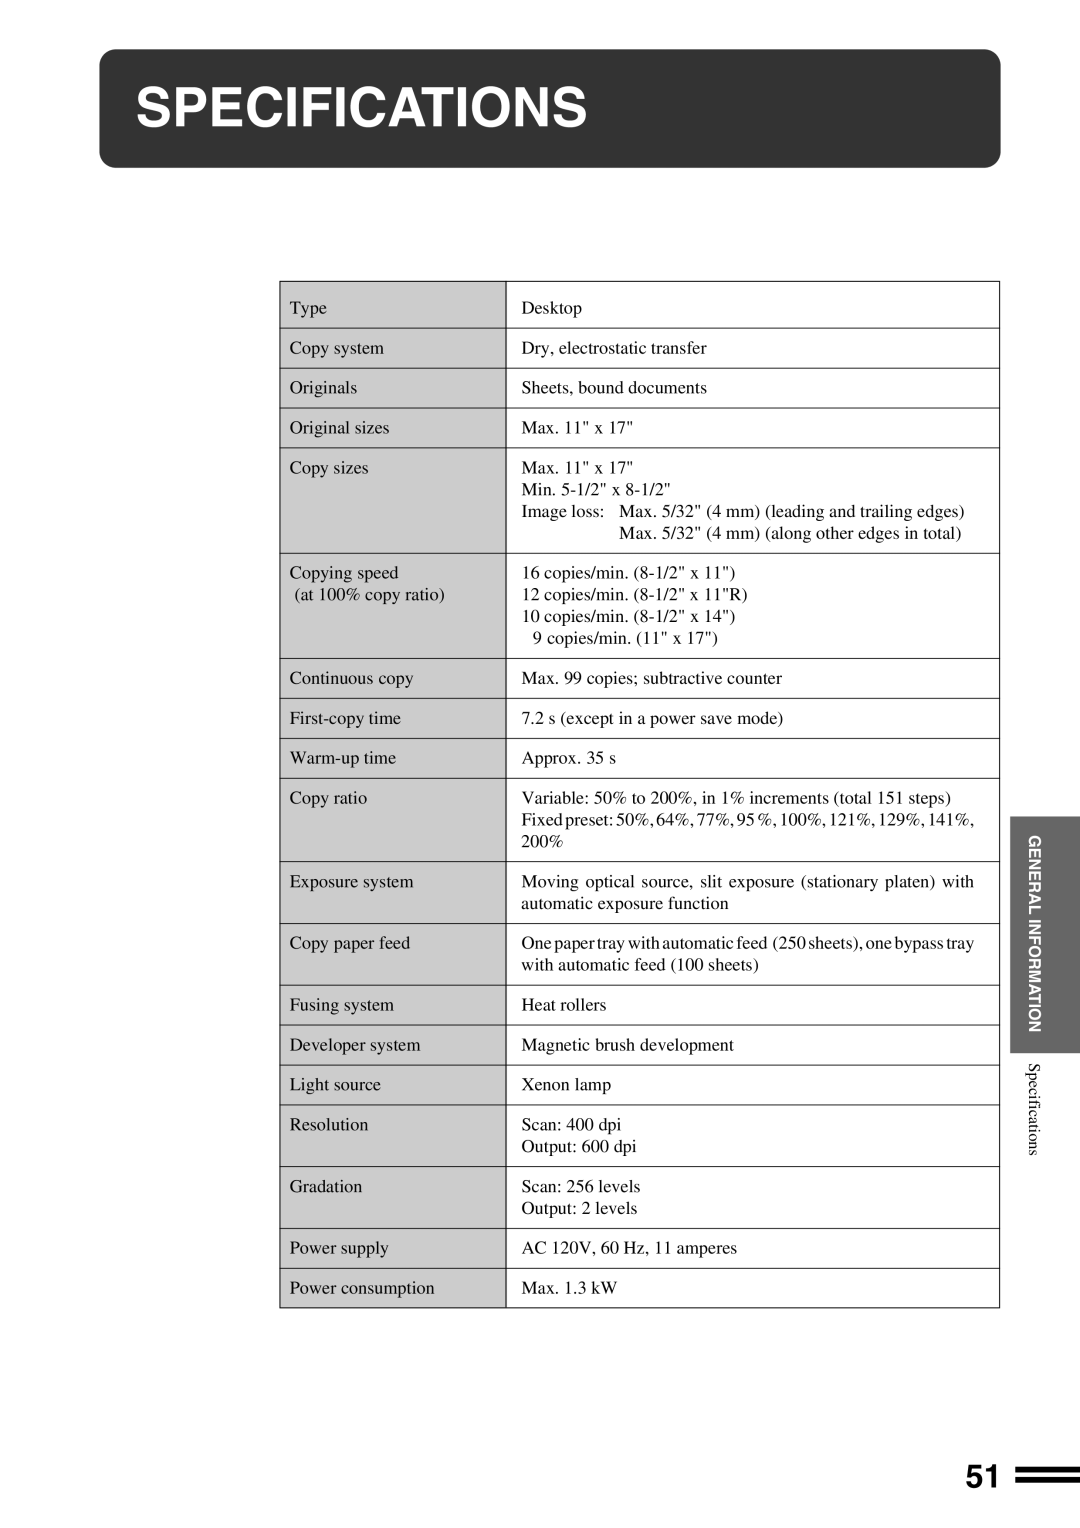
Page
MODEL
STATUS INDICATORS
AR-162S
CAUTIONS
SAFETY PRECAUTIONS
FOR YOUR RECORDS
AR-162S
STATUS INDICATORS
CONTENTS Page
GETTING STARTED
MAKING COPIES
Conventions used in this manual
INTRODUCTION
Substantial copying features
MAIN FEATURES
Optional feature
High-speed laser copying
Overall layout
PART NAMES AND FUNCTIONS
Fusing unit release levers
PART NAMES AND FUNCTIONS
Accessories
Toner cartridge lock release lever
PART NAMES AND FUNCTIONS
Operation panel
Zero key
PART NAMES AND FUNCTIONS
COPIER INSTALLATION
CAUTIONS ON HANDLING
1 Gently lift and pull out the paper tray until it stops
LOADING COPY PAPER
Push the pressure plate down until it locks in place
4 Push the paper tray firmly back into the copier
Squeeze the lock lever of the front guide and slide the
LOADING COPY PAPER
3 front guide to match the width of the paper
Left guide
Use the ORIGINAL SIZE ENTER key to select the paper size which is set
To set the selected paper size, press the PAPER SIZE ENTER key
Press the START key and then the PAPER SIZE ENTER key
If copying is being performed, paper size setting cannot be made
AUDITING ACCOUNTS
Enter your account number using the numeric keys
When copying is completed, press the AUDIT CLEAR 2 key
Adjust the copy density
Turn the power switch on
NORMAL COPYING
Close the platen cover
Set the number of copies using the numeric keys
How to remove the platen cover
NORMAL COPYING
Press the START key
Automatic
REDUCTION/ENLARGEMENT/ZOOM
Place the original on the original table and close the 1 platen cover
Press the AUTO IMAGE key
Ensure that copy paper of the desired size is installed in
Use the PRESET RATIO selector , keys and the
REDUCTION/ENLARGEMENT/ZOOM
Manual
Set the paper guides to the copy paper width
BYPASS FEED special paper
1 Unfold the bypass tray
5 the number of copies if using standard copy paper or envelopes
Leave the copy quantity at 0 if using special papers. Set
BYPASS FEED special paper
4 Press the TRAY SELECT key to select the bypass tray
Use the TRAY SELECT key to select the bypass tray Press the START key
TWO-SIDED COPYING
Place the first original on the original table and make a copy
XY ZOOM
Use the PRESET RATIO selector , keys and zoom
Press the XY-ZOOM key
3 , keys to change the copy ratio in the vertical direction
7 the paper tray
XY ZOOM
8 Set the number of copies 9 Press the START key
Use the PRESET RATIO selector , keys and zoom
Press the B/W REVERSE key Check the copy paper size
B/W REVERSE
Make all other desired copier selections and press the START key
Place the original on the original table and close the 1 platen cover
Set the number of copies Press the START key
DUAL PAGE COPY
Press the DUAL PAGE COPY key
When all INTERRUPT copies are finished, press the
When the copier stops, remove the originals and set
INTERRUPTING A COPY RUN
Press the INTERRUPT key
Press the AUTO/MANUAL/PHOTO key
AUTOMATIC EXPOSURE ADJUSTMENT
Press the AUTO/MANUAL/PHOTO key to select the PHOTO mode
Press the AUTO/MANUAL/PHOTO key to select the MANUAL mode
TONER SAVE MODE
To enter the toner save mode, press the light key
Toner save mode
Open the bypass tray. Lift slightly on the side cover and
TONER CARTRIDGE REPLACEMENT
1 slide the cover out until it stops
2 Push gently on both sides of the front cover and open it
1 seconds until all the alarm indicators
TONER CARTRIDGE REPLACEMENT
Toner cartridge life
Gently insert the toner cartridge along the guides until
Misfeed in the bypass tray
MISFEED REMOVAL
Misfeed in the copier
First confirm the misfeed location
MISFEED REMOVAL
B. Misfeed in the fusing area
Misfeed in the paper feed area
Check the misfeed location. Remove the misfed paper
C. Misfeed in the transport area
Carefully remove the misfed paper. Lower the fusing
Turn the roller rotating knob in the direction of the 2 arrow
Open the paper guide by pressing down the projection
Close the side cover by pressing the handle on the 3 cover
Misfeed in the paper tray
Gently lift and pull out the paper tray and remove the 1 misfed paper
2 Close the paper tray
DEVELOPER REQUIRED
MAINTENANCE REQUIRED
List of user programs
USER PROGRAMS
Enter a program number using the numeric keys
Setting the user programs
USER PROGRAMS
1 seconds until all the alarm indicators
Press the START key
To continue with other user programs, press the key
USER PROGRAMS
Program No. 10 Auditing mode
Settings for auditing accounts
1. Select the desired setting using the numeric keys
1. Enter a 3-digit account number using the numeric keys
USER PROGRAMS Program No. 12 Account number change
3. Enter a new account number using the numeric keys
Program No. 13 Account number deletion
1. Use the copy ratio display key to select the account
1. Use the copy ratio display key to select the account number
USER PROGRAMS Program No. 14 Number of copies per account
2. Press and hold down the 0 key
Example 1,234 copies
1. To reset an individual account, press the 0 key
USER PROGRAMS Program No. 15 Resetting account
To reset all accounts, press key 2. Press the START key
number to be reset
Auto power shut-off mode
POWER SAVE MODES
Preheat mode
Copying from the preheat mode
POWER SAVE MODES
Setting the power save modes
Bypass tray paper feed roller
USER MAINTENANCE
Original table and platen cover
Transfer charger cleaning
USER MAINTENANCE
1 Turn the power switch off
3 charger cleaner out by holding the tab
COPIER TROUBLE?
Problem
Solution
Problem
COPIER TROUBLE?
Solution
GENERAL INFORMATION Copier trouble?
Problem
Self-diagnostic function
Solution
COPIER TROUBLE?
Types and sizes of copy paper
SUPPLIES
Genuine supplies statement
SUPPLIES
Proper storage
1. Store the supplies in a location that is
GENERAL
SPECIFICATIONS
SPECIFICATIONS
OPTIONAL EQUIPMENT
CONTENTS
PART NAMES
Specifications
SINGLE PASS FEEDER AR-SP2
EQUIPMENTOPTIONAL
Single pass feeder AR -SP2
4 misfeed location indicator
Open and close the document feeder cover to cancel the
SINGLE PASS FEEDER AR-SP2
Misfeed removal
INDEX
INDEX
Section 1. Product Identification
MATERIAL SAFETY DATA SHEET
Section 2. Supplier’s Name and Address
Section 3. Ingredients
Section 9. Precautions for Safe Handling and Use
Section 6. Physical Chemical Characteristics
Section 7. Fire and Explosion Data
Section 8. Reactivity Data
Product Identification
Section
Supplier’s Name and Address
Ingredients
Section 9. Precautions for Safe Handling and Use
Section 6. Physical Chemical Characteristics
Section 7. Fire and Explosion Data
Section 8. Reactivity Data
MEMO
MEMO
AR-162S Digital Laser Copier
AR-162S
PRINTED IN CHINA
SHARP CORPORATION
SHARP ELECTRONICS CORPORATION