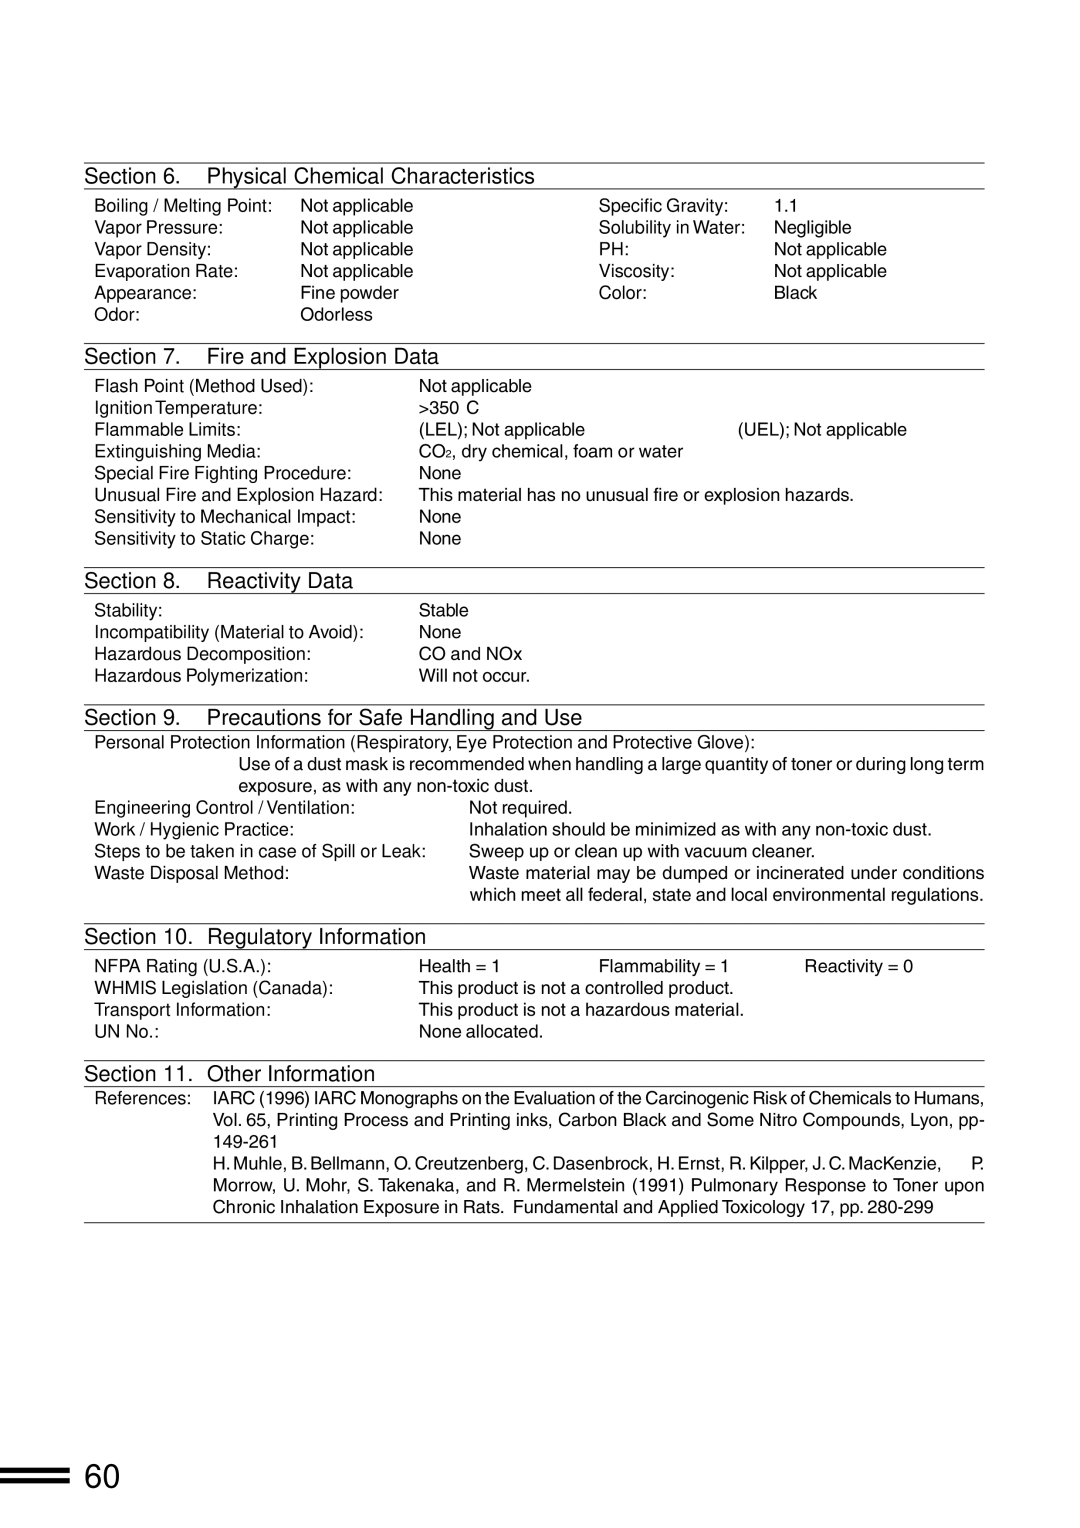
Section 6. Physical Chemical Characteristics
Boiling / Melting Point: | Not applicable | Specific Gravity: | 1.1 |
Vapor Pressure: | Not applicable | Solubility in Water: | Negligible |
Vapor Density: | Not applicable | PH: | Not applicable |
Evaporation Rate: | Not applicable | Viscosity: | Not applicable |
Appearance: | Fine powder | Color: | Black |
Odor: | Odorless |
|
|
Section 7. Fire and Explosion Data
Flash Point (Method Used): | Not applicable |
|
Ignition Temperature: | >350°C |
|
Flammable Limits: | (LEL); Not applicable | (UEL); Not applicable |
Extinguishing Media: | CO2, dry chemical, foam or water |
|
Special Fire Fighting Procedure: | None |
|
Unusual Fire and Explosion Hazard: | This material has no unusual fire or explosion hazards. | |
Sensitivity to Mechanical Impact: | None |
|
Sensitivity to Static Charge: | None |
|
Section 8. Reactivity Data
Stability: | Stable |
Incompatibility (Material to Avoid): | None |
Hazardous Decomposition: | CO and NOx |
Hazardous Polymerization: | Will not occur. |
Section 9. Precautions for Safe Handling and Use
Personal Protection Information (Respiratory, Eye Protection and Protective Glove):
Use of a dust mask is recommended when handling a large quantity of toner or during long term exposure, as with any
Engineering Control / Ventilation: | Not required. |
Work / Hygienic Practice: | Inhalation should be minimized as with any |
Steps to be taken in case of Spill or Leak: Sweep up or clean up with vacuum cleaner. | |
Waste Disposal Method: | Waste material may be dumped or incinerated under conditions |
| which meet all federal, state and local environmental regulations. |
Section 10. Regulatory Information
NFPA Rating (U.S.A.): | Health = 1 | Flammability = 1 | Reactivity = 0 |
WHMIS Legislation (Canada): | This product is not a controlled product. |
| |
Transport Information: | This product is not a hazardous material. |
| |
UN No.: | None allocated. |
|
|
Section 11. Other Information
References: IARC (1996) IARC Monographs on the Evaluation of the Carcinogenic Risk of Chemicals to Humans, Vol. 65, Printing Process and Printing inks, Carbon Black and Some Nitro Compounds, Lyon, pp-
H. Muhle, B. Bellmann, O. Creutzenberg, C. Dasenbrock, H. Ernst, R. Kilpper, J. C. MacKenzie, P. Morrow, U. Mohr, S. Takenaka, and R. Mermelstein (1991) Pulmonary Response to Toner upon Chronic Inhalation Exposure in Rats. Fundamental and Applied Toxicology 17, pp.
60