AR-203E
Bank drafts
Important points when selecting an installation site
20 cm
Laser information
Store paper in the wrapper and lying flat
Contents
Using the Manual
Conventions used in the manual
AR-203E
Part Names
SPF as an option
Exposure mode selector key and indicators
Operation Panel
Type of paper Type of media Size Weight Feeding
Paper
Loading the Paper Tray
Gently push the paper tray back into the unit
Multi-bypass tray
Open the multi-bypass tray and extend the tray
Press the tray select key to select the multi-bypass tray
Copy Flow
Turn on the unit p.13
Start copying
Connecting the Power Cord
Power on
Power off methods
Initial settings of operation panel
About the scan head
Setting a large original
Original Placement
Using the original table
Open the original cover, and place the original
Using the SPF
Original feeder tray
Exposure ADJUSTMENT/PHOTO Copying
Exposure adjustment
SET the Copy Quantity
Automatic exposure adjustment
Set the reduction/enlargement ratio
REDUCTION/ENLARGEMENT/ZOOM
Selecting the tray
Press the tray select key
Sharpdesk
Software
MFP driver
Button Manager
Before Installation
Installation environment and usable software
Hardware and software requirements
Installing the Software
Using the machine with a USB connection
Double-click the setup icon
Select Connected to this computer and click the Next button
When installing is finished, click the Close button
This completes the installation of the software
Connecting a USB cable
Using the machine as a shared printer
Insert the cable into the USB connector on the machine
Click the Printer Driver button
You will return to the window of . Click the Close button
Online indicator
Indicators on the Operation Panel
Start indicator
Power save indicator
Using the Printer Mode
Opening the printer driver from the start menu
Click Printing Preferences button in the General tab
How to print
About interrupt copying
Using the Scanner Mode
Using the Button Manager
Setting up the Button Manager Windows XP/Vista
Windows 98/Me/2000
Select Sharp AR-xxxx, and click the Properties button
Properties screen, click Events tab
Scan Button Destination Setting Dialog Box
Flow of the Button Manager setting
Scanner Event
Press the right copy quantity
Using the Scan key to begin scanning
Press the Scan key
Application Application launched Number
Opening the scanner driver and scanning from your computer
Press the start Key
Scan is started
Scanning with the Scanner and Camera Wizard in Windows XP
Select a name, format, and folder for the scanned image
Click Finish in the screen that appears
HOW to USE the Online Manual
Toner Save Mode
Description of Special Functions
Setting the user programs
User Programs
Press the light Key to return to the normal copy mode
Displaying Total Number of Copies
Maintenance
Toner Cartridge Replacement
Release lever
Gently pull the toner cartridge
Out while pressing the lock
Release lever
Press the light key
Toner Cartridge Life
Seconds
As a percentage 100, 75, 50, 25 or 10 is displayed. When
Cleaning the Unit
Cabinet
Transfer charger
Troubleshooting the Unit
Troubleshooting
Status Indicators
Be sure to use only genuine Sharp parts and supplies
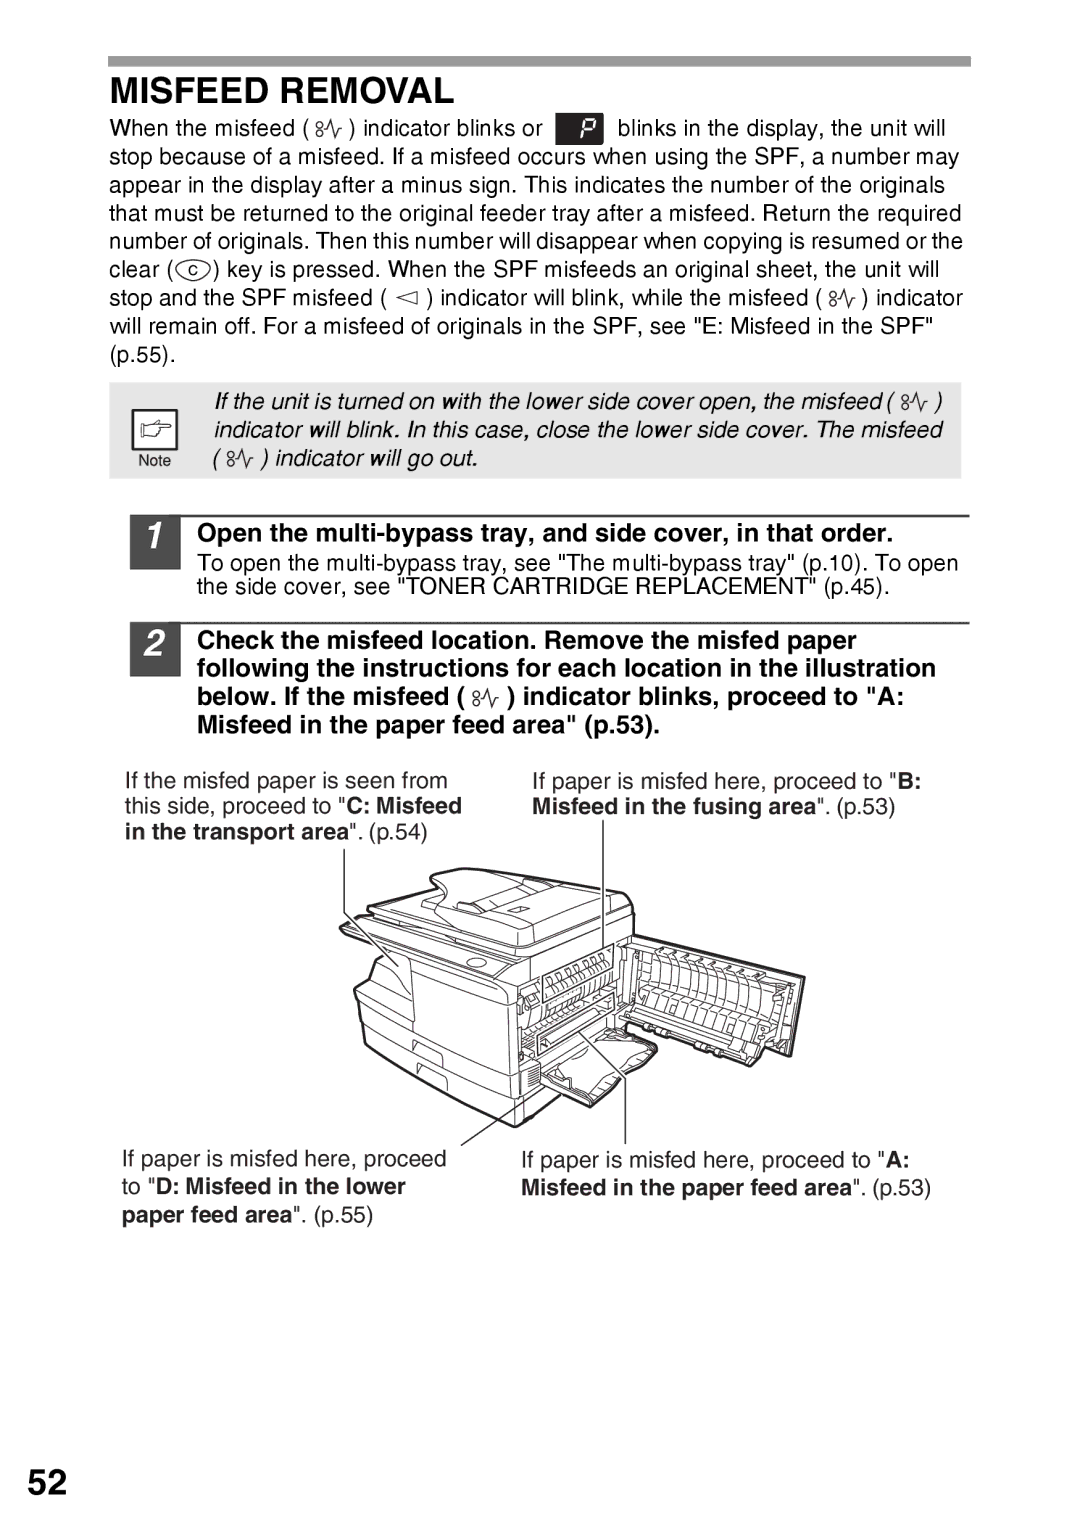
Misfeed Removal
Open the multi-bypass tray, and side cover, in that order
Paper feed area. p.55
Fusing unit release lever
Misfeed in the fusing area
Lower the fusing unit release Lever
Misfeed in the paper feed area
Rotate the feeding roller Direction of the arrow
Misfeed in the transport area
Open the front cover
Gently remove Misfed paper from the exit Area
Misfeed in the lower paper feed area
Misfeed in the SPF
Maintenance Required
Developer Required
Scan Head Locking Switch
LockUnlock
System Configuration
Single Pass Feeder AR-SP9
AR-SP9 Feed unit AR-D33
Press the copy ratio display % key
Using the paper feed unit with the printer function
Sheet Paper Feed Unit AR-D33
Specifications
Appendix
Sharp GDI
Single pass feeder AR-SP9
Sheet paper feed unit AR-D33
Interface cable
About Supplies and Options
Supply list
USB interface cable
Index
Name
Index by Purpose
Material Safety Data Sheet
Exposure Controls / Personal Protection
Physical and Chemical Properties
Transport Information
Date Issued Nov.01
Hazards Identification
Physical and Chemical Properties
Ecological Information
Other Countries outside the EU
Class Laser Product Laser Klasse
Sharp Manufacturing France S.A
AR-203Ev1

![]() ) indicator blinks or
) indicator blinks or ![]() blinks in the display, the unit will stop because of a misfeed. If a misfeed occurs when using the SPF, a number may appear in the display after a minus sign. This indicates the number of the originals that must be returned to the original feeder tray after a misfeed. Return the required number of originals. Then this number will disappear when copying is resumed or the clear (
blinks in the display, the unit will stop because of a misfeed. If a misfeed occurs when using the SPF, a number may appear in the display after a minus sign. This indicates the number of the originals that must be returned to the original feeder tray after a misfeed. Return the required number of originals. Then this number will disappear when copying is resumed or the clear (![]() ) key is pressed. When the SPF misfeeds an original sheet, the unit will stop and the SPF misfeed (
) key is pressed. When the SPF misfeeds an original sheet, the unit will stop and the SPF misfeed ( ![]() ) indicator will blink, while the misfeed (
) indicator will blink, while the misfeed ( ![]() ) indicator will remain off. For a misfeed of originals in the SPF, see "E: Misfeed in the SPF" (p.55).
) indicator will remain off. For a misfeed of originals in the SPF, see "E: Misfeed in the SPF" (p.55).![]() ) indicator will blink. In this case, close the lower side cover. The misfeed (
) indicator will blink. In this case, close the lower side cover. The misfeed ( ![]() ) indicator will go out.
) indicator will go out.![]() ) indicator blinks, proceed to "A: Misfeed in the paper feed area" (p.53).
) indicator blinks, proceed to "A: Misfeed in the paper feed area" (p.53).