Manuals
/
Sharp
/
Computer Equipment
/
All in One Printer
Sharp
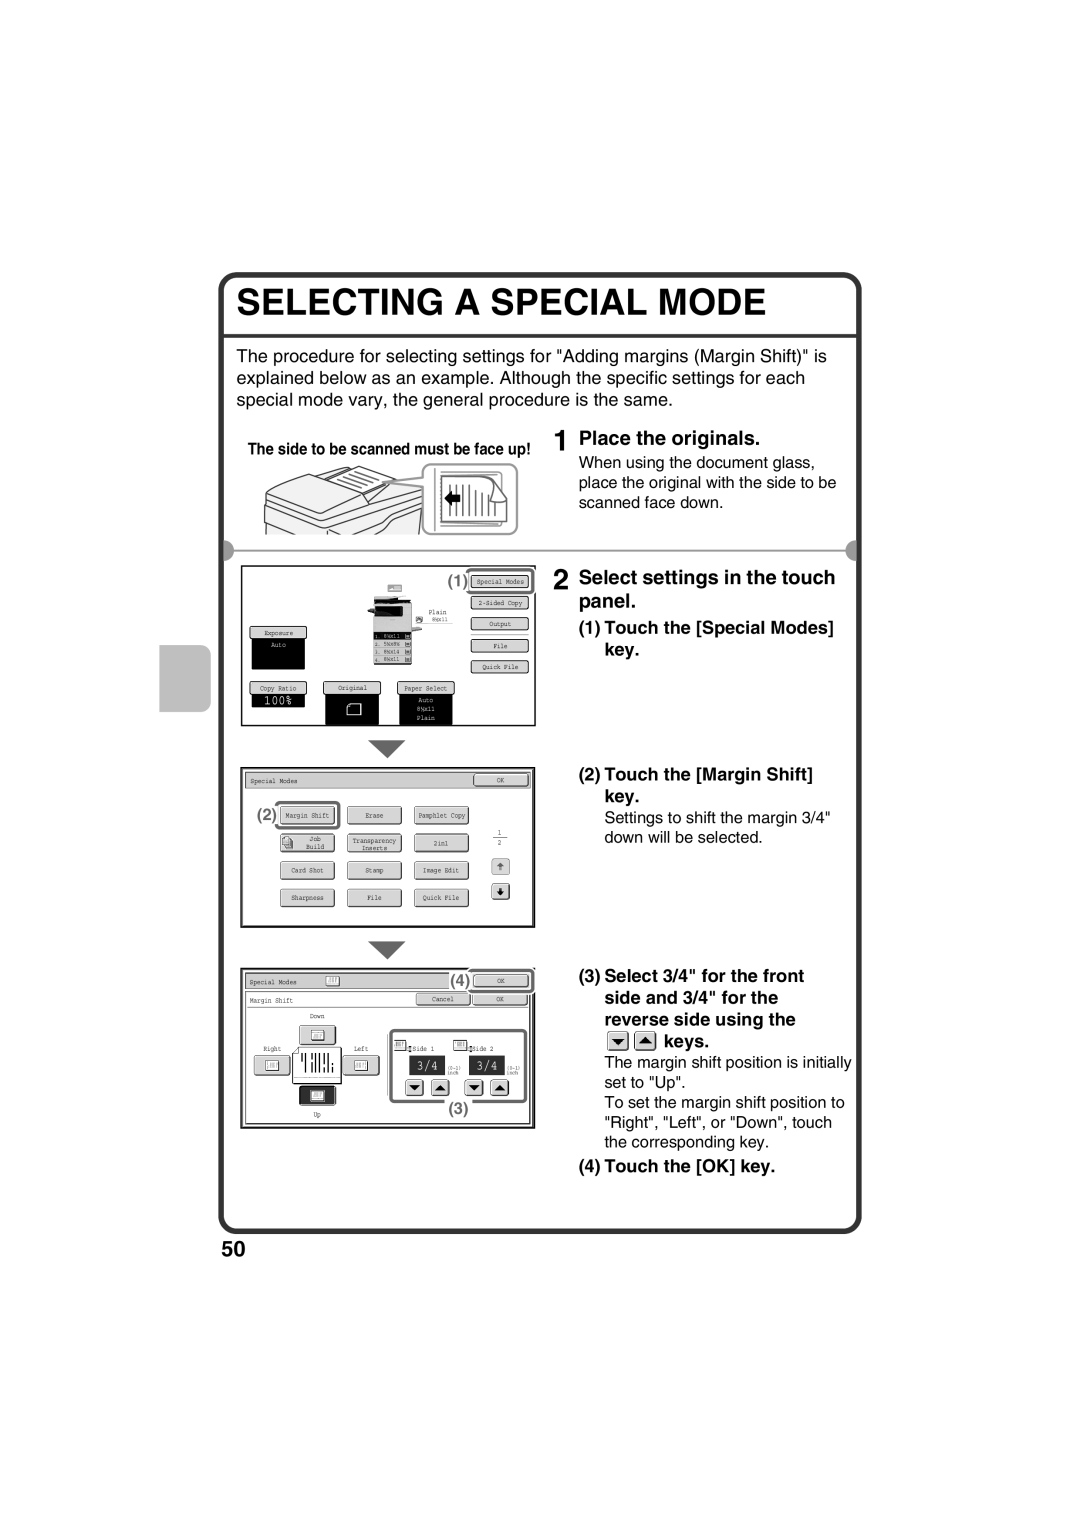
MX-B401 Selecting A Special Mode, Touch the Special Modes key 2 Touch the Margin Shift key
Models:
TINSE4377FCZZ
MX-B401
1
52
144
144
Download
144 pages
23.13 Kb
49
50
51
52
53
54
55
56
Troubleshooting
FAQ
Password
Image send indicators
Login
System settings administrator
Maintenance
Software Setup Guide
Brightness adjustment key
System Settings
Page 52
Image 52
Page 51
Page 53
Page 52
Image 52
Page 51
Page 53
Contents
System settings
Troubleshooting
Before using the machine
MODEL MX-B401
Maintenance Safety Guide
Software Setup Guide
Printed manuals
Quick Start Guide
Manuals in PDF format
Operation Guide
Convenient methods for using the Operation Guide
BEFORE USING THE MACHINE
SETTINGS key
2 Select the all custom setting list in the touch panel
CHECKING THE IP ADDRESS
1 Press the SYSTEM
Access the Web server in the machine to open the Web pages
ACCESSING THE WEB SERVER IN THE MACHINE
Opening the Web pages
Downloading the Operation Guide
Downloading the Operation
Guide
1 Click Operation Manual
TABLE OF CONTENTS
Before using the machine
ENLARGEMENT/REDUCTION Preset Ratios / Zoom
Copying
Printing
Faxing
System settings
Troubleshooting
SYSTEM SETTINGS
Scanning
Page
XUSING THE TOUCH PANEL XUSER AUTHENTICATION XHOME SCREEN
XPART NAMES AND FUNCTIONS XSUPPLIES XOPERATION PANEL
XIMAGE CHECK FUNCTION PREVIEW XPLACING ORIGINALS
XCHANGING PAPER IN A TRAY
PART NAMES AND FUNCTIONS
SUPPLIES
OPERATION PANEL
Image send indicators
Print mode indicators
SYSTEM SETTINGS key
POWER key
POWER SAVE key
Main power indicator
Numeric keys
USING THE TOUCH PANEL
Brightness adjustment key
Mode select keys
COPY key
Using general keys
Checking the status of the machine
Job Status display
System display
MFP Status display
USER AUTHENTICATION
User authentication methods
Login by user number
Login by login name and password
How to log out
Logging out
1st screen
HOME SCREEN
2nd screen
Checking the content of a file stored in the machine
IMAGE CHECK FUNCTION PREVIEW
Convenient uses of image check
Data that can be checked
The content of the data appears here In the touch panel, you can
Scroll the display Change pages Change the display magnification
Example The image check screen for a received fax
Image Check
Using the document glass
Using the automatic document feeder
PLACING ORIGINALS
Portrait originals
Landscape originals
Originals
Portrait original
CHANGING PAPER IN A TRAY
Names of the trays
Print side face up or face down
Tray
Loading paper in a tray
Indicator line
The loaded paper should not go higher than these protrusions
Insert the paper with the print side face up
Changing the tray settings
2 Configure the tray settings in the touch panel
1 Touch the Paper Tray Settings key
2 Touch the Tray Settings key
Select settings in the touch panel. Continued
4 Select Recycled from the Type select box
5 Make Sure that Auto-Inch is selected in the Size select box
6 Touch the OK key
Loading paper in bypass tray
Example Loading an envelope
X ENLARGEMENT/REDUCTION Preset Ratios Zoom
Copying
XBASE SCREEN OF COPY MODE XMAKING COPIES
X2-SIDED COPYING Automatic Document Feeder
BASE SCREEN OF COPY MODE
Select copy settings in the base screen
7 Paper select display
2 Select settings in the touch panel
MAKING COPIES
1 Touch the COPY key
2 Touch the Original key
5 Make sure that the desired paper size is selected
3 Set the number of copies and then press the START key
Correct sets Cancel scanning Cancel copying
Select settings in the touch panel
2-SIDED COPYING Automatic Document Feeder
1 Set the original size 2 Touch the 2-Sided Copy key
3 Touch the 1-Sided to 2-Sided key 4 Touch the OK key
Correct sets Cancel scanning Cancel copying
3 Select settings in the touch
COPYING ON SPECIAL PAPER Bypass Copy
2 Insert paper in the bypass
tray
4 Touch the Heavy Paper key 5 Touch the Auto-Inch key
4 Set the number of copies and then press the START key
6 Touch the OK key 7 Touch the bypass tray key 8 Touch the OK key
A Touch to select one of trays 1 to B Touch to select the bypass tray
Selecting a tray
C Touch to set the type of paper in the bypass tray
SELECTING THE EXPOSURE AND IMAGE TYPE
1 Touch the Exposure key 2 Touch the Light Original key
3 Darken the printed result with the key
Exposure adjustment
Correct sets Cancel scanning Cancel copying
FITTING THE COPY IMAGE TO THE PAPER Automatic Ratio Selection
1 Touch the Original key 2 Touch the 5-1/2 x 8-1/2 key
3 Touch the OK key 4 Touch the Paper Select key
5 Touch the tray that has the desired paper size 6 Touch the OK key
3 Set the number of copies
4 Press the START key
7 Touch the Auto Image key
Cancel scanning Cancel copying
ENLARGEMENT/REDUCTION Preset Ratios / Zoom
2 Touch the Copy Ratio key
3 Touch the key
Ratio-specified copy
4 Touch the 50% key
5 Set the copy ratio to 55% with the key
Touch the preset ratio key that is closest to 55% the desired ratio
The key decreases the ratio in
1 Touch the Interrupt key while the machine is printing
INTERRUPTING A COPY RUN Interrupt Copy
The side to be scanned must be face up! 2 Place the originals
STORING COPY OPERATIONS Job Programs
Storing a job program
1 Press the #/P key
1 Touch the Store/Delete tab
Using a job program
3 Select the copy settings that you wish to store
Deleting a job program
2 Touch the key of the desired job program
3 Read the displayed message and touch the Delete key
2 Touch the key of the job program that you wish to delete
4 Touch the Exit key
SPECIAL MODES
Special modes
reverse side using the keys
SELECTING A SPECIAL MODE
1 Touch the Special Modes key 2 Touch the Margin Shift key
3 Select 3/4 for the front side and 3/4 for the
Correct sets Cancel scanning Cancel copying
CONVENIENT COPY FUNCTIONS
Adding margins Margin Shift
Erasing peripheral shadows Erase
Making copies in pamphlet format Pamphlet Copy
Copying a large number of originals at once Job Build
Adding inserts when copying on transparency film Transparency Inserts
Copying two original pages onto one sheet of paper 2in1
Copying both sides of a card onto one sheet of paper Card Shot
Printing the date or a stamp on copies Stamp
Repeating photos on a copy Photo Repeat
Inverting the image Mirror Image
Adjusting the sharpness of an image Sharpness
Reversing black and white in a copy B/W Reverse
Checking copies before printing Proof Copy
Copying in the center of the paper Centering
Copying thin originals Slow Scan Mode
Copying originals that are different sizes Mixed Size Original
Copying multiple business cards Business Card Scan
XSELECTING PRINT SETTINGS XCONVENIENT PRINTER FUNCTIONS
XPRINTING XCANCELING PRINTING AT THE MACHINE
Printing
1 Select the print 1command in the application
PRINTING
Windows
2 Open the printer driver properties window
3 Select print settings
4 Click the Print button
1 Click the Paper tab
2 Select Letter
Using printer driver help
2 Click the Help button
1 Open the printer driver properties window
1 Select the printer driver of the machine 2 Click the Preferences
To view Help for a specific setting
When the information icon appears
Setting the paper size
1 Open the page setup
2 Select paper settings
2 Select Page Setup
2 Select print settings and click the Print button
2 Select print settings
Printing a file
1 Execute printing from TextEdit
CANCELING PRINTING AT THE MACHINE
3 Touch the key of the print job that you wish to cancel
1 Touch the Print Job tab
2 Change the print job status mode to Spool or Job Queue
SELECTING PRINT SETTINGS
Select print settings
2 Select Invoice
3 Select Fit To Paper Size
1 Select Layout 2 Select 3 Select the order of the pages
4 Select the desired type of borderline
Printing on both sides of the paper 2-sided printing
CONVENIENT PRINTER FUNCTIONS
Fitting the print image to the paper Fit To Paper Size
Printing multiple images on one page N-Up Printing
Stapling printed pages Staple
When a finisher is installed
Use this function to staple printed output
Functions to adjust the size and orientation of the image
Image adjustment function
The machine also has these functions
Convenient functions for creating pamphlets and posters
Page
XCHANGING THE EXPOSURE XCHANGING THE RESOLUTION XSTORING A FAX NUMBER
Faxing
XBASE SCREEN OF FAX MODE XSENDING A FAX XCHANGING THE SIZE OF A FAX
X FORWARDING RECEIVED FAXES Fax Data
BASE SCREEN OF FAX MODE
Select fax settings in the base screen
8 Resend key / Next Address key
SENDING A FAX
1 Touch the IMAGE SEND key
2 Make sure that the size of the placed original is displayed
Cancel scanning
CHANGING THE SIZE OF A FAX
1 Touch the Original key 2 Touch the 2-Sided Booklet key
3 Make sure that the size of the placed original is displayed
4 Touch the Send Size key
3 Enter the fax number of the first destination
5 Touch the 11 x 17 key 6 Touch the OK key 7 Touch the OK key
Cancel scanning
Correct a mistake
1 Touch the Exposure key
CHANGING THE EXPOSURE
2 Touch the Manual key 3 Touch the key to darken the exposure
CHANGING THE RESOLUTION
1 Touch the Resolution key 2 Touch the Fine key
3 Touch the Half Tone key
Half Tone cannot be selected when Standard is selected
STORING A FAX NUMBER
Storing an individual key
1 Touch the Address Control key
2 Touch the Address Book key
3 Touch the Add New key
4 Select Fax from the Address Type select box
5 Touch the Address Name text box
6 Touch the Initial text box
FORWARDING RECEIVED FAXES Fax Data Forward
2 Touch the Fax Settings key
1 Touch the Fax Data Receive/Forward key
3 Touch the Execute key in Forward Received Data 4 Touch the OK key
Transfer the received data to another device? CancelOK
CONVENIENT DIALING METHODS
One-touch keys
1 Touch the Address Book key
2 Touch the key of the desired destination
Resending
1 Touch the Resend key 2 Touch the key of the desired destination
1 Touch the key
Speed dialing
2 Enter the 3-digit search number with the numeric keys
Dialing using the speaker
Touch the Speaker key
SENDING THE SAME FAX TO MULTIPLE DESTINATIONS Broadcast Transmission
2 Enter the fax number of the first destination
3 Select settings in the touch panel
2 Touch the one-touch key in which the desired destination is stored
3 Touch the To key 4 Touch the Address Review key
5 Check the destinations and then touch the OK key
SPECIAL FAX MODES
2 Touch the Erase key
1 Touch the Special Modes key
3 Set the erasure width to 3/4 with the keys
Cancel scanning
CONVENIENT FAX FUNCTIONS
Sending a fax directly from a computer PC-Fax
This function can only be used on a Windows computer
Page
XCHANGING THE RESOLUTION XCHANGING THE FILE FORMAT
Scanning
XNETWORK SCANNER FUNCTION XBASE SCREEN OF SCAN MODE
XSCANNING AN ORIGINAL X CHANGING THE EXPOSURE AND ORIGINAL IMAGE TYPE
NETWORK SCANNER FUNCTION
and then
Scan modes
USB memory mode
BASE SCREEN OF SCAN MODE
1 Select settings in the touch panel
SCANNING AN ORIGINAL
1 Touch the IMAGE SEND key 2 Touch the Scan tab
1 Make sure that the size of the placed original is displayed
Cancel scanning
2 Read the displayed message and touch the OK key
CHANGING THE EXPOSURE AND ORIGINAL IMAGE TYPE
3 Touch the Text/Prtd. Photo key 4 Darken light colors with the key
3 Select the destination and then press the START key
2 Touch the 300X300dpi key 3 Touch the OK key
1 Touch the Resolution key
300X300dpi
1 Touch the File Format key
CHANGING THE FILE FORMAT
3 Change the mode to Color/Grayscale mode
3 Select the destination and press the START key
4 Touch the TIFF key
5 Touch the High key
a smaller file size
STORING A DESTINATION
4 Select E-mail from the Address Type select box
8 Touch the E-mail Address text box
One-touch key
CONVENIENT TRANSMISSION METHODS
2 Touch the key in which the desired destination is stored
1 Touch the Resend key
Search number sending
EEE EEE
4 Touch the To key 5 Touch the Address Review key
HHH HHH
3 Press the START key
6 Check the destinations and then touch the OK key
SPECIAL SCAN MODES
Scan mode
1 Touch the Special Modes key 2 Touch the Suppress Background key
This function cannot be used when the original is scanned in Mono2
3 Read the displayed message and touch the OK key
Here 1 is set for the lightest background
CONVENIENT SCANNER FUNCTIONS
Erasing peripheral shadows on the image Erase
Whitening faint colors in the image Suppress Background
Scanning both sides of a card onto a single page Card Shot
Scanning many originals at once Job Build
X APPENDING INFORMATION WHEN STORING A
Document filing
DOCUMENT FILING
Uses of the document filing function
Copy
Print
Features that make the document filing function even more convenient
The document filing function is convenient in these situations
In this situation
Document filing is convenient
1 Touch the Quick File key
QUICKLY SAVING A JOB Quick File
2 Touch the OK key
APPENDING INFORMATION WHEN STORING A FILE File
1 Touch the File key
2 Touch the User Name key
Password
3 Touch the Name 1 key 4 Touch the OK key 5 Touch the File Name key
6 Touch the Stored to key 7 Touch the User 1 key 8 Touch the OK key
A text entry screen appears. Enter a file name
Name
Correct sets Cancel scanning Cancel copying
SAVING A DOCUMENT ONLY Scan to HDD
Touch the Scan to HDD tab
1 Touch the DOCUMENT FILING key
The base screen of document filing mode appears
4 Press the START key
5 Touch the Image Check key to check the content of a file
PRINTING A SAVED FILE
Select the file and print it
1 Touch the DOCUMENT FILING key 2 Touch the Main Folder key
System settings
XSYSTEM SETTINGS
SYSTEM SETTINGS
Displaying the system settings screen
What you can do in the system settings
Settings
System settings administrator
Page
Troubleshooting
FREQUENTLY ASKED QUESTIONS
Making a copy of a non-standard size original
1 Place the originals
2 Enter the original size
3 Place paper in the bypass tray
4 Select the bypass tray
Printing on envelopes
2 Tray Settings
1 Place paper in the bypass tray
3 Select settings in the printer driver
1 Select the size of the envelope in Paper Size
2 Select Bypass Tray from Paper Source in Paper Selection
3 Select Envelope in Paper Type
Changing the paper size used for a print job
1 Check details on the job
2 Change the paper size used for the job
1 Select the job whose status is Paper Empty 2 Touch the Detail key
Adjusting the volume of the ringer
Checking the machines communication record
REMOVING MISFEEDS
AInstructions for removing the
misfeed appear here
BAnimation showing what to do
Please note
Illustrations and the operation panel shown in this manual
Page
Page
MX-B401 Quick Start Guide
SHARP ELECTRONICS CORPORATION
This manual has been printed using a vegetable-based
2009B
Top
Page
Image
Contents