UX-B700
About the Telephone Consumer Protection ACT
Introduction
Vertical
Paper tray capacity
Applicable telephone line
Important safety information
Page
Table of Contents
Printing Lists Maintenance
Look at the Operation Panel
Speaker key
Hold key
COPY/HELP key
Stop key
Installation
Unpacking Checklist
Points to keep in mind when setting up
Attachments
Removing the packing tape
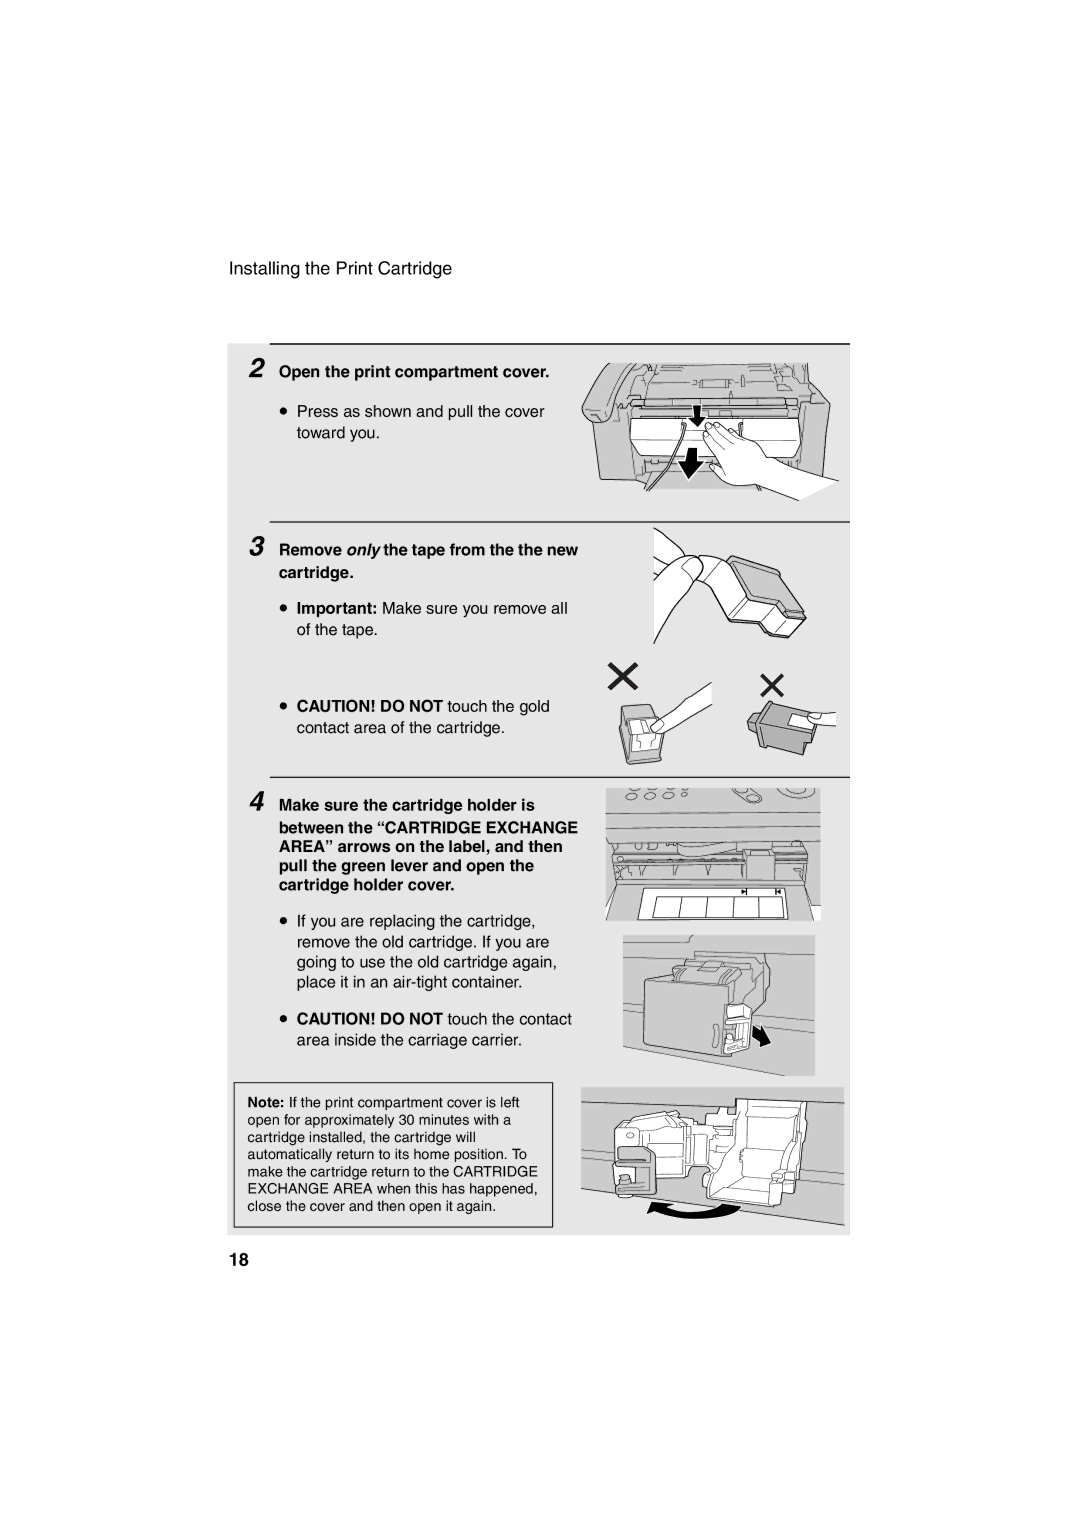
Open the print compartment cover
Connecting the handset
Close the printer cover
Attaching the paper trays
Installation1
Loading Printing Paper
Place
Connecting the Power Cord
Installing the Print Cartridge
Open the operation panel
Remove only the tape from the the new cartridge
Change Cartridge
Press NEW if the cartridge you
Installed is new
Press OLD if the cartridge you Installed is old
Press Memory
Setting the paper size
Ink save mode
Press
Press Once Times
Press To turn on ink save mode, or
Connecting the Telephone Line Cord
Connect the extension phone line to the TEL. SET jack
Extension phone optional
Remove the seal covering the TEL. SET jack
Entering Your Name and Fax Number
Chart below. Up to 24 characters can be entered
Enter your fax number by pressing the number keys max digits
Setting the Date and Time
Press once and 3 times
Daylight Saving Time
Mode
Setting the Reception Mode
Setting the reception mode
Volume Adjustment
Desired volume level
Speaker
Press To select
When talking through the handset Press To select
Handset
Ringer
If you selected Ringer OFF OK ? to
Transmittable Documents
Size and weight
Sending Faxes
Loading the Document
Other restrictions
Removing a document from the feeder
Open the operation panel Remove the document
Contrast settings
Adjusting the Resolution and Contrast
Resolution settings
Press RESOLUTION/ one or more times
Load the documents
Changing the default resolution
Sending a Fax by Normal Dialing
Sending a Fax by Automatic Dialing
Sending a Fax by Automatic Dialing
Storing fax and phone numbers for automatic dialing
Space =
Editing and clearing auto-dial numbers
Return to to store another number, or press to return to
Date and time display
Press 1 for Edit or 2 for Clear
Press Memory Make the desired changes to the name
To the date and time display
Load the documents If desired, press
Using a Rapid Key for a voice call
Rapid Key Dialing
Memory . If not, press Repeat Step
Using a Speed Dial number for a voice call
Speed Dialing
Display if no name was stored, the number will appear
Searching for an auto-dial number
Press Until the name of the other party appears
Sending a fax by Direct Keypad Dialing
Correct, press Memory
Redial
Automatic redialing
Once. Redial appears in the display, followed by
Press Redial
Error Correction Mode
Press Function once Times. Display
Batch Page Numbering
Sending a Fax From Memory
Broadcasting sending a fax to multiple destinations
Broadcasting using a Group Key
When you are ready to begin transmission, press Memory
Load the documents If desired, press RESOLUTION/ to set
Press the appropriate Group Key
Press To clear a Group Key
Storing numbers in Group Keys
Press To program a Group Key
Press to return to the date and time display
Memory transmission
If the memory becomes full
Changing the number of rings
Using FAX Mode
Receiving Faxes
Using TEL Mode
Using TEL Mode
Answer the extension phone when it rings
Answering with the fax’s handset
Answering on an extension phone connected to the same line
Display shows Receiving and then
Press once and 7 times
Optional Reception Settings
Fax Signal Receive
Changing the number for remote fax activation
Reception Ratio
Press Function once and twice
Press To select AUTO, or 2 to
Select 100%
Substitute Reception to Memory
Example of two Copies each Three originals
Select any of the following copy settings as needed
Making Copies
When you are ready to begin copying, press
Copy Cut-off
If Memory is Full appears
Press Once Twice
Connecting an Answering Machine
Answering Machine Connection
Using the Answering Machine Connection
Set the reception mode to A.M
Changing the outgoing message
Set your answering machine to auto answer
Quiet Detect Time
Optional A.M. Mode Settings
How answering machine mode operates
Enter a number from 01 to 10, or enter
To turn off the function
Press once and 6 times
Quiet Detect Start Time
Press Function once
On TAD Failure
Caller ID Requires Subscription to Service
Special Functions
How Caller ID operates
Display messages
Enter the three digits of your area code
Press Memory to store your area code
Voice call Press when you have finished viewing the list
Viewing the Caller ID list
Press Z twice
Document and then press Memory Fax
To store or clear the number
To delete calls from the Caller ID list
Priority Call
Blocking voice calls
Distinctive Ring Requires Subscription to Service
Set the reception mode to FAX
Blocking Reception of Unwanted Faxes
Polling Requesting a Fax Transmission
Requesting transmission
Being polled polling standby
Polling security
Storing fax numbers for polling permission
Enter the fax number maximum of 20 digits
Editing and clearing polling permission numbers
Printing Lists
Activity Report
Press Function once and once
Press Memory to print the list
Setup List
Telephone Number List
Group List
Caller-ID List
Transaction Report
Headings in the Transaction Report
Transaction Report print condition
Auto print-out of Activity Report
Press 1 to turn on auto print out, or To turn it off
Cleaning the scanning glass and rollers
Maintenance
Cleaning the Machine
Maintenance
Cleaning the housing
Rotating the white roller
Improving Print Quality
Aligning the print cartridge
Cleaning the print cartridge nozzles
Maintenance
Wiping the print nozzles and contacts
Cleaning the cartridge holder
Troubleshooting
Problems and Solutions
Line error
Problem Solution
Dialing and transmission problems
Trouble- shooting
Reception and copying problems
100
General problems
Answering machine connection
Messages and Signals
Press Start KEY
104
Audible signals
Recalling
Clearing Paper Jams
Clearing a jammed document
Clearing jammed printing paper
Flip down the green levers on each side of the white roller
108
Ordering Parts
FCC Regulatory Information
A R P
Material Safety Data Sheet 2/3
Material Safety Data Sheet 3/3
Quick Reference Guide
Sending Faxes
Guía de referencia rápida
Transmisión de documentos
Index
116
117
118
Limited Warranty
Sharp Corporation