
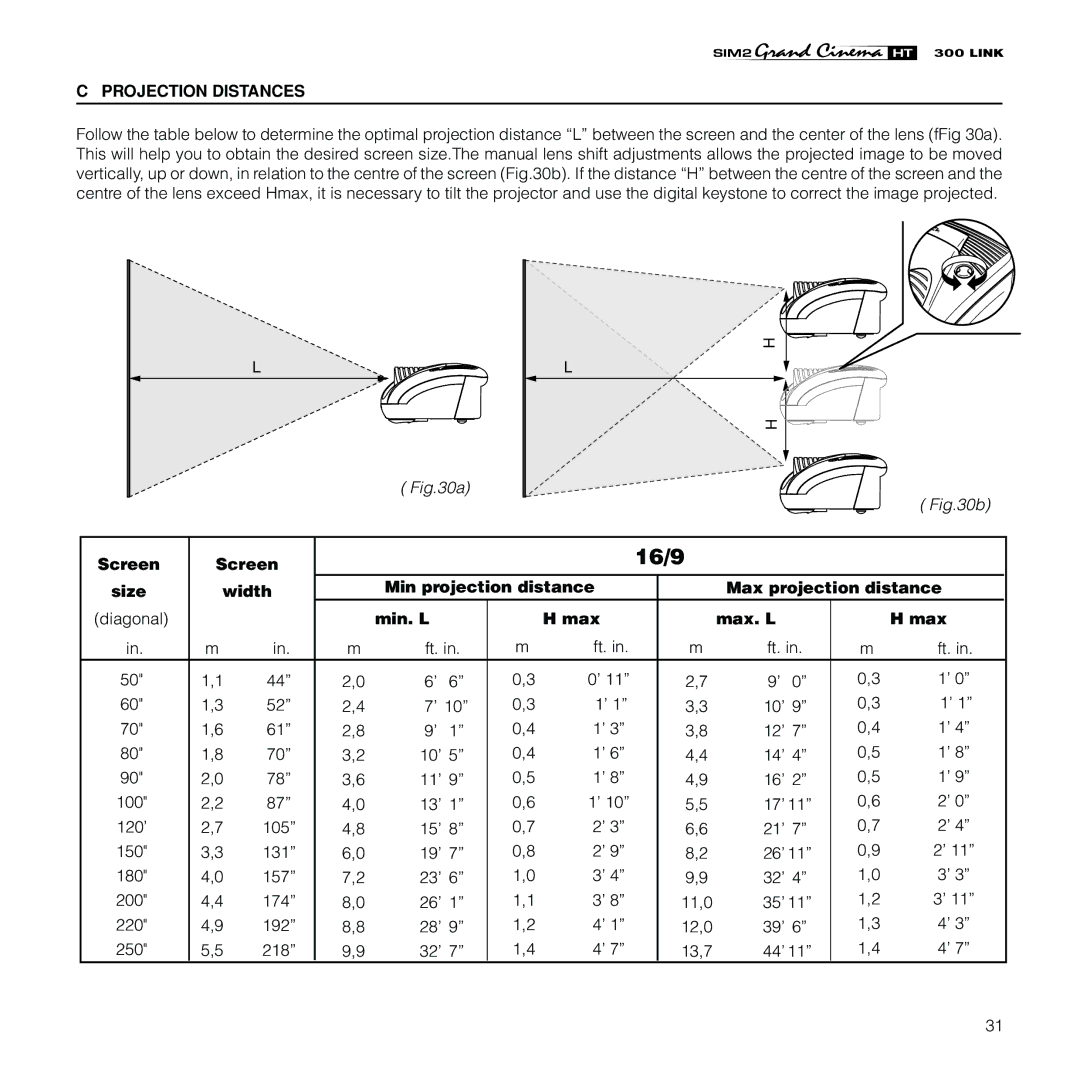
HT300 Link specifications
The Sim2 Multimedia HT300 Link is a groundbreaking multimedia projector that seamlessly blends high-performance technology with user-friendly design, catering to both home theater enthusiasts and professional environments. Its sleek and compact form factor ensures that it can fit effortlessly into any setup, while delivering exceptional performance that meets the demands of the modern viewer.One of the standout features of the HT300 Link is its impressive brightness. With a powerful illumination system, it projects vivid images with sharp contrast, ensuring that content displayed remains clear and stunning, even in ambient light conditions. The unit boasts a native resolution of 1080p, which brings a cinematic experience to home viewers with mesmerizing details and color accuracy.
Additionally, the HT300 Link utilizes advanced DLP technology, renowned for its reliability, durability, and ability to render colors that are true to life. DLP ensures a smooth visual experience, reducing the possibility of motion blur, which is especially important for fast-paced action scenes or high-speed sports.
The projector also supports various input options, allowing for versatility in connectivity. It features multiple HDMI ports, USB inputs, and an array of audio outputs, making it easy to connect different devices, including gaming consoles, Blu-ray players, and streaming devices. Furthermore, the HT300 Link integrates wireless connectivity options, enabling users to stream content effortlessly from smartphones, tablets, or laptops.
Thermal management is another area where the HT300 Link excels. Designed with an efficient cooling system, it eliminates the risk of overheating and ensures prolonged operation without compromise to performance. This feature is particularly important for extended viewing sessions, whether in a home theater setting or during business presentations.
The user interface of the HT300 Link is intuitive, making it accessible for users of all levels. With straightforward settings and remote control functionality, users can easily navigate options to customize their viewing experience.
In summary, the Sim2 Multimedia HT300 Link sets a high standard in the realm of multimedia projectors. With its bright projection, advanced DLP technology, versatile connectivity, and user-friendly interface, it is a fantastic choice for anyone looking to elevate their visual experience, whether for entertainment or professional presentations.