HT5000
Selecting the NO option causes the
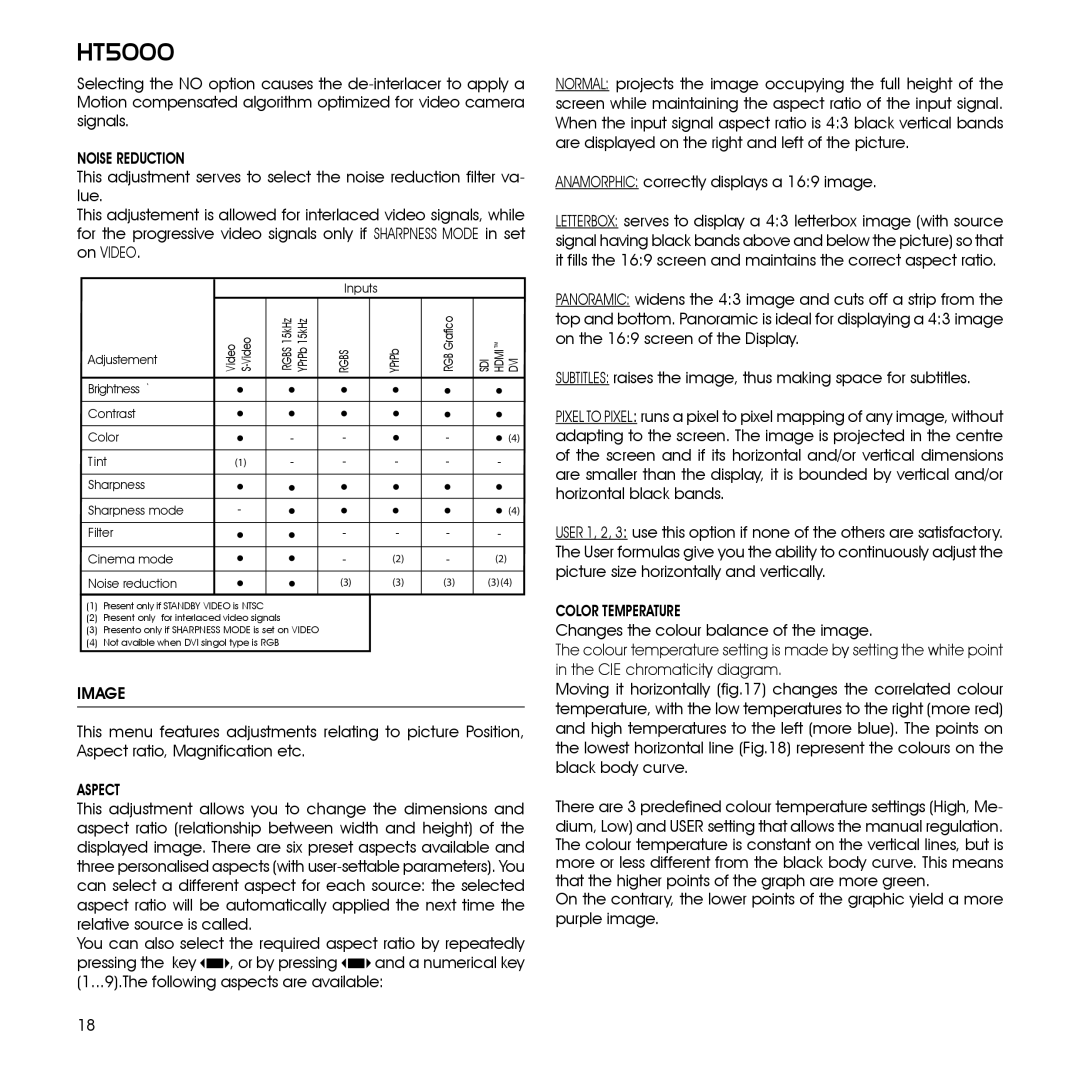
NOISE REDUCTION
This adjustment serves to select the noise reduction filter va- lue.
This adjustement is allowed for interlaced video signals, while for the progressive video signals only if SHARPNESS MODE in set on VIDEO.
|
|
|
|
| Inputs |
|
|
|
Adjustement | V ideo | RGBS 15kHz | YPrPb 15kHz | RGBS | YPrPb | RGB Grafico | SDI HDMI™ DVI | |
| ||||||||
Brightness |
|
|
|
|
|
|
|
|
Contrast |
|
|
|
|
|
|
|
|
Color |
|
| - |
| - |
| - | (4) |
Tint | (1) | - |
| - | - | - | - | |
Sharpness |
|
|
|
|
|
|
|
|
Sharpness mode |
| - |
|
|
|
|
| (4) |
Filter |
|
|
|
| - | - | - | - |
Cinema mode |
|
|
|
| - | (2) | - | (2) |
Noise reduction |
|
|
|
| (3) | (3) | (3) | (3)(4) |
(1)Present only if STANDBY VIDEO is NTSC
(2)Present only for interlaced video signals
(3)Presento only if SHARPNESS MODE is set on VIDEO
(4)Not avaible when DVI singol type is RGB
IMAGE
This menu features adjustments relating to picture Position, Aspect ratio, Magnification etc.
Aspect
This adjustment allows you to change the dimensions and aspect ratio (relationship between width and height) of the displayed image. There are six preset aspects available and three personalised aspects (with
You can also select the required aspect ratio by repeatedly
pressing the key ![]()
![]()
![]() , or by pressing
, or by pressing ![]()
![]()
![]() and a numerical key (1...9).The following aspects are available:
and a numerical key (1...9).The following aspects are available:
Normal: projects the image occupying the full height of the screen while maintaining the aspect ratio of the input signal. When the input signal aspect ratio is 4:3 black vertical bands are displayed on the right and left of the picture.
Anamorphic: correctly displays a 16:9 image.
Letterbox: serves to display a 4:3 letterbox image (with source signal having black bands above and below the picture) so that it fills the 16:9 screen and maintains the correct aspect ratio.
Panoramic: widens the 4:3 image and cuts off a strip from the top and bottom. Panoramic is ideal for displaying a 4:3 image on the 16:9 screen of the Display.
SUBTITLES: raises the image, thus making space for subtitles.
Pixel to Pixel: runs a pixel to pixel mapping of any image, without adapting to the screen. The image is projected in the centre of the screen and if its horizontal and/or vertical dimensions are smaller than the display, it is bounded by vertical and/or horizontal black bands.
User 1, 2, 3: use this option if none of the others are satisfactory. The User formulas give you the ability to continuously adjust the picture size horizontally and vertically.
Color Temperature
Changes the colour balance of the image.
The colour temperature setting is made by setting the white point in the CIE chromaticity diagram.
Moving it horizontally (fig.17) changes the correlated colour temperature, with the low temperatures to the right (more red) and high temperatures to the left (more blue). The points on the lowest horizontal line (Fig.18) represent the colours on the black body curve.
There are 3 predefined colour temperature settings (High, Me-
dium, Low) and USER setting that allows the manual regulation. The colour temperature is constant on the vertical lines, but is more or less different from the black body curve. This means that the higher points of the graph are more green.
On the contrary, the lower points of the graphic yield a more purple image.
18