Camera Operations Guide
Declaration of Conformity
Read this first
Owner’s Record
Page
Illustrations used on this manual are based on
Table of Contents DCR-TRV280
Playback
Advanced operations
To charge the battery, see
Attach the charged battery pack to the camcorder
Recording movies
Insert a cassette into the camcorder
Quick Start Guide
Lens cap is not attached when you purchase your camcorder p
View the recorded picture on the LCD screen
Recording/Playing back with ease
Press Easy when recording/ playing back
Connecting cable
AC Adaptor Power cord Lens cap
Rechargeable battery pack NP-FM30
Shoulder strap
InfoLITHIUM battery pack M series
Charging the battery pack
Info
Slide the Power switch up to CHG
Getting started
Charging time
Recording time when recording with the viewfinder
Recording time when recording with the LCD screen on
Using an outside power source
Turning the power on
To turn off the power
Slide the Power switch up to CHG OFF
Adjusting the LCD panel
Adjusting the LCD panel and viewfinder
Adjusting the viewfinder
To adjust the brightness of the LCD screen
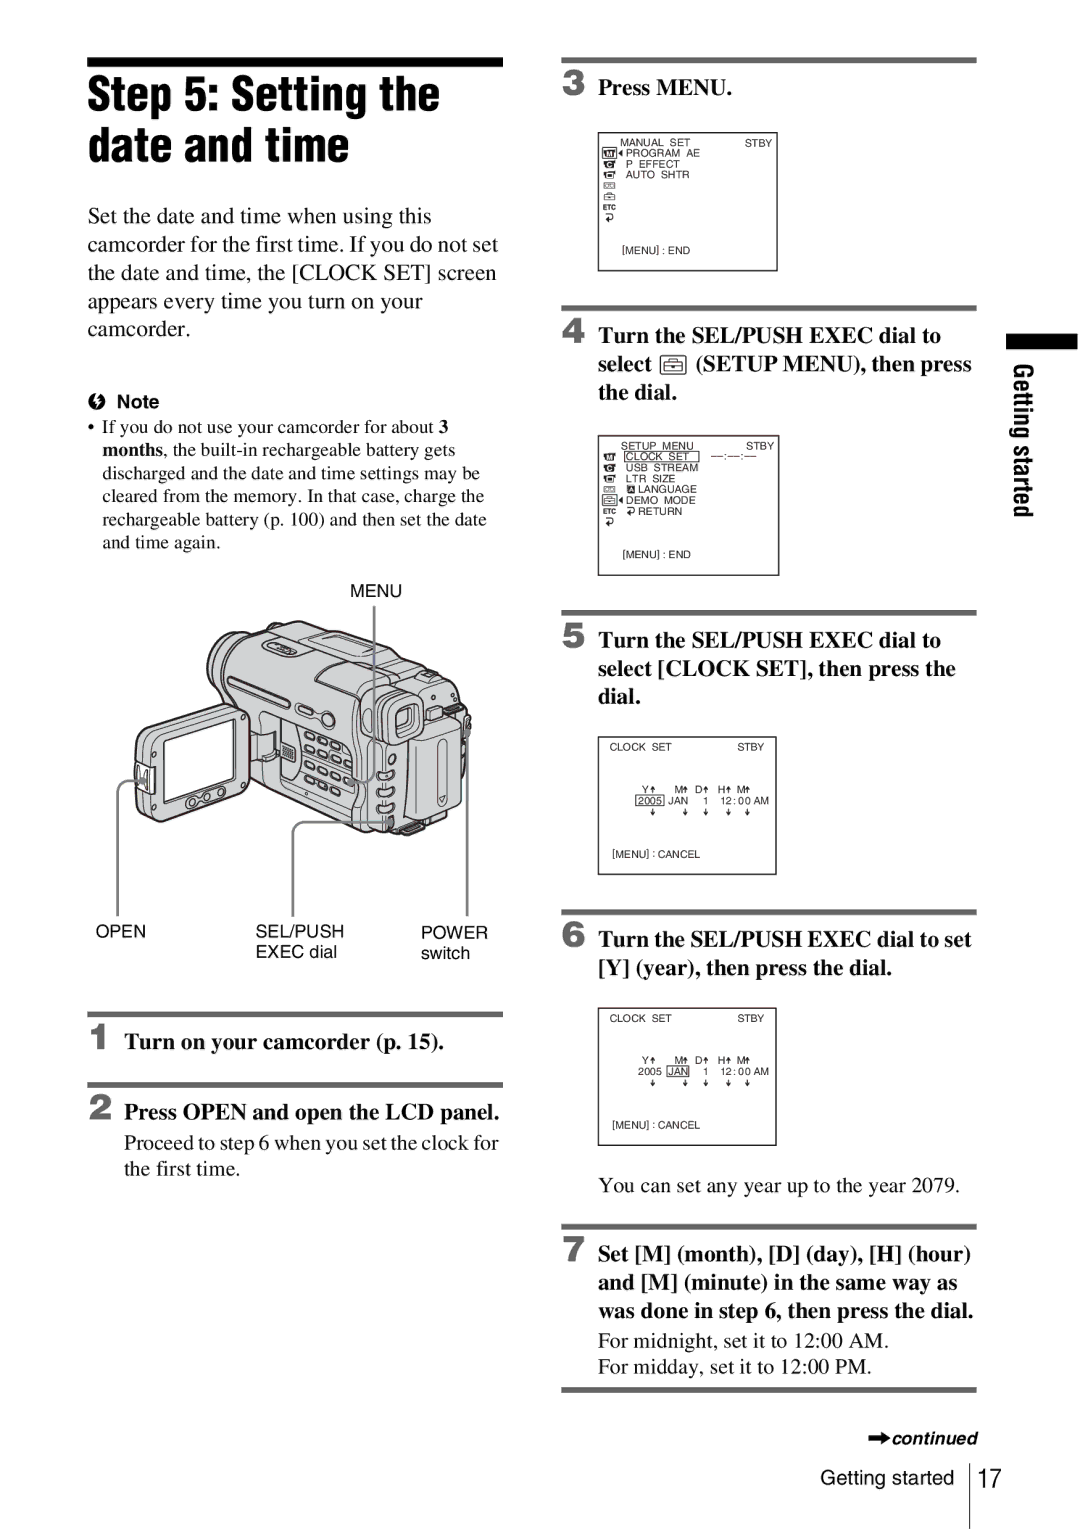
Proceed to when you set the clock for the first time
Setting the date and time
Press Menu
Turn on your camcorder p Press Open and open the LCD panel
Cassette compartment automatically comes out and opens up
To check the preset date and time
To eject the cassette
Setting the screen language
Insert a cassette with its window-side facing up
Press
Tip
Press REC START/STOP
To turn the power off
Your camcorder is set to the standby mode
Indicators will not be recorded on the tape For TRV138/338
Indicators displayed during recording
To set the counter to 00000, press Counter Reset p
This appears while recording Hi8 format tapes
Using the built-in light
Using zoom
Recording for a longer time
To record for a longer time
To turn off the built-in light
Recording in mirror mode
Superimposing the date and time On pictures TRV138/338
Recording still images
Easy Handycam
Recording with ease
Adjusting the exposure for backlit subjects
Adjusting the exposure
To cancel Easy Handycam operation
Press Back Light in Camera mode
To return the setting to automatic exposure
Adjusting the exposure manually
Recording in dark places
NightShot plus
Press Focus in Camera mode
Adjusting the focus manually
Turn the SEL/PUSH Exec dial to sharpen focus
Appears
Tips for focusing manually
To adjust the focus automatically
Fading in and out of a scene
Fader
This feature is for TRV138/338 only
To cancel the operation
, press Fader repeatedly until the indicator disappears
Superimposing a title
Change COLOR, SIZE, or Position as necessary
To superimpose the title while you are recording
Press END Search again
Searching for the last scene of the most recent recording
Viewing pictures recorded on a tape
Playback
Playing back in various modes
This appears while playing back Hi8 format tapes
To fast forward or rewind during playback Picture search
Play back a tape
Playing back with ease
Indicators appear/disappear as you press the button
Displaying the screen indicators
Various playback functions
Press DISPLAY/BATT Info
Follow steps 2 to 4, and select OFF in step
To hide the date/time or the camera settings data
Camera settings data display
For TRV280
Playing the picture on a TV
For TRV138/338
When your TV is stereo
When your TV is connected to a VCR
Turn on the power p Press Menu
Changing the menu settings
Customizing Your Camcorder
Press Menu to hide the menu screen
Program AE/P EFFECT, etc
Program AE
Auto
Sunsetmoon
Effect
Tip
Auto Shtr
GON
OFF
WIDE/STEADYSHOT, etc
Zoom
Cinema
169 Full mode
Wide
Tips
Light
Steadyshot
Edit
HiFi Sound
Menu HiFi SOUND/EDIT, etc
Gstereo
Audio MIX
TBC
DNR
LCD Bright
Using the LCD
LCD B.L
LCD Color
REC Mode
Using the Tape
Audio Mode
ORC to SET
Gauto
Remain
Frame REC
Flashes
INT.REC
Clock SET
Using the Setup
Auto Date
USB Stream
Language
Demo Mode
World Time
Data Code
Beep
Shut OFF
REC Lamp
Display
Video Edit
Glcd
Dubbing/Editing
Connecting to a VCR
To use an i.LINK cable for connection
Connecting with an i.LINK cable
Prepare your camcorder for playback
Dubbing to another tape
Press Easy DUB
Easy Dubbing TRV138/338
11Set the VCR to recording pause
IR Setup code list
Manufacturing IR Setup code Company
Title flashes
Selecting the title
When you select Normal
Selecting the dubbing mode
When you select Preview
Performing Easy Dubbing
Connect your VCR to your camcorder p
To stop dubbing during editing
To quit Easy Dubbing
Digital program editing TRV280
Dubbing selected scenes from a tape
Connect your VCR to the camcorder as a recording device p
Prepare your VCR
When connecting with an A/V connecting cable
To set the IR Setup code
When connecting with an i.LINK cable
11Turn the SEL/PUSH Exec dial to Select RETURN, then press
Rewind the tape on your VCR, then play back in slow mode
Prepare a cassette
Calculated start position for recording is set
Mark OUT Undo Erase ALL
When you select Undo
To save a program without using it to record
When you select Erase ALL
To end Digital program editing
TRV280
Features
System requirements
About First Step Guide
About the help function of the software
Installing on a Windows computer
Installing the software and First Step Guide on a computer
For Windows 2000/Windows XP
Click Install
Place the CD-ROM in the disc drive of your computer
Click Next
Installation of Picture Package starts
Click Install on the Ready to Install the Program screen
If you have any questions about Picture Package
Installing on a Macintosh computer
15Remove the CD-ROM from the disc drive of your computer
Contact information is listed on
For inquires about this software
Using First Step Guide
Viewing First Step Guide
Your
Creating a DVD Direct Access to Click to DVD
Quit all applications running with an i.LINK
Switch repeatedly to select the PLAY/ Edit mode
Click to DVD Automatic Mode Launcher starts up
Writing The picture is being written onto the DVD
Press Burn DVD/VCD to finish creating a DVD
Disc tray comes out automatically
Press Burn DVD/VCD
Batteries/Power sources
Troubleshooting
Symptom Cause and/or Corrective Actions
Overall operations
Symptom
Troubleshooting
Cassette tapes
LCD screen/viewfinder
Recording
Playback
Dubbing/Editing
Connecting to a computer
Symptom
For copying and viewing pictures recorded on a Tape
SymptomCause and/or Corrective Actions
For Windows
Symptom
Troubleshooting
Indication Cause and/or Corrective Actions
Self-diagnosis display/Warning indicators
Corrective Actions/References
Subjects Indications
Power supply
Using your camcorder abroad
Simple setting of clock by time difference
On TV color systems
Usable cassette tapes
About the InfoLITHIUM battery pack
What is i.LINK?
About battery life
About i.LINK
About i.LINK Baud rate
To use i.LINK functions on this unit
Maintenance and precautions
About the required i.LINK cable
On use and care
How to prevent moisture condensation
When not using your camcorder for a long time
Moisture condensation
Video head
About care and storage of the lens
LCD screen
On handling the casing
Input/Output connectors
Specification
Video camera recorder
System
AC Adaptor AC-L15A/L15B
Rechargeable battery pack NP-FM30
General
Model
Types of differences
To attach the lens cap
Identifying parts and controls
Camcorder
105
Quick Reference
REC rec
Burn DVD/VCD
Reference
To attach the shoulder strap
Stby REC
Indicators for the LCD screen and viewfinder
Indicators Meanings
Numerics
Index
SP Standard Play See Recording mode
Recording mode
Picture effect
Recording capacity