Enjoying movies
Model No. MVC-CD350 Serial No
If you have any questions about this product, you may call
Regulatory Information Declaration of Conformity
Recycling LITHIUM-ION Batteries
Before using your camera
Do not get the camera wet
Clean the flash surface before use
Do not expose the camera to sand or dust
Do not aim the camera at the sun or other bright light
Table of contents
Still image editing
Introduction
Flow chart for disc operations
Capture images with your computer
Required
See the pages in parentheses for details of operation
Identifying the parts
SCN To shoot in the Scene Selection mode
SET UP To set the SET UP items
To view or edit images Hook for shoulder strap
Image Size/Delete button 20
Open the battery cover
Charging the battery pack
Install the battery pack, then close the battery cover
Slide the cover in the direction of the arrow
CHG lamp
Battery pack Charging time Min
NP-FM50 supplied Battery life min
Image size No. Battery life Images Min
Power sources
Using an external power source Using your camera abroad
Press Power
Turning on/off your camera How to use the control button
Turning off the power
Set the mode dial to
Setting the date and time
Date and time are entered and the clock starts to keep time
Select OK with B on the control button, then press z
Open the disc cover
Inserting and removing a disc
Place a disc in the disc tray
Close the disc cover
To cancel initialization
What is initialization?
Initializing a disc
Select OK with v on the control button, then press z
Set the mode dial to and turn on the power
Setting the still image size
Image Size setup appears
Press Image Size
Number of images that can be saved in a supplied CD-R2
Image size and quality
Image size Examples
Quality3 Fine Standard Image size
Set the mode dial to , and turn on the power
Basic still image shooting Auto adjustment mode
Do not cover the lens or flash with your fingers
Press and hold the shutter button halfway down
Press the shutter button fully down
Auto adjustment mode
Program auto shooting
SCN Scene Selection
Checking the last image you shot Quick Review
Using the zoom feature
Press b 7 on the control button
To delete the image displayed on the screen
When the zoom is set all the way to W side
Macro recording mode is used when
When the zoom is set all the way to T side
Shooting close-ups Macro
To return to normal recording mode
Using the self-timer
Indicator disappears
To cancel the self-timer in the middle of the operation
Selecting a flash mode
Each time you press v , the indicator changes as follows
To reduce the red-eye phenomenon when shooting live subjects
Indicators on the screen during shooting
SET UP screen appears
Set the mode dial to SET UP
Inserting the date and time on a still image
Viewing single images
Viewing images on the LCD screen of your camera
Single single-image screen
Index nine-image screen
Image screen
Viewing an index screen nine-image or triple-image
To display the next previous index
Screen
Set the mode dial to , and turn on the camera
Turn on the TV and set the TV/ Video switch to Video
Viewing images on a TV screen
Press b/B on the control button to select the desired image
PAL-N system
Viewing images on a TV screen PAL-M system
Secam system
Ntsc system
Deleting images
To cancel deleting
Press Delete
Select Delete with v on the control button, then press z
Green indicator appears on
Deleting images in index nine-image mode
Select Exit with b on the control button, then press z
Deleting images in index triple-image mode
CD-R cannot be formatted
Formatting a CD-RW
Select Cancel with V on the control button, then press z
To cancel formatting
Format Place on level surface appears on the LCD screen
Select OK with v, then press z
Changing the menu settings
How to setup and operate your camera
Changing the items in the SET UP screen
To turn off the SET UP screen display
Mode dial SET UP
Mode dial /SCN
Set the mode dial to or SCN Press Menu
Deciding the still image quality
To cancel changing the recording folder
To cancel folder creation
Creating a new folder
Changing the recording folder
Choosing a focus range finder frame
Choosing an auto focus method
Single AF
Choosing a focus operation
Monitoring AF
Continuous AF
Shooting techniques
Adjusting the exposure
Setting the distance to the subject
Focus preset
To reactivate auto focusing
To reactivate auto exposure
Selecting the metering mode
Select EV with b/B
Select the desired exposure value with v/V
To reactivate auto adjustment
Adjusting color tones
White Balance
You can adjust the amout of flash light
Adjusting the flash level
Flash Level
Clip Motion
Shooting multiple frames
Before operation
Set the mode dial to Press Menu
Shooting in Multi Burst mode
Multi Burst
Shooting two images continuously
To return to normal mode
Burst
Select Mode REC Mode with b/B, then select Tiff with
Shooting still images in Tiff mode
Shooting still images for e-mail
Mail
Shooting still images with audio files
Select Mode REC Mode with b/B, then select Voice with
Voice
Scene Selection
Shooting according to scene conditions
To cancel Scene Selection
Adding special effects
To cancel Picture Effects
Confirming whether to record images
Picture Effect
Record the image
To confirm recording of images shot in the Burst 2 mode
If you select Delete
When multiple folders are created in the disc
To cancel the selection
Mode dial Select the desired folder with
Selecting the folder and playing back images
Adjust the image size with the zoom W/T button
To cancel playback zoom
Enlarging a portion of a still image
Enlarging an image Playback zoom
Playing back successive images
To cancel the Slide Show setting
Recording an enlarged Image Trimming
Slide Show
Rotating still images
To cancel rotation
To stop slide show playback
To skip to the next/previous image during the slide show
Playing back continuously
Playing back images shot in Multi Burst mode
To pause playback
Playing back frame by frame
To delete shot images
To return to the normal playback
Index nine-image mode
Single-image mode
To cancel the protection
Protecting images
Index triple-image mode
Changing image size
To cancel resizing
Choosing images to print
Resize
Select Dpof with b/B, then press z
To unmark the mark
Repeat to mark other images
To unmark all the marks in the folder
To unmark marks
To exit the mark function
Select Dpof with v, then
Using the self-timer
Indicators during shooting
Shooting movies
Before starting
To adjust the volume
Indicators during viewing movies
Viewing movies on the LCD screen
To advance or rewind the movie
Deleting movies
To cancel deletion
Delete
Select Delete with v, then press z
Select Exit in or
To delete all movies in the folder
Select Exit in , then press z
Viewing images on your computer
When a USB connector is not provided on your computer
Communication with your computer
There are two methods for viewing images on a computer
What is finalization?
Viewing images using CD-ROM drive
Finalizing a disc
Canceling finalization Unfinalize CD-RW only
To cancel finalization
To cancel the unfinalization
To unfinalize again after canceling the unfinalization
Slide the disc into the inner
Using the supplied 8cm CD adapter
Groove and under two
Tabs on the inner circle
Viewing images through a CD-ROM drive
Folder contents are displayed
Windows 98/98SE/2000/Me/XP
Double-click the desired image file
Example For Windows Me users
Image file storage destinations and image file names
101MSDCF
Folder File name File meaning
Copying images into your computer through a USB connection
Installing the PTP Manager
Select the destination folder, then click Next
Check the settings and click Next
Select Program Folder screen appears
Select PTP Manager as a program folder, then click Next
Connecting the camera to your computer
Installing ImageMixer
Install ImageMixer according to the screen
Windows 98/98SE/2000/Me/XP
Turn on your computer and the camera
USB Mode PTP appears on the LCD screen of the camera
Windows 98/98SE/2000/Me Users
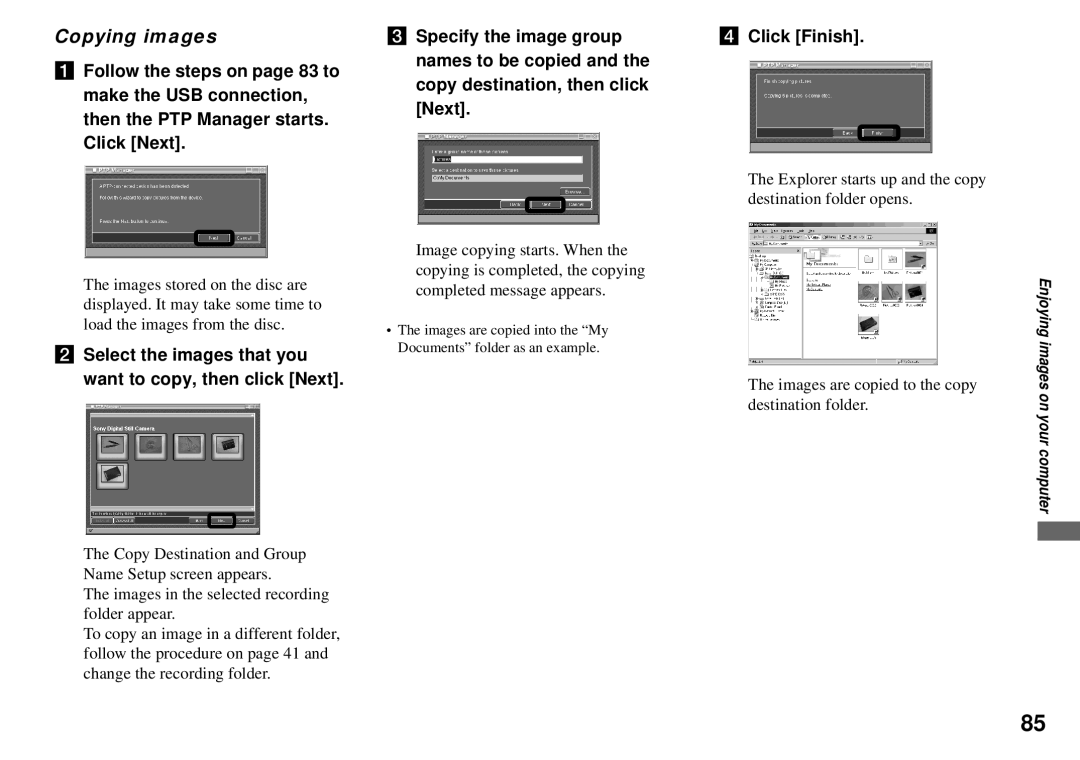
Select the images that you want to copy, then click Next
Copying images
Images in the selected recording folder appear
Images are copied to the copy destination folder
Copying images using the Windows XP AutoPlay Wizard
When the PTP Manager does not start up
Windows XP Make a USB connection
Creating a Video CD
Viewing images on your computer
For Mac OS X v10.0/v10.1/ v10.2 users
Battery pack and power
Troubleshooting
Bottom of the camera using a fine-tipped
Indicator is incorrect, or
Symptom Cause Solution Battery remaining
Sufficient battery
Remaining indicator is
SCN or
Shooting still images/movies
Record images
Symptom Cause Solution Your camera cannot
Flash does not work
Macro function does
Deleting/Editing Images
Viewing images
Computers
Disc
Others
Following messages may appear on the screen
Format error
Message Meaning/Corrective action Not enough battery
Turn the power off and on
Can not unfinalize
Code Cause Corrective action C32 ss
Self-diagnosis display
C13 ss
E61 ss
Number of images that can be saved or shooting time
Recording mode Image size
Number of still images that can be saved
Shooting time
100
When the mode dial is set to Or SCN
When the mode dial is set to
Menu items
101
102
± Flash Level
103
Interval
104
105
SET UP items
Camera
Disc Tool
106
Setup
107
Precautions
Cleaning the disc
On internal rechargeable button battery
On discs
108
What is the InfoLITHIUM battery pack?
On InfoLITHIUM battery pack
Charging the battery pack
109
Remaining battery time indicator
Effective use of the battery pack
How to store the battery pack
Battery life
111
Specifications
Camera System
Accessories
NP-FM50 battery pack
112
AC-L15A/L15B AC Adaptor
Center AF indicator 43/ Focus preset value
When shooting still images
Mode dial indicator/ Flash mode indicator
LCD screen
Self-timer indicator 26 P Menu/Guide menu
When shooting movies
Recording time maximum recordable time indicator
EV level indicator 46 N Macro indicator
Playback folder indicator 59 R Image number/Number
When playing back still images When playing back movies
115
Image number/Number of images recorded in selected
116
Index
GIF
117
USB
118
Page
308183511