Compact Disc MiniDisc Deck
Page
Page
Page
Precautions
About This Manual
Welcome
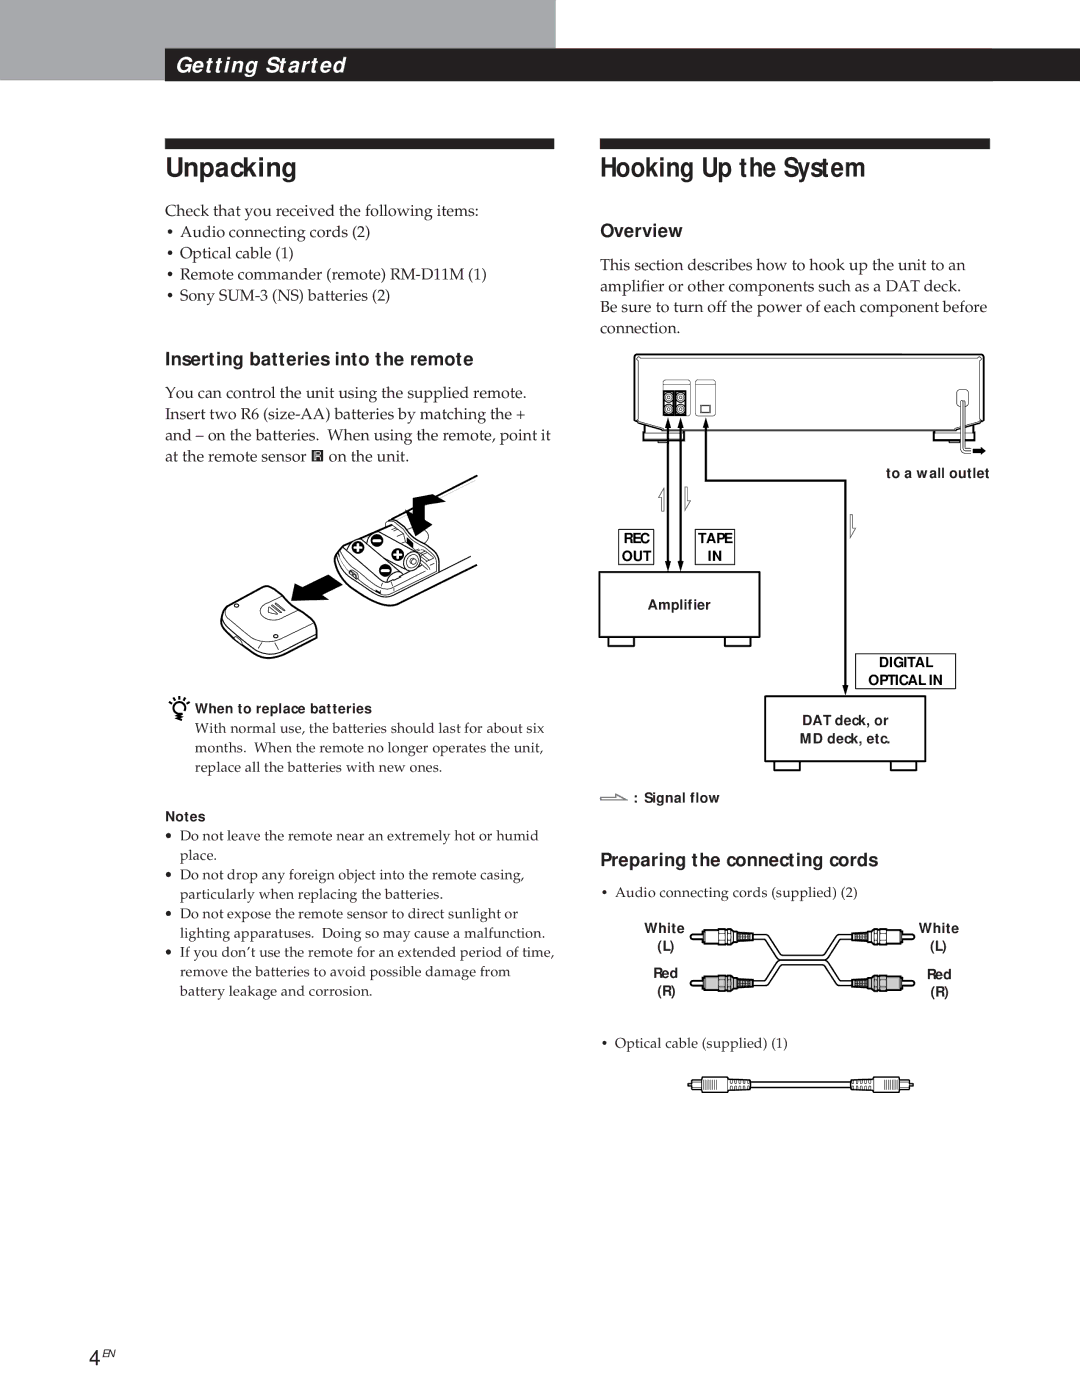
Inserting batteries into the remote
Preparing the connecting cords
Unpacking
Hooking Up the System
Connecting the unit to an amplifier
Connecting the AC power cord
Hooking up the system
Do the following
When you play an 8-cm CD
To use headphones
You can locate and play a track while the player is stopped
Playing an MD
Recording a CD on an MD
Press
When TOC flashes in the display
Music calendar display
Checking Remaining Time of a
Locating a Specific Track on a
Playing Tracks on a CD Repeatedly Repeat Play
Locating a Particular Point in a Track on a CD
Repeating the current track
Repeating a specific portion A-B Repeat
Playing Tracks on a CD in Random Order Shuffle Play
Changing the track order
Playing Tracks on a CD in the Desired Order Program Play
Difference between Normal
Normal mode
Rhythm mode
Looping Part of a CD Loop Play
Recording the current track on an MD Rec-It
Useful Tips When Recording from CDs
Pausing after each track Auto Pause
Inserting blank spaces while recording to tape Auto Space
Checking remaining time and track title
Checking Remaining Time of an
To pause playback at the beginning of a track
Locating a Specific Track on an
Locating a Particular Point in a Track on an MD
When the MD is played Player repeats
Playing Tracks on an MD Repeatedly Repeat Play
Playing tracks on an MD in Random Order Shuffle Play
Playing Tracks on an MD in the Desired Order Program Play
To restart playback
Useful Tips When Recording from MDs to Tape
Track Marking
Digital Recording and Analog Recording
Other cases
When LEVEL-SYNC is displayed during analog recording
To play from the first track of the MD after recording
Useful Tips for Recording
Checking the remaining recordable time on the MD
Playing back tracks just recorded
Digital recording
Analog recording
Recording the Mixed Sounds Microphone Mixing
Adjusting the Recording Level
Marking Track Numbers while Recording Track Marking
To stop Time Machine Recording
Seconds of Prestored Audio Data Time Machine Recording
To cancel Automatic Track Marking
Starting Recording with
Erasing a single track
Erasing Recordings Erase Function
If Protected appears in the display
Erasing a portion of a track
To cancel the Erase function
Erasing all tracks on an MD
You can divide a track while recording
To cancel the Divide function
Dividing Recorded Tracks Divide Function
You can undo a track division
Combining Recorded Tracks Combine Function
To cancel the Combine function
You can undo a track combination
Moving Recorded Tracks Move Function
To cancel the Move function
Labeling Recordings Title Function
Changing an existing title
Labeling tracks and MDs with the remote
Erasing all titles on a disc Name Erase
Undoing the Last Edit Undo Function
To cancel the Undo function
Editing done Message
Some tracks cannot be combined with others
MD Display Messages
System Limitations of MD
Message Meaning
CD player section
Troubleshooting
MD deck section
There is no sound
General
Recording is not possible
Sound has a lot of static
Specifications
Rule
Guide to the Serial Copy Management System
43EN
J, K
Index
W, X, Y, Z
Buttons
Names of controls
Précautions
Enregistrement synchronisé d’un CD
Présentation du mode d’emploi
Bienvenue
Lecture d’un CD Lecture d’un MD
Aperçu
Mise en place des piles dans la télécommande
Déballage
Raccordement de la platine
Remarque
Raccordement de la platine
Raccordement au secteur
Raccordement de la platine à un amplificateur
Pour Vous devez
Lecture d’un CD
Lecture d’un MD
Enregistrement d’un CD sur un MD
Pour Appuyez sur
Quand TOC clignote sur l’afficheur
Affichage du répertoire
Vérification du temps restant sur un CD
Pour revenir rapidement au début de la plage précédente
Localisation d’une plage donnée sur un CD
Pour localiser Vous devez
Pour faire une pause au début d’une plage
Lecture répétée des plages d’un CD lecture répétée
Localisation d’un point donné d’une plage sur un CD
Répétition de la plage en cours
Pour annuler la lecture aléatoire
Répétition d’un passage donné d’une plage répétition A-B Z
Pour annuler la répétition A-B
Pose de nouveaux points de départ et de fin
Changement de l’ordre des plages
Différence entre Normal et Rhythm
En mode Normal
En mode Rhythm
Lecture en boucle d’une partie d’un CD lecture en boucle Z
Pour poursuivre la lecture
Conseils utiles pour l’enregistrement d’un CD Z
Enregistrement de la plage en cours sur un MD Rec-it
Pour annuler l’espacement automatique
Vérification du temps restant et du titre d’une plage
Vérification du temps restant sur un MD
Scan
Localisation d’une plage donnée sur un MD
Localisation d’un point donné d’une plage d’un MD
Quand vous écoutez un MD La platine répète En mode de
Lecture répétée des plages d’un MD lecture répétée
20F
21F
Pause après chaque plage pause automatique
’enregistrement
Remarques sur
EgauqrMa
Numéro De plage Original
Autres cas
Lecture à partir du début du MD après un enregistrement
Conseils utiles pour
Euqigolana tnmertsigernE
Euqimérun mentertsigernE
REC Level
Réglage du niveau d’enregistrement
Après avoir terminé le mixage
Si vous avez Tournez MIX Balance Choisi
Egalp
Si vous ne choisissez qu’une seule source
Sur AMS à l’étape
Pour annuler le marquage automatique
Si Protected apparaît sur l’afficheur
Remarques sur le montage
Effacement d’un enregistrement fonction d’effacement
Effacement d’une seule plage
Effacement d’un passage d’une plage
Effacement de toutes les plages d’un MD
Pour annuler la fonction d’effacement
Vous pouvez diviser une plage pendant l’enregistrement
Division d’une plage enregistrée fonction de division
Pour annuler la fonction de division
Vous pouvez supprimer une division de plage
Vous pouvez supprimer une combinaison de plages
Pour annuler la fonction de combinaison
Pour annuler la fonction de déplacement
Déplacement d’une plage enregistrée Fonction de déplacement
Pour entrer un espace
Titrage d’un enregistrement fonction de titrage
Pour titrer Assurez-vous que la platine est
Pour effacer un caractère
Pour sélectionner Appuyez plusieurs fois sur
Titrage des plages et MD à l’aide de la télécommande Z
Changement d’un titre Z
Pour changer
Pour annuler la fonction de annulation
Certaines plages ne peuvent pas être recombinées
Messages MD affichés
Limites du système MD
Messages Signification
Section lecteur CD
Guide de dépannage
Section platine MD
Le son est très parasité
La télécommande ne fonctionne pas
Généralités
’enregistrement n’est pas possible
Spécifications
Deuxième règle
Guide du système de protection contre la copie abusive Scms
Première règle
Troisième règle
X, Y, Z
G, H, I, J, K
Touches
Nomenclature