Sun Microsystems, Inc San Antonio Road Palo Alto, CA
Please Recycle
Declaration of Conformity
Page
Safety Precautions
Safety Agency Compliance Statements
Selv Compliance
Laser Compliance Notice
Einhaltung sicherheitsbehördlicher Vorschriften
Einhaltung der SELV-Richtlinien
Gehäuseabdeckung
Conformité aux normes de sécurité
Positionnement d’un produit Sun Conformité Selv
Bloc-batterie Couvercle
Normativas de seguridad
Cumplimiento de la normativa Selv
Batería de litio
Norge Sverige
GOST-R Certification Mark Nordic Lithium Battery Cautions
FCC Class a Notice
Regulatory Compliance Statements
FCC Class B Notice
ICES-003 Class B Notice Avis NMB-003, Classe B
ICES-003 Class a Notice Avis NMB-003, Classe a
Xvii
Bsmi Class a Notice
Page
Contents
Hardware Installation
Installation Overview
Installing a New SAN
Switch Activation
Configuring the SAN
Upgrading the SAN
Managing the SAN
Software Architecture Error Messages
Troubleshooting Tools and Resources 133
Page
Figures
16-Port Switch Power Connector
Preface
Using Unix Commands
Shell Prompts
Typographic Conventions
Related Documentation
Installer’s/User’s Manual
Sun Welcomes Your Comments
Accessing Sun Documentation Online
Introduction
New Device Names
New Features, Benefits, and Products
Examples
On-Demand Node Creation
Cascading of Switches
Fabric Connection of Hosts
Higher Realized Bandwidth
Support of Multiple Protocols
Software Upgrade Only
Support for More, Heterogeneous Storage Devices
Support for New Hardware and Software
Switch
Configurations
Supported Hardware
1Supported Hardware
SG-XSW16
Hosts
Supported Configurations
Host/Operating Environment Rules
Supported Host Bus Adapters
Arrays
FC Tape
Software/Drivers
3Sun StorEdge T3 Array and T3+ Array
2Sun StorEdge A5200 Array
L180 and L700 FC Tape Libraries
Switches
Fcip NFS/NAS and Sndr
4Sun StorEdge A3500FC array
FC Tape Libraries
Ports
6Switch Port Types
Zones
Hard Zones
Zoning Rules
SL Zones
Cascading Rules
Zones
Page
Zones and Arrays
Guidelines for Configuration
Zones and Storage
Single Host Connected to One Storage Array
Configuration Examples
8Arrays, Zones, and Initiators
Host adapter
3Single Host Connected to One Sun StorEdge T3 Partner Pair
Single Host Connected to Multiple Storage Arrays
Configurations
Page
SL SL SL SL SL SL SL
FC Tape library
Sun StorEdge T3 partner pairs Host Host Adapter Switches
Scsi
IBA IBB
Multihost
FC-AL Port Controller B Scsi x Drive Tray x Controller a
Host Host Adapter Switches Sun StorEdge A5200 arrays
Two Hosts Connected to Four Sun StorEdge T3 Partner Pairs
IBA
Sun Enterprise E220 Host a Host Adapter Sun Enterprise E3000
Install the jumpers on the pins as shown in Figure
Setting the Loop ID
To Set the Loop ID of a Sun StorEdge A3500 FC Controller
Configurations
Controller B 2 1 Dec
Installation Overview
1Minimum Software Component Versions and Patches
Software Components and Patches
Sndr
Overview-Installing a New Switch
PatchPro Interactive
Overview for Software Installations
PatchPro Expert
To Download Patches Using PatchPro Interactive
Under switches and HBAs, select the HBAs in your SAN
To Download Patches Using PatchPro Expert
Download the patches
Preparing for the Installation
Hardware Installation
Attaching the Mounting Rails to the Expansion Cabinet
Back Stopper screws
Mount the first two switches
To Attach Mounting Rails for Four 8- Port Switches
3Attaching the Mounting Rails for a 16-port Switch
To Attach Mounting Rails for Two 16-Port Switches
To Install the 8-port or 16-port Switch into the Cabinet
Installing the Switch
To Install the Vent Panel on Two 8-Port Switches
Installing the Vent Panel
5Installing the Vent Panel- Two 8-Port Switch Configuration
To Install the Vent Panels on Four 8-Port Switches
6Installing the Vent Panel-Four 8-Port Switch Configuration
To Install the Vent Panel on a 16-Port Switch
7Installing the Vent Panel for a 16-Port Switch
Connecting the Cables
8Power Sequencer
Power off the system
To Connect the Cables to a Sun StorEdge A3500FC Array
To Connect the Cables to a Sun StorEdge A5200 Array
Gbic
11Power Connection for Two or Four Switches
Install the Gbic
Power Fibre channel cables Tie wrap
Page
Configuring the Switch Ethernet Port
Switch Activation
Using Rarp to Change the IP Address
1Sun StorEdge Network FC Switch-8 MAC Address Location
To Set the Network IP Address Using Rarp
80207d937e switch-name
Back up the affected management station configuration files
Switch-name
Determine whether the Rarp daemon is running by typing
# /usr/sbin/in.rarpd -ad
To Make the IP Address Setting Permanent
# ping
To View the SANsurfer Application Version
Installing the Sun StorEdge Network FC Switch 3.0 GUI
Upgrading the GUI
To Remove the 2.0 GUI
To Install the 3.0 GUI Software
Root directory, type
Type
Use the command line and type
To Install the 3.0 GUI Patch
To Start the GUI Software
Use Component Manager Click the Launch button
To Verify the Firmware Revision Level of the switches
To Verify and Load the Switch Firmware
Enter the switch IP address in the Fabric window of the GUI
After the switch icon becomes gray, click the Sun logo
If you want to Reset, click Yes
Double-click the switch icon
To Load the Firmware Revision
Make a note of the firmware revision level
To Change SL Zoning to FLS-IO Transfer IOT
Setting the Stage Type
Required Software Components
Installing a New SAN
Software Components
Luxadm and libgfc/liba5k
Verifying Successful Patch Downloads
Downloading Patches and Packages
To Verify Successful Patch Downloads
1Software Download Sites
2Software Installation Sequence
Installing the Software
Code Example 6-2Example of GNU md5sum Utility
# pkagdd -d pkg-locationSUNWsan
To Install the Software
Install ses driver patch
Install the SAN Foundation Kit SUNWsan patch
Install Solaris driver patches
Install Network Storage Traffic Manager patch
Install luxadm/libgfc/liba5k patch
Install fcip driver patch
Install qlc driver patch
Install Network Storage Agent package SUNWrasag
Install StorTools package SUNWvtsst
Reboot the system
Installing a New SAN
Page
Upgrading the SAN
Verifying Upgrade Compliance
Volume Management
To Upgrade Software
Upgrade the Solaris Operating System
Sun StorEdge SAN
# pkginfo -l pkgname
Upgrade your SUNWsan package to StorEdge SAN
# pkgadd -d pkg-locationSUNWsan
Cfgadm Plug-in Library Packages
Software Installation
SAN Management Software
Follow through on page 72 and page 74 of Chapter
# pkginfo -l SUNWvtsst
Upgrade StorTools package SUNWvtsst
Network Storage Agent
Upgrade the Network Storage Agent package, SUNWrasag
# pkginfo -l SUNWrasag
Switch Firmware
Sun StorEdge Network FC Switch Manager
Upgrade the switch firmware on all SAN switches
# showrev -p grep
For a sample installation session, see Appendix D
Managing Multiple Switches
Configuring the SAN
To Save a Subsequent Switch IP Configuration to Disk
To Save a Switch IP Configuration to Disk
To Recall a Switch IP Configuration
Click File Click Open Fabrics
Managing Cascaded Switches
To Delete a Switch Configuration
Adding an Inter-Switch Link
Zoning
To Create a Name Server Zone Across Cascading Switches
Managing Switch Zones
Broadcast Zones
SL Zones and Name Server Zones
Configuring the SAN
# cfgadm -l
To Discover Fabric Devices Visible on a Host
# cfgadm -al
Become superuser Identify the device to be configured
To Configure a Fabric Device
Configure the Fabric device
# cfgadm -c configure c050020f2300006077
# luxadm display 50020f2300006077
Verify that the selected Fabric device is configured
Code Example
Become superuser Identify the device to be unconfigured
To Unconfigure a Fabric Device
Unconfigure the Fabric device
# cfgadm -c unconfigure c050020f2300006077
Verify that the selected Fabric device is unconfigured
# cfgadm -c configure c0
Verify that all devices on c0 are configured
# cfgadm -c unconfigure c0
Verify that all the devices on c0 are unconfigured
Become superuser
To Discover Fabric Devices Visible to a Host
# cfgadm -l
Code Example
# cfgadm -c configure c050020f2300006077 c250020f2300006107
Verify that the selected devices are configured
Online
Code Example
Verify that the selected devices are unconfigured
Code Example
# cfgadm -c unconfigure c250020f2300006107
Verify that the selected device is unconfigured
StatusPort B Vendor
# cfgadm -al
# cfgadm -c configure c2
Verify that all devices on c2 are configured
Standby
# cfgadm -c unconfigure c2
Unconfigure all of the configured devices on a selected port
Verify that all of the devices on c2 are unconfigured
Page
Managing the SAN
Managing Sun StorEdge Traffic Manager with a Volume Manager
Managing With VxVM/VxDMP
Managing Without a Volume Manager
Managing With the Solstice DiskSuite Software
Rezoning Hosts and Arrays
To Rezone a Sun StorEdge A5200 Array to Host B
To Rezone a Sun StorEdge A5200 Array from Host a
To Rezone a Sun StorEdge A3500FC Array From Host a
If necessary, run the /etc/init.d/rdacctrl start command
To Rezone a Sun StorEdge A3500FC Array to Host B
# /etc/init.d/rdacctrl stop
To Rezone Sun StorEdge T3 Array from Host a
Run the following commands
To Rezone a Sun StorEdge T3 Array to Host B
Adding Storage Devices
Adding a Sun StorEdge A5200 Array
Adding a Sun StorEdge T3 Workgroup or Enterprise Array
Removing Storage Devices
Adding a Sun StorEdge A3500FC Array
Adding a FC-Tape Drive
To Remove a Sun StorEdge A3500FC Array
Removing a Sun StorEdge A5200 Array
Removing a FC-Tape Drive
Managing Fabric Devices Through Dynamic Reconfiguration
Click remove
Managing IP Networks Over Fibre Channel Networks
Managing IP Networks in a SAN
Installation
To Determine All FP Instances to Which IP Can Be Plumbed
Become root Determine fp instances
Manually plumb fp instances
# ifconfig fcip0 plumb
Other /etc/pathtoinst Device Path Entries
# ifconfig fcip7 plumb
Manually plumb the fp instance
Device Path Entry
Invocation
Configuration
To Start a Network Interface Manually
Use the ifconfig command with the appropriate interface
Usage
Diagnostics
Troubleshooting Tools Resources
To Identify the Problem
Host Based Files
Storage Software
Component Based Resources
General Tips For Troubleshooting
Common Problems
Problems and Corrective Measures-General Storage
Problem
Corrective Measures
Check /var/adm/messages for errors
Code Example 10-1Output for Sun StorEdge T3 Array
Seagate
Code Example 10-2Output for Sun StorEdge A5200 Array
Problems and Corrective Measures-Switch
Problems and Corrective Measures-Error Messages
Troubleshooting Tools and Resources
Page
143
Software Architecture
Figure A-1Software Architecture Block Diagram
Cfgadm Error Messages
Error Messages
Table B-1cfgadm Utility Messages
Table B-2Fabric Display Messages
Fabric Display Error Messages
Table B-3Faceplate Display Messages
Faceplate Display Error Messages
Page
Application Error Messages
Help Error Messages
Table B-4Help Messages
Table B-5Application Messages
Port Display Error Messages
Network Configuration Error Messages
Table B-6Network Configuration Messages
Table B-7Port Display Messages
Table B-8Topology Display Messages
Topology Display Error Messages
Page
Zoning Error Messages
User Administration Error Messages
Table B-9User Administration Messages
Table B-10Zoning Messages
Page
What do I do If I lose my super user password?
Frequently Asked Questions
What do I do if SANSurfer does not start?
Ii. Type
What does it mean if the Fabric Icon displays PROM?
What do I do if the Fabric icon is red in the Fabric window?
How do I replace a non-functional switch in the Fabric?
How can I find out which switch SANsurfer is connected to?
To Replace a Switch
How do I identify Duplicate Chassis IDs in a Fabric?
What do I do if a Port is in an unknown mode
How do I confirm a T-Port connection Failure?
What do I do if Loading a Flash File .fls fails?
Why are my zones unintentionally merging in the Fabric?
Click the Apply button to save the changes
# pkgadd -d /download SUNWsan
Sample Installation Session
# patchadd /download/108982-09
# patchadd /download/111847-01
# patchadd /download/111412-04
# patchadd /download/108984-08
# patchhad /download/111096-03
# patchadd /download/111095-05
# patchadd /download/109529-06
# patchadd /download/111097-04
# patchadd /download/111413-04
# pkgadd -d /download SUNWcfplx
# pkgadd -d /download SUNWcfpl
# patchadd /download/111267-02
# patchadd /download/111846-01
# patchadd /download/110614-02
# pkgadd -d /download SUNWvtsst
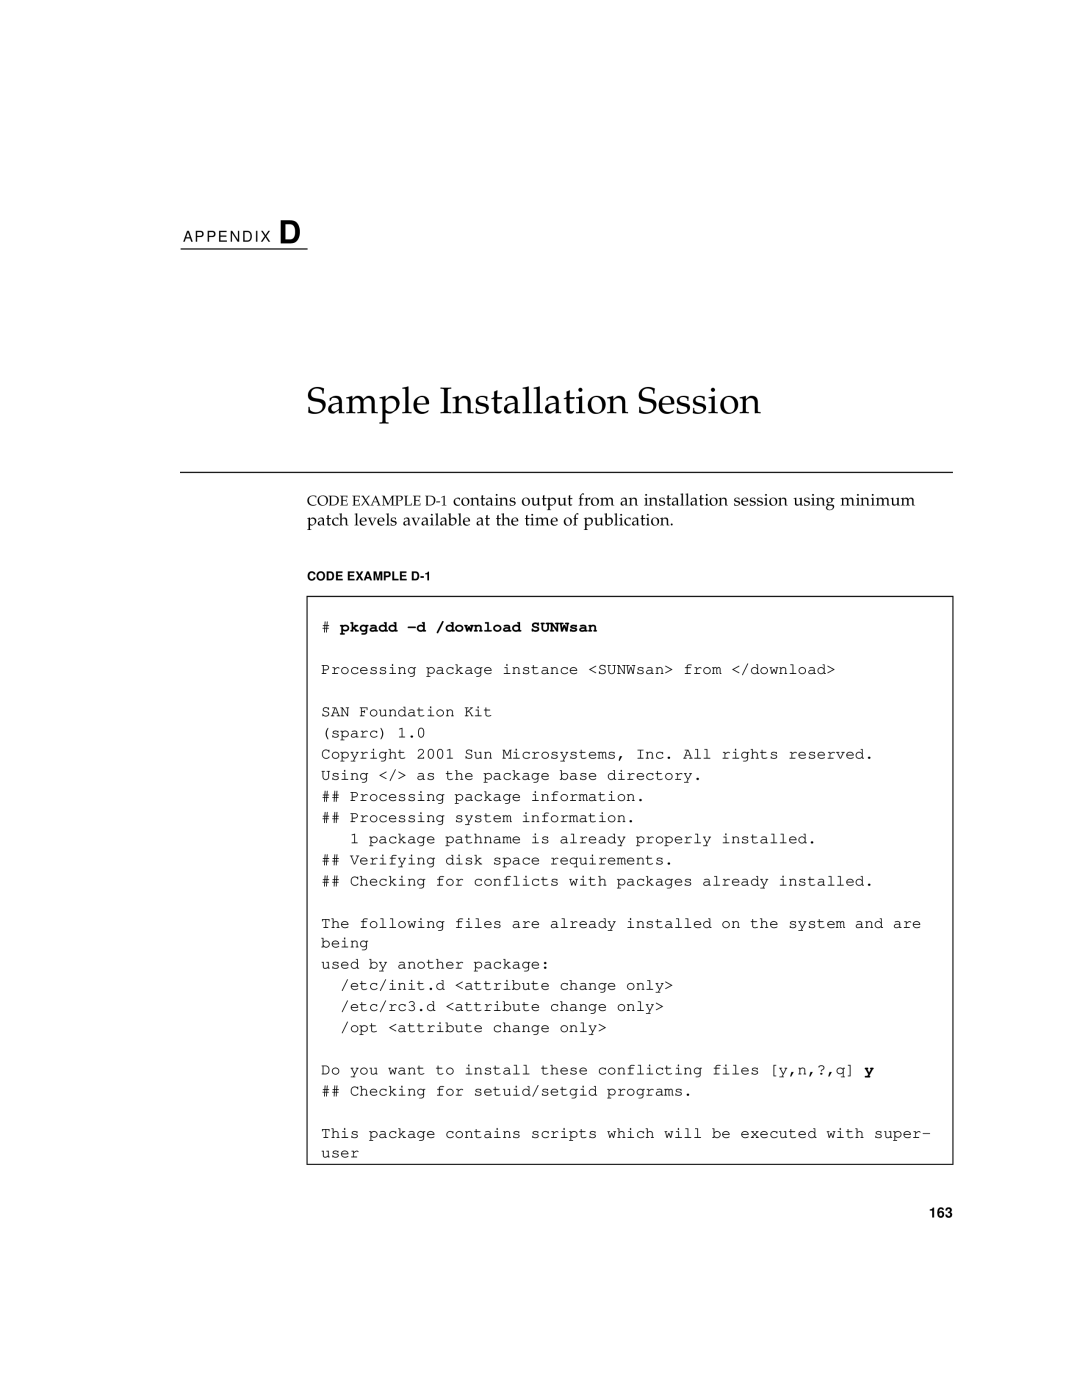
Appendix D Sample Installation Session
Code Example D-1
Appendix D Sample Installation Session
Code Example D-1
Appendix D Sample Installation Session
Code Example D-1
Appendix D Sample Installation Session
Code Example D-1
# pkgadd -d /download SUNWrasag
Code Example D-1
Appendix D Sample Installation Session
Code Example D-1
Appendix D Sample Installation Session
Code Example D-1
Appendix D Sample Installation Session
Code Example D-1
Opt/SUNWrasag/lib/FindBin.pm /opt/SUNWrasag/lib/GDBMFile.pm
Code Example D-1
Appendix D Sample Installation Session
Code Example D-1
Opt/SUNWrasag/lib/NWS/Host.pm
Code Example D-1
Appendix D Sample Installation Session
Code Example D-1
Opt/SUNWrasag/lib/date.sh Opt/SUNWrasag/lib/myMenu.js
# pkgadd -d /download/SUNWsmgr
Appendix D Sample Installation Session
Usr/opt/SUNWsmgr/jre/lib/font.properties
Appendix D Sample Installation Session
Code Example D-1
Appendix D Sample Installation Session
Now you can start the GUI by typing
# patchadd /download/110696-03
Page
Terms
Glossary