APPENDIX
Optional VIA!migo iPod Dock
|
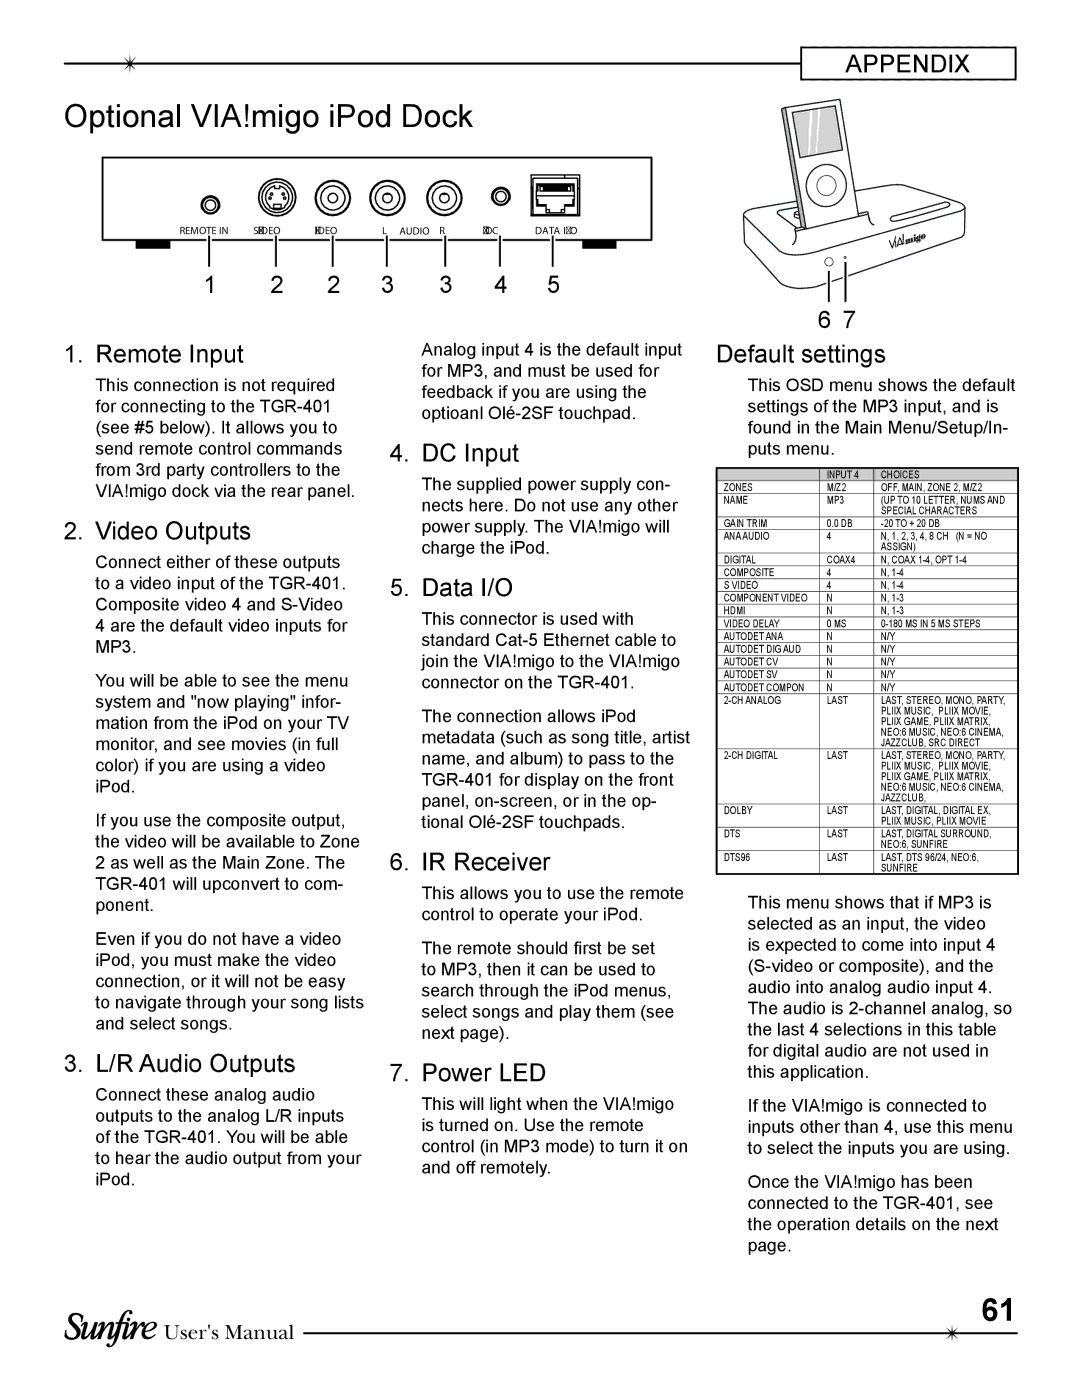
| REMOTE IN | L AUDIO R | 10V DC DATA I/O | |||||||||
|
|
|
|
|
|
|
|
|
|
|
|
|
|
|
|
|
|
|
|
|
|
|
|
|
|
|
|
1 2 2 3 3 4 5
1. Remote Input
This connection is not required for connecting to the
2. Video Outputs
Connect either of these outputs to a video input of the
4 are the default video inputs for MP3.
You will be able to see the menu system and "now playing" infor- mation from the iPod on your TV monitor, and see movies (in full color) if you are using a video iPod.
If you use the composite output, the video will be available to Zone 2 as well as the Main Zone. The
Even if you do not have a video iPod, you must make the video connection, or it will not be easy to navigate through your song lists and select songs.
Analog input 4 is the default input for MP3, and must be used for feedback if you are using the optioanl
4. DC Input
The supplied power supply con- nects here. Do not use any other power supply. The VIA!migo will charge the iPod.
5. Data I/O
This connector is used with standard
The connection allows iPod metadata (such as song title, artist name, and album) to pass to the
6. IR Receiver
This allows you to use the remote control to operate your iPod.
The remote should first be set to MP3, then it can be used to search through the iPod menus, select songs and play them (see next page).
67
Default settings
This OSD menu shows the default settings of the MP3 input, and is found in the Main Menu/Setup/In- puts menu.
| INPUT 4 | CHOICES |
ZONES | M/Z2 | OFF, MAIN, ZONE 2, M/Z2 |
NAME | MP3 | (UP TO 10 LETTER, NUMS AND |
|
| SPECIAL CHARACTERS |
GAIN TRIM | 0.0 DB | |
ANA AUDIO | 4 | N, 1, 2, 3, 4, 8 CH (N = NO |
|
| ASSIGN) |
DIGITAL | COAX4 | N, COAX |
COMPOSITE | 4 | N, |
S VIDEO | 4 | N, |
COMPONENT VIDEO | N | N, |
HDMI | N | N, |
VIDEO DELAY | 0 MS | |
AUTODET ANA | N | N/Y |
AUTODET DIG AUD | N | N/Y |
AUTODET CV | N | N/Y |
AUTODET SV | N | N/Y |
AUTODET COMPON | N | N/Y |
LAST | LAST, STEREO, MONO, PARTY, | |
|
| PLIIX MUSIC, PLIIX MOVIE, |
|
| PLIIX GAME, PLIIX MATRIX, |
|
| NEO:6 MUSIC, NEO:6 CINEMA, |
|
| JAZZCLUB, SRC DIRECT |
LAST | LAST, STEREO, MONO, PARTY, | |
|
| PLIIX MUSIC, PLIIX MOVIE, |
|
| PLIIX GAME, PLIIX MATRIX, |
|
| NEO:6 MUSIC, NEO:6 CINEMA, |
|
| JAZZCLUB, |
DOLBY | LAST | LAST, DIGITAL, DIGITAL EX, |
|
| PLIIX MUSIC, PLIIX MOVIE |
DTS | LAST | LAST, DIGITAL SURROUND, |
|
| NEO:6, SUNFIRE |
DTS96 | LAST | LAST, DTS 96/24, NEO:6, |
|
| SUNFIRE |
This menu shows that if MP3 is selected as an input, the video is expected to come into input 4
3. L/R Audio Outputs
Connect these analog audio outputs to the analog L/R inputs of the
7. Power LED
This will light when the VIA!migo is turned on. Use the remote control (in MP3 mode) to turn it on and off remotely.
for digital audio are not used in this application.
If the VIA!migo is connected to inputs other than 4, use this menu to select the inputs you are using.
Once the VIA!migo has been connected to the
![]() User's Manual
User's Manual
61