CHAPTER 5
Automatic and Manual Equalization
Auto EQ
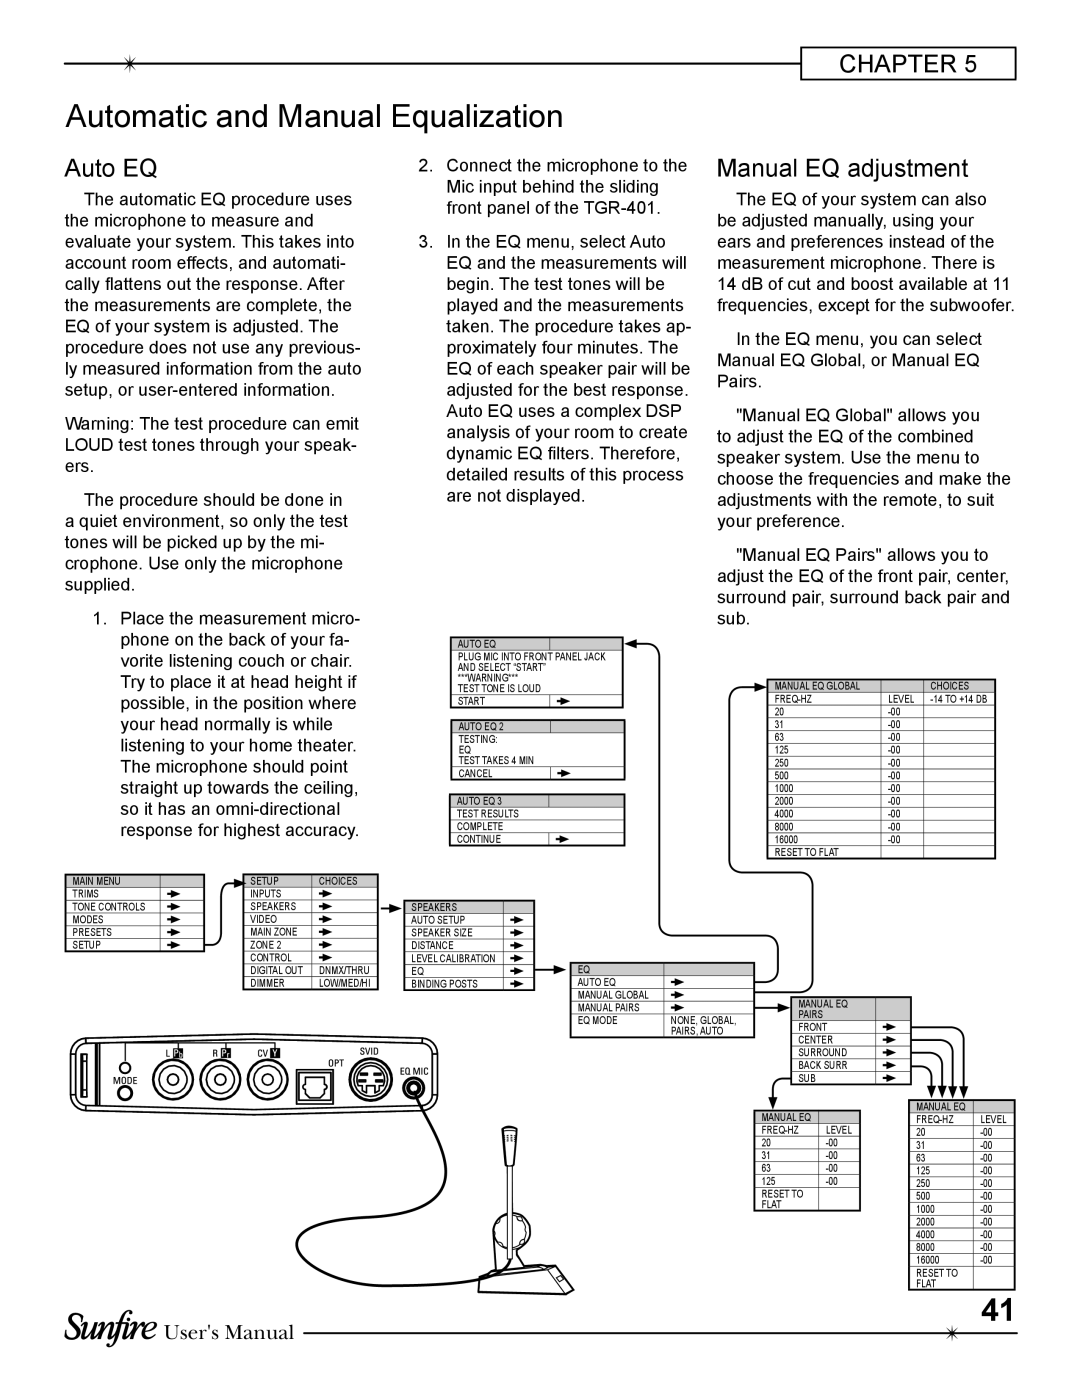
The automatic EQ procedure uses the microphone to measure and evaluate your system. This takes into account room effects, and automati- cally flattens out the response. After the measurements are complete, the EQ of your system is adjusted. The procedure does not use any previous- ly measured information from the auto setup, or
Warning: The test procedure can emit LOUD test tones through your speak- ers.
The procedure should be done in a quiet environment, so only the test tones will be picked up by the mi- crophone. Use only the microphone supplied.
1. Place the measurement micro- |
phone on the back of your fa- |
2.Connect the microphone to the Mic input behind the sliding front panel of the
3.In the EQ menu, select Auto EQ and the measurements will begin. The test tones will be played and the measurements taken. The procedure takes ap- proximately four minutes. The EQ of each speaker pair will be adjusted for the best response. Auto EQ uses a complex DSP analysis of your room to create dynamic EQ filters. Therefore, detailed results of this process are not displayed.
Manual EQ adjustment
The EQ of your system can also be adjusted manually, using your ears and preferences instead of the measurement microphone. There is
14 dB of cut and boost available at 11 frequencies, except for the subwoofer.
In the EQ menu, you can select Manual EQ Global, or Manual EQ Pairs.
"Manual EQ Global" allows you to adjust the EQ of the combined speaker system. Use the menu to choose the frequencies and make the adjustments with the remote, to suit your preference.
"Manual EQ Pairs" allows you to adjust the EQ of the front pair, center, surround pair, surround back pair and sub.
vorite listening couch or chair. |
Try to place it at head height if |
possible, in the position where |
your head normally is while |
listening to your home theater. |
The microphone should point |
straight up towards the ceiling, |
so it has an |
response for highest accuracy. |
AUTO EQ
PLUG MIC INTO FRONT PANEL JACK AND SELECT “START”
***WARNING***
TEST TONE IS LOUD
START
AUTO EQ 2
TESTING:
EQ
TEST TAKES 4 MIN
CANCEL
AUTO EQ 3
TEST RESULTS
COMPLETE
CONTINUE
MANUAL EQ GLOBAL | CHOICES |
LEVEL | |
20 | |
31 | |
63 | |
125 | |
250 | |
500 | |
1000 | |
2000 | |
4000 | |
8000 | |
16000 | |
RESET TO FLAT |
|
MAIN MENU | SETUP | CHOICES |
TRIMS | INPUTS |
|
TONE CONTROLS | SPEAKERS |
|
MODES | VIDEO |
|
PRESETS | MAIN ZONE |
|
SETUP | ZONE 2 |
|
| CONTROL |
|
| DIGITAL OUT | DNMX/THRU |
| DIMMER | LOW/MED/HI |
![]()
![]() User's Manual
User's Manual
SPEAKERS
AUTO SETUP
SPEAKER SIZE DISTANCE
LEVEL CALIBRATION EQ
BINDING POSTS
EQ |
|
AUTO EQ |
|
MANUAL GLOBAL |
|
MANUAL PAIRS |
|
EQ MODE | NONE, GLOBAL, |
| PAIRS, AUTO |
MANUAL EQ PAIRS FRONT CENTER SURROUND BACK SURR ![]() SUB
SUB
MANUAL EQ |
|
LEVEL | |
20 | |
31 |
63
125
RESET TO FLAT
MANUAL EQ |
|
LEVEL | |
20 | |
31 | |
63 | |
125 | |
250 | |
500 | |
1000 | |
2000 | |
4000 | |
8000 | |
16000 | |
RESET TO |
|
FLAT | 41 |
|
