LD200SL8
Important note is located on the rear of the cabinet
Introduction
Laser Safety
Precautions
RADIO-TV Interference
Important Copyright Information
5Supplied Accessories
5Symbols Used in this Manual
5Tilt Stand
Introduction
Contents
DTV/TV/CATV
Features
REV E button p29
5Installing the Batteries
5Rear Panel
5Control Panel
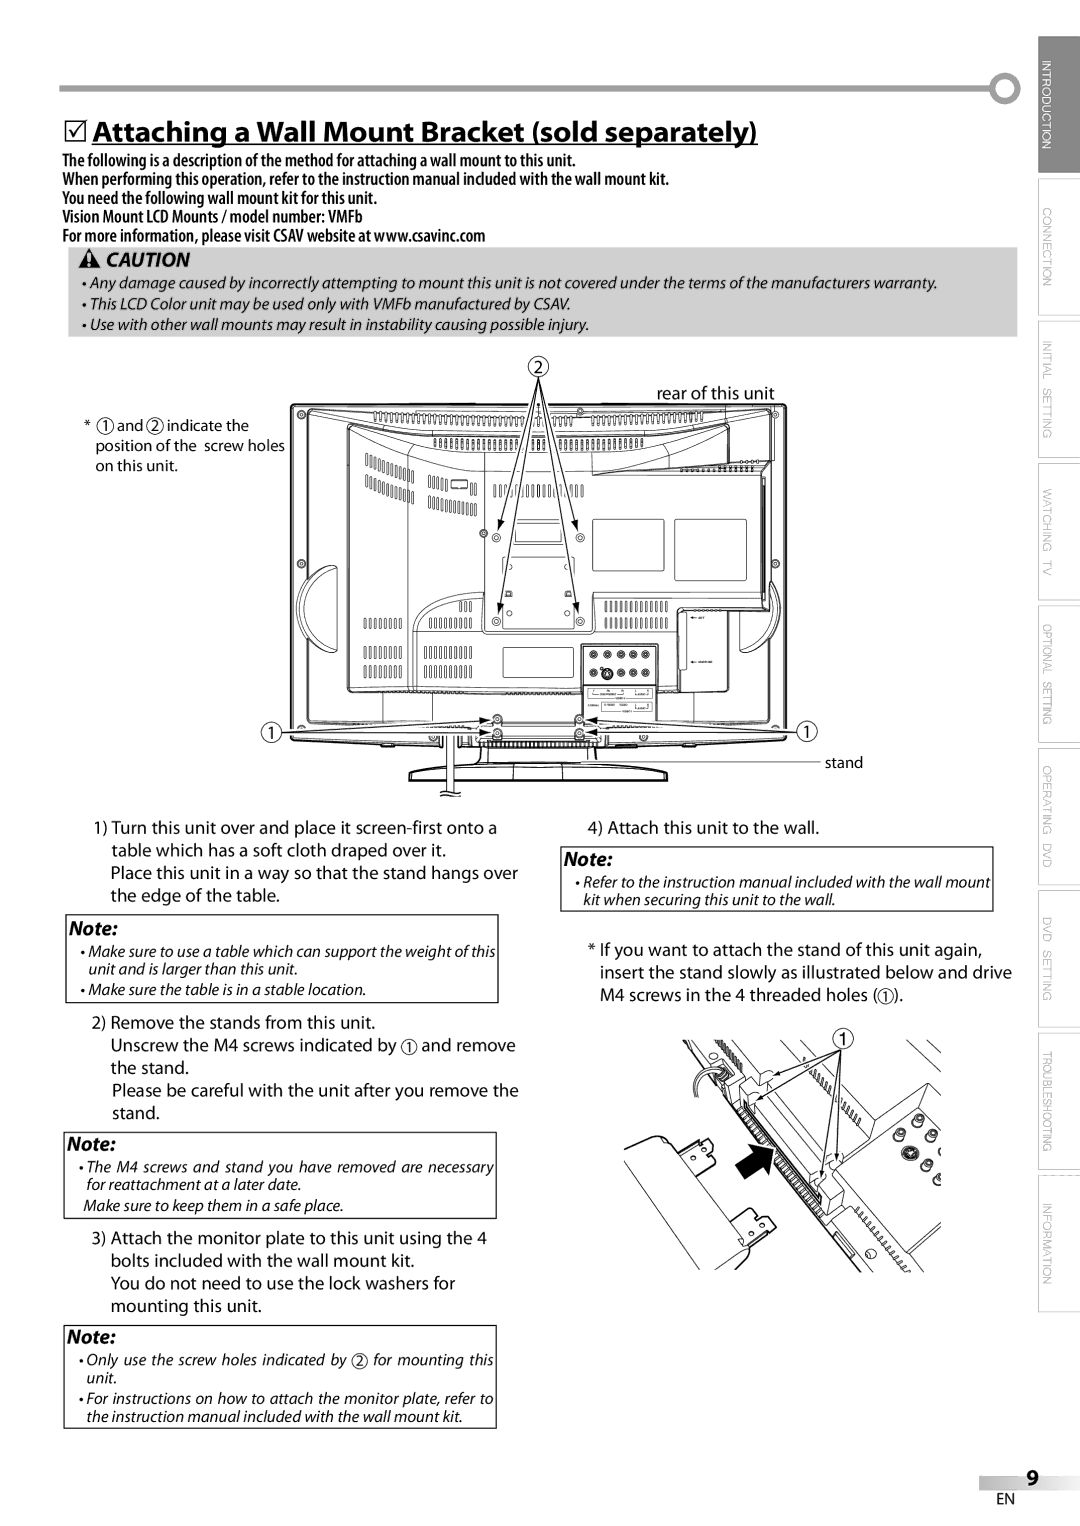
Attach this unit to the wall
5Attaching a Wall Mount Bracket sold separately
5Basic Connection
Connection
Antenna Cable Connection
Connection to Cable Box or Satellite Box
5External Device Connection
Component Video Cable Connection
Video Cable Connection
Digital Audio Output Connection
Video Connection
5Initial Setup
Initial Setting
Make sure if the unit is connected to antenna or cable
Scanning and memorizing the channels automatically start
5Auto Channel Scan
5Main Menu
Channel settings will be saved even if the power fails
Press Setup to exit
5Language Selection
English Español Français
5Volume Adjustment
Watching TV
5Channel Selection
Analog Mode Digital Mode VIDEO1 VIDEO2
5Switching Each Mode
5MTS System
English Spanish French
OFF Broadcasting Information Program Guide
5Screen Information
Press Display
Broadcasting Information
5Sleep Timer
5TV Screen Display Mode
To Cancel the Sleep Timer
Letterbox
5Picture Adjustment
Optional Setting
5Channel Add/Delete
Brightness Contrast Color Tint Sharpness
Caption Mode CAPTION1 and TEXT1
Press Setup to display the main menu
5Closed Caption
OFF CAPTION1 CAPTION2 TEXT1 TEXT2
5DTVCC Style
5DTV Closed Caption
Bright Normal Dark
5Back Light Setting
You can adjust color temperature of the TV screen
5Color Temperature
When you have not set up your password, enter
Chip
To Set the Sub Ratings
TV Rating
Enter password again in Confirm Password space
Change Password
Mpaa Rating
Enter
DVD Functions 5Playable Media
Operating DVD
5Unplayable Media
Any other discs without compatibility indications
5DVD Menu
Playback
5Resume Playback
Pause
5Fast Forward / Fast Reverse
Step-by-step Playback
5Slow Forward / Slow Reverse
5Zoom
5MP3 Playback
When selecting the folder
5Search Functions
Chapter / Title Search
Track Search
5Repeat Playback
Time Search
Direct Search
5Repeat A-B Playback
5Random Playback
5Programmed Playback
Sequence
Press Play B to start random playback
ALL
5On-screen Display
Subtitle Language
5Special Settings
Audio Language
Camera Angles
Stereo Sound Mode
Black Level Setting
Use Cursor K/ L to adjust the black level
Virtual Surround
When there is no input You can mark up to 10 points
Marker Setup
Press Clear
Ers
5DVD Language Setting
DVD Setting
Subtitle *1, *2 Default OFF
Audio *1, *2
Use Cursor K/L to select DVD SETUP, then press Enter
5Display Setting
Use Cursor K/L to select CUSTOM, then press Enter
Use Cursor K/L to select DISPLAY, then press Enter
Down Sampling Default on
5DVD Audio Setting
Use Cursor K/L to select AUDIO, then press Enter
Dolby Digital
5Parental Setting
Use Cursor K/L to select PARENTAL, then press Enter
Use Cursor K/L to select Parental LEVEL, then press Enter
5Others
Angle Icon Default on
You can change the other functions
Use Cursor K/L to select OTHERS, then press Enter
5Language Code List
5Reset to the Default Setting
Use Cursor K/L to select INITIALIZE, then press Enter
Use Cursor K/L to select YES, then press Enter
5Troubleshooting Guide
Troubleshooting
Check the Parental setting
Problems with Closed Caption Feature
Information
Maintenance
Glossary
Atsc
5Electrical Specification
5General Specifications
5Other Specifications
5Cable Channel Designations
Limited Warranty
Manual del Usuario
Introducción
Importante para su Seguridad
Interferencia DE RADIO-TELEVISIÓN
Precauciones
Seguridad DEL Láser
Protection DE Copyright
5Accesorios Suministrados
5Base Inclinable
5Símbolos Utilizados en este Manual
Contenido
Introducción
Características
5Instalación de las Pilas
5Función de Mando a diDistanciia
5Panel de Control
Instale el aparato en la pared
Parte trasera del aparato
Una mesa protegida con una tela suave extendida
Coloque el aparato de manera que la base de
5Conexión Básica
Conexión
Conexión de Cable de Antena
Conexión a Caja de Cable o Caja de Satélite
5Conexión de Dispositivo Externo
Conexión de Cable de Vídeo en Componentes
Conexión de Cable de S-video
Conexión de Salida de Audio Digital
Conexión de Vídeo
5Configuración Inicial
Ajuste Inicial
Esta operación tardará unos momentos
5Menú Principal
Presione Setup para salir
5Selección de Idioma
Español Français English
Para VER LA Televisión
5Ajuste de Volumen
5Selección de Canal
Para utilizar los botones numéricos
5Sistema MTS
5Para Cambiar entre Cada Modo
Modo Analógico Modo Digital
Inglés Español Francés
OFF Información DE Emisión Guía DE Programas
5Información de Pantalla
Presione Display
Información de Emisión
5Temporizador de Apagado
5Modo de Visualización de Pantalla del Televisor
Ancho Buzón
Presione Sleep para ajustar el temporizador de apagado
5Agregar/Borrar Canales
Ajuste Opcional
5Ajuste de Imagen
En 5 segundos, utilice Cursor s / B para ajustar la calidad
Modo de Subtítulos SUBTIT1 y TEXTO1
5Subtítulos Cerrados
SUBTIT2 y TEXTO2
Pantalla del televisor los caracteres introducidos
5Estilo Dtvcc
5Subtítulos Cerrados en DTV
Brillo Normal Oscuro
5Ajuste de Luz de Fondo
5Temperatura de Color
Cuando no haya configurado su contraseña, introduzca
Normal Caliente Frío
Clase de TV
Para Ajustar las Subcategorías
Clase de TV
Vuelva a introducir la contraseña en el espacio
Clase de Mpaa
Funciones del DVD 5Medios que se Pueden Reproducir
Utilización DEL DVD
5Medios que no se Pueden Reproducir
En los discos siguientes Puede QUE no se oiga el sonido
5Menú DVD
Reproducción
5Reanudación de la Reproduc- ción
Pausa
5Reproducción Paso a Paso
Durante la reproducción, presione repetidamente
× Zoom
Cuando seleccione la carpeta
5Reproducción MP3
Presione Cursor B cuando quiera ir a la siguiente jerarquía
Consulte Reanudación de la Reproducción en la página
5Funciones de Búsqueda
5Repetición de Reproducción
Búsqueda por Tiempo
Dirija la búsqueda
5Repetición de Reproducción A-B
Ej. CD de audio
5Reproducción Programada
Se pueden ordenar hasta 99 pistas/archivos
Presione Play B para iniciar la reproducción pro- gramada
Todo
5Visualización en Pantalla
Idioma de Subtítulos
5Ajustes Especiales
Idioma de Audio
Ángulos de la Cámara
Surround Virtual
Ajuste del Nivel del Negro
Modo de Sonido Estéreo
Utilice Cursor K/ L para ajustar el nivel del negro
Para poner un marcador
Puesta de Marcador
Ajuste DE DVD
5Ajuste de Idioma en DVD
Utilice Cursor K/L para seleccionar Idioma y presione Enter
Instalación TV
5Ajuste de la Pantalla
Dolby Digital Ajuste predeterminado Bitstream
5Ajuste de Audio de DVD
Deseado y luego presione Enter
5Ajuste Paterno
Puede cambiar otras funciones
Otros
5Reposición de los Ajustes Predeterminados
5Lista de Códigos de Idiomas
Idioma Código
5Guía de Solución de Problemas
Solución DE Problemas
Problemas con la Función de Subtítulos Cerrados
Glosario
Información
Mantenimiento
Edtv
5Especificaciones Generales
5Denominaciones de Canales de Cable
5Especificación Eléctrica
5Otras Especificaciones
Garantía Limitada