Supplied Accessories
Please read before using this equipment
Recording function
Before You Start Connections
BeforeYou Start
Precautions
Before
Precautions Cont’d
You Start Connections
Installation Location
Table of Contents
Recording
Features
Playback
Editing
Symbols Used in this Manual
Features Cont’d
Symbol Description
Information on Recording DVR
Information on Playback
Play the recorded contents
DVD indicator Lights up when DVD mode is selected
Power indicator Lights up when the power is on
Functional Overview
Front Panel
Front Panel Display
Functional Overview Cont’d
Display message
PM Appears in the afternoon with the Clock Display
Number Buttons
Remote Control
REC / OTR DVR
Open / Close A* DVD Press to open / close the disc tray
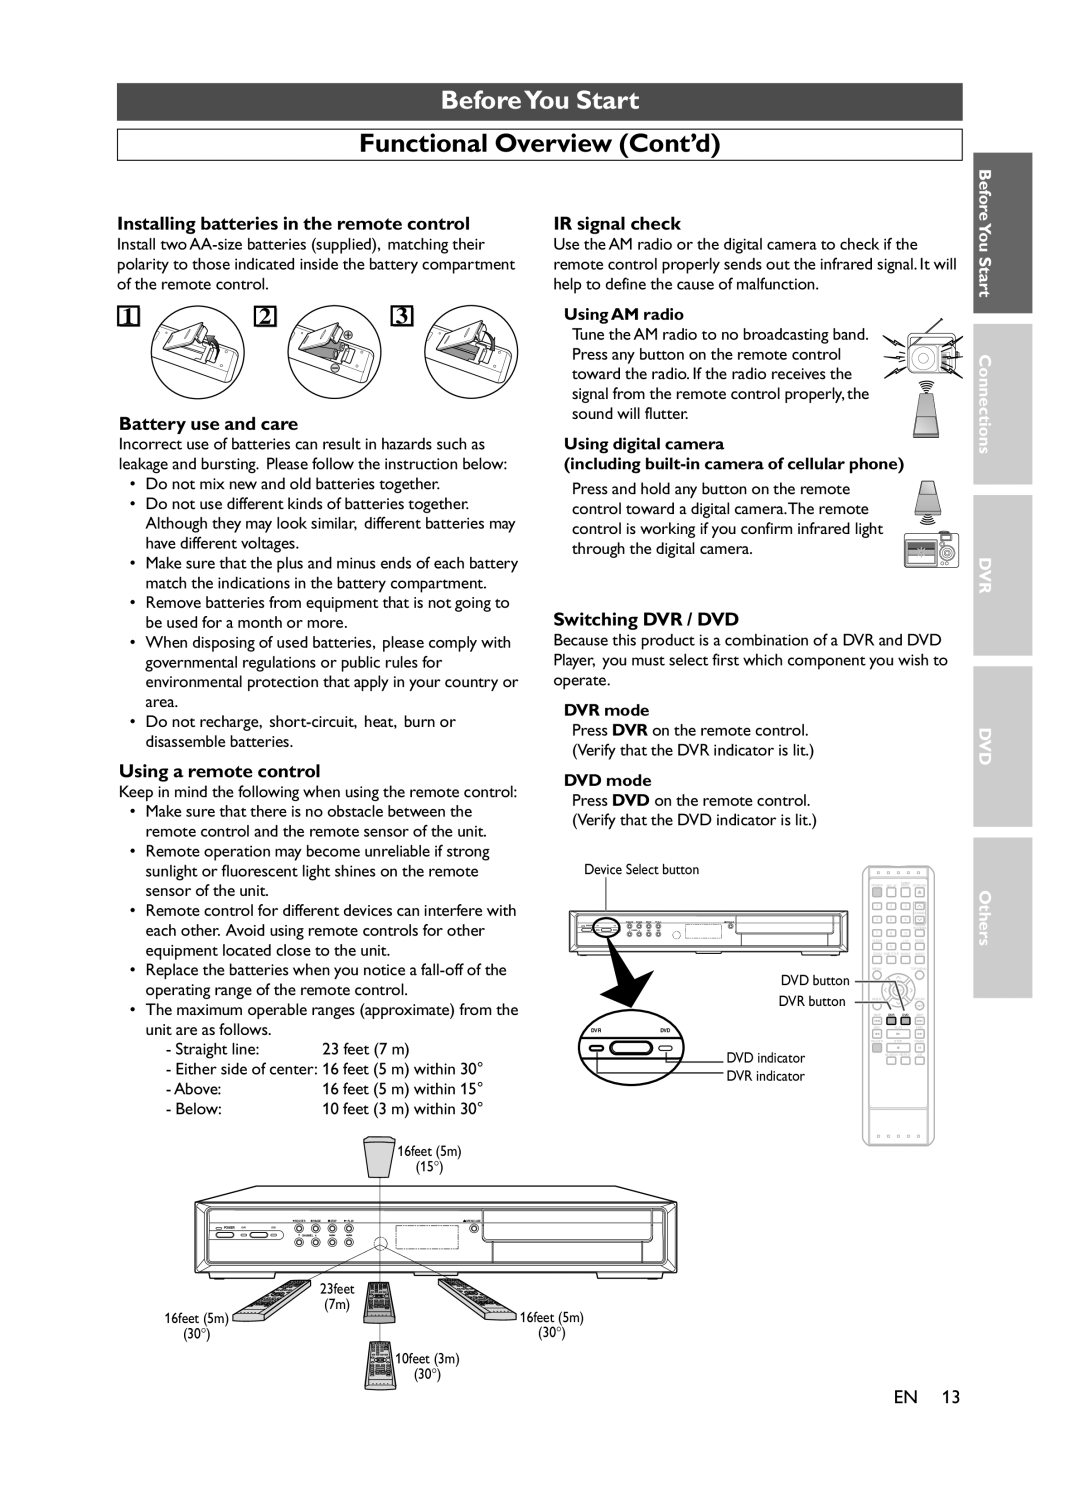
Battery use and care
Installing batteries in the remote control
IR signal check
Switching DVR / DVD
Setup Menu
On-Screen Display for DVR Mode General Information
Press SET UP to display Easy Setting Menu or
Display Menu
Setup Menu
On-Screen Display for DVD Mode Display Menu
Example DVD Custom Menu
Example Audio CD
Connection to aTV
Connections
If yourTV is not compatible with Progressive Scan
This unit
Connection to a TV Cont’d
Cable TV signal
Connection to a Cable Box or Satellite Box
After you have completed connections
Connection to an Audio System
OSD Language Setting Turn on the Unit for the FirstTime
DVR Initial Setups
Using / , select a desired language
Press Enter to start Auto Setups
Press DVR first Press SET UP
Channel Setting
Select Channel Setting
Channel Setting Menu will appear
Easy Setting Menu or Advanced Menu will appear
Channel Setting Cont’d Adding / Deleting Channels
Press SET UP to exit
Select Initial Setup
Auto Clock Setting
Clock Setting
Select Clock Setting
Select Auto Clock Setting
Manual Clock Setting
Clock Setting Cont’d
If you do not know the PBS channel number in your area
If you know the PBS channel number in your area
Select Daylight Saving Time
Clock Setting Cont’d Setting Daylight Saving Time
SAP Secondary Audio Program
TV Audio Setting
Select TV Audio Select
Stereo
DVR Recording
Using Channel / , or the Number
Basic Recording
One Touch Recording OTR
Using Channel / or the Number
Preparing for OTR
Press REC / OTR
Preparing for Timer recording
Timer Recording
Press Timer Prog
Timer Programming List will appear
Recording Date
Timer Recording Cont’d
January 1st
To change the setting of a program
Using / , select the program you want to edit
Using / , select Program Change, then press Enter
Editing Menu will appear
Priority of overlapped settings
Hints for Timer Recording
Same start time and different end time
Different start time and different end time
Information
Preview window
Previous recordings
Scheduled Recordings
Recording & Playback
To Change or Cancel Program
Navigator
Video Cable Audio cable
Settings for the External Devices
Dubbing from the External Devices
Basic Playback Direct Playback
DVR Playback
Playback from theTitle List
Press TOP Menu
Basic Playback Cont’d
Using
Playback from theTitle List Menu
To exit the Title List, press TOP Menu
Slow forward / Slow reverse
Special Playback Fast forward / Fast reverse
Sound will remain muted
To return to the normal playback, press Play B
Simultaneous Playback and Recording
Special Playback Cont’d Time Shift Playback
You can also playback a title in the same device DVR
Start Connections
Step-by-Step Playback
Special Playback Cont’d Pause
Special Playback Cont’d Repeat Playback
Using / , select
Program
Chapter
Using Display
Using Skip H / G
Search Title / Chapter Search
Title
Search Cont’d Time Search
Using Select
Elapsed time counter
Search Cont’d Series Search
Using / , select Search. Press Enter
Series List will appear
Title List of the selected series will appear
Search Cont’d
Selecting a Format of Audio and Video Audio Status
This feature allows you to check the current audio status
It only affects during the playback of DVR
Current audio status will appear
Before You
Deleting Titles Deleting SelectedTitles
DVR Editing
Press Enter Title List Menu will appear
Using Select DVR Menu
Press SET UP
Deleting Titles Cont’d
Press DVR first
Protecting / Undo Protecting Titles
Tour of the Setup Menus
DVR Other Setups
Press Enter Using
Playback Setting
Select Advanced Menu
Playback Menu will appear
Audio Out
Playback Setting Cont’d TV Aspect
Letter Box
Pan & Scan
Press Enter Using Select Initial Setup. Press Enter
Recording Setting Auto Chapter
Using Select Record. Press Enter
Select Reset to factory default
Reset to Factory Default
Press Enter Confirmation window will appear
About the Discs
DVD Disc Playback
Unplayable Discs
On the following disc, the sound MAY not be heard
Press Open / Close a
Playback Basic Playback
This operation may take a While to be recognized
Title Menus
Playback Cont’d Disc Menus
Example DVD and CD
Playback Cont’d Resume Playback
Playback Cont’d Pause
Press Play Bto continue playback
Special Playback Cont’d Slow Forward / Slow Reverse
To exit zoom mode, press Zoom repeatedly to
Special Playback Cont’d Zoom
Select OFF
When a folder is selected
When a track is selected
Special Playback Cont’d Playing back MP3 / WMA Discs
Hints for MP3 / WMA files
Track Search is not available on some discs
Search Track Search
Using Search
Using Skip H/ G
Search Cont’d Title / Chapter Search
Buttons within 30 seconds
Time Search display appears
Title track number and the time will appear
Search Cont’d Marker Setup
To return to the marker later
Hints for DVD Repeat
Repeat / Random / Programmed Playback Repeat Playback
Hints for CD Repeat
Hints for MP3 and WMA Repeat
Repeat A-B Playback
Repeat / Random / Programmed Playback Cont’d
Press Play B Random Playback will start
Random Playback
If a folder is selected
Programmed Playback
To set subtitle ON/OFF
Special Settings Subtitle Language
During playback, press SUBTITLE, and then
Languages are available on disc during DVD playback
Special Settings Cont’d Audio Language
Example DVD Press DVD first
Special Settings Cont’d Camera Angles
Special Settings Cont’d Black Level Setting
Special Settings Cont’d Stereo Sound Mode
For CD play back only
Special Settings Cont’d Virtual Surround
P80 a P81 B P82 C Step
DVD Setups
Language menu Display menu
Parental menu
DVD Setup Cont’d Language Setting
DVD Setup Cont’d Display Setting
DRC
DVD Setup Cont’d Audio Setting
If a password is not yet set, enter your desired
DVD Setup Cont’d Parental Setting
If a password is already set, enter the current
Using Select desired level Press Enter
Parental Setting Cont’d
DVD Setup Cont’d
Using the Number Button, enter your current password
Using the Number Button, enter your new four
Press Enter to change the setting Angle Icon Default on
DVD Setup Cont’d Others Setting
Auto Power OFF Default on
Others
Symptom Solution
Troubleshooting Cont’d
Every time the power turns on
Activate the setting
Signal.This is not a malfunction
Symptom Solution Recording is impossible
Titles from the Title List
Maximum number of titles has exceeded. Delete
Symptom
Refer to the infrared signal. See
Symptom Solution Titles can not be edited or deleted
Pressing SET UP does not do anything
Displayed or while the disc is loading, SET UP does not
Glossary
Language Code
Language Code
Maintenance
Specification
Frequently Asked Questions
Memo
Limited Warranty