Synology DiskStation Users Guide
Table of Contents
Back Up Data
Manage Media Server and iTunes Service
Manage Files with Web-Based File Browser
Enjoy Entertainment Content on the Server
Store and Share Files over the Internet
Transfer Files via FTP
USB Print Server
Enjoy Music Anytime and Anywhere
Host Websites
Record Videos with IP Cameras
Most Models
Bay & 2-Bay Models
DS211+
DS710+
DiskStation
Bay Models
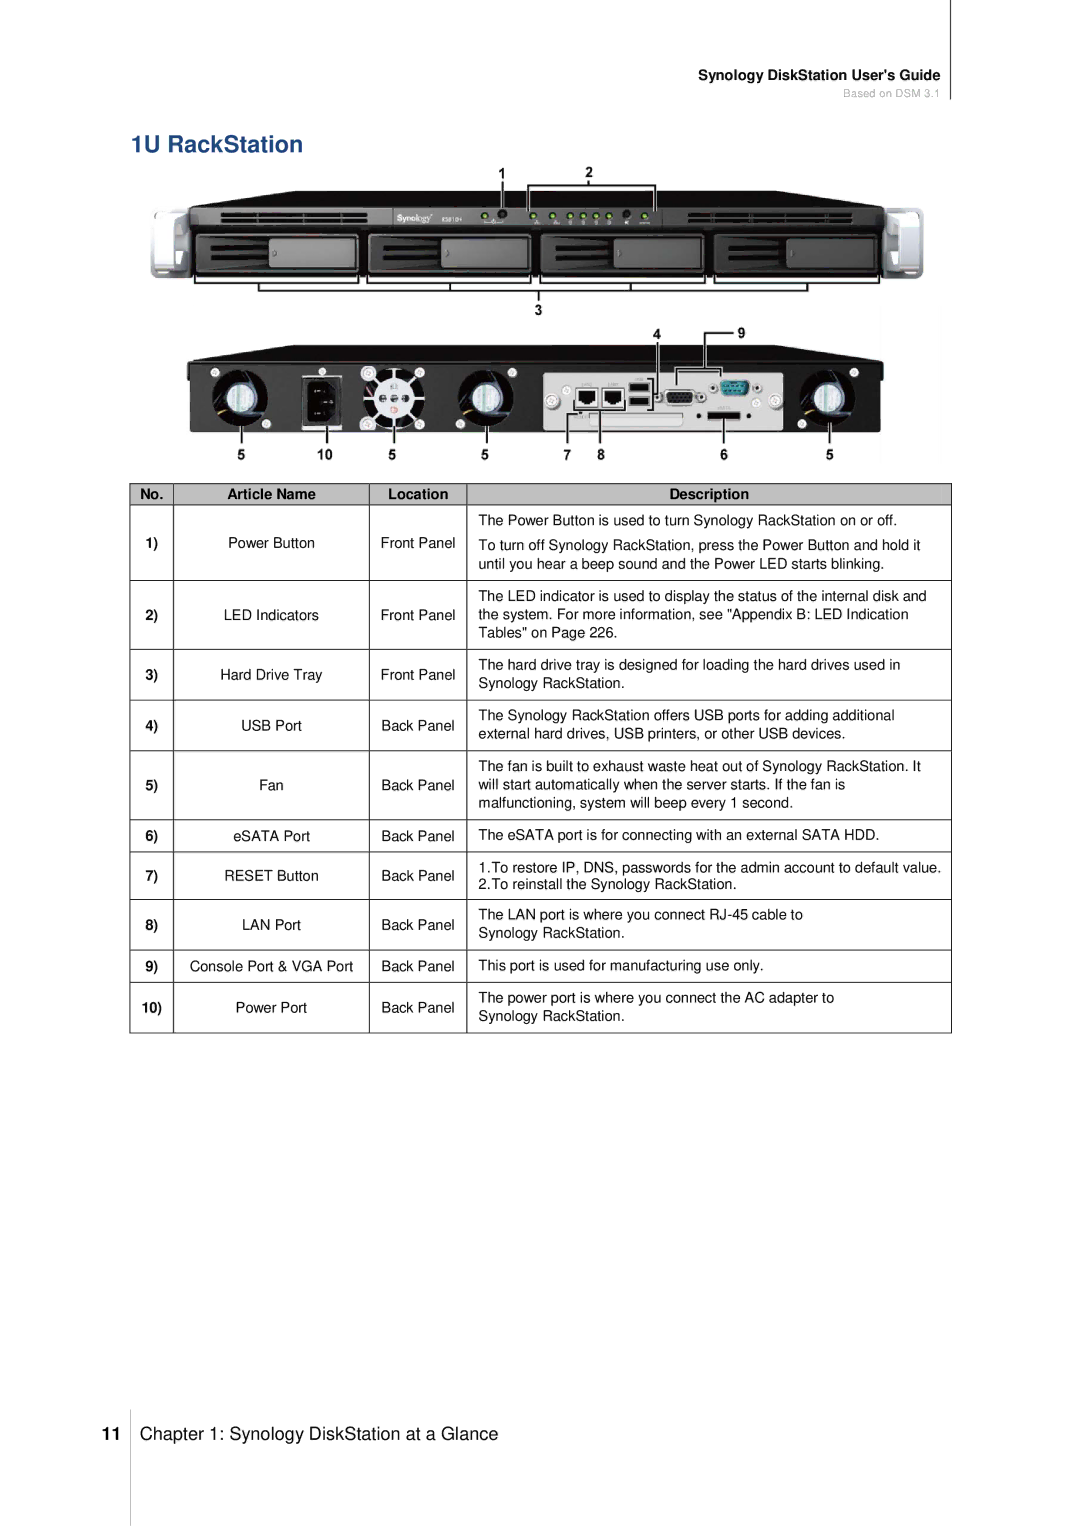
1U RackStation
DS411slim
DS1511+
2U RackStation
Windows User
Install Synology DiskStation
Log in to Synology DiskStation Manager
Use Synology Assistant
Mac OS X User
Get Started with Synology DiskStation Manager
Linux Ubuntu User
Use a Web Browser
To remove a desktop shortcut to an application
DiskStation Manager Appearance
Desktop and Shortcuts
To create a desktop shortcut to an application
Logout, Restart, and Shutdown
Manage DSM with the Main Menu
Taskbar
To open an application window
Reorder Main Menu’s Thumbnails
Open Application Windows
Use the Control Panel
To modify your account
Volume Usage
Manage Personal Options
Account
Tick Customize Wallpaper and then tick Customize image
Desktop
To choose a background color for your desktop
Tick Customize Wallpaper
Photo Station
Tick Do not expand the Main Menu after login
Tick Dont show confirmation dialog when leaving DSM
Tick Resume DSM to previous logout status when logging
To display your own recognition image on the login
Change DSM Settings
Login Style
To change the style of login
Ports used for Https connection
Http Service Options
To enable Https connection
About redirecting to Https connection
Tick Enhance browser compatibility by skipping IP checking
To set the logout timer
Session Security
To skip IP checking
To see the File Browser log
Enable File Browser log
To enable File Browser log
Tick Enable File Browser log
To rename DiskStation
Change Network Settings
To set up domain name server and default gateway
General
To decide how your DiskStation obtains IP address
To set up IPv6
Network Interface
To separate the Bond interface into multiple LAN interfaces
Bond
To combine multiple LAN interfaces with Link Aggregation
To set up a wireless network
Wireless Network
IPv6 Setup
To connect to the Internet via PPPoE
Click PPPoE Setting
PPPoE
Tunnel
To setup IPv6 Tunnel
Tick Enable tunnel
Language
Modify Regional Options
To sync the date and time with NTP server
Set Up Time
To set the time zone
To set the date and time manually
Below are a few recommended NTP servers
Use Energy Saving Features
HDD Hibernation
Manage General Settings
Power Recovery
Tick Restart automatically after a power failure
To manage beep control
Fan speed mode
Manage Beep Control
Manage UPS
Tick the Enable UPS support checkbox
Choose Startup or Shutdown
Power Schedule
Synology DiskStation Supported RAID Types
What is Volume and Disk Group?
Volume Creation Methods
Manage Volumes or Disk Groups with Storage Manager
To create a SHR volume using the Quick mode
Create a Volume
Create a Volume Using the Quick Mode
Choose Single Volume on RAID, and click Next
Create a Volume by Combining Several Hard Disks
Create a Volume by Allocating Partial Space on a Disk Group
To create a volume by combining several hard disks
To create a Disk Group
To create volumes on the created Disk Group
Create a Disk Group
To repair a volume or Disk Group
Remove a Volume or Disk Group
Repair a Volume or Disk Group
Click the Volume or Disk Group tab
Change RAID Type
Expand a Volume or Disk Group
Expand a Volume by Changing Volume Size
For RAID 1 and RAID 5, RAID 5+Spare, and RAID
For one-bay models
For Basic or RAID 0 on models with two or more bays
To expand a volume or Disk Group by adding disks
Expand a Volume or Disk Group by Adding Disks
To create an iSCSI Target
Manage iSCSI Target with Storage Manager
ISCSI
ISCSI Target and LUN
Tick Enable iSNS
Click Enable or Disable
To create an iSCSI LUN
Manage iSCSI LUNs with Storage Manager
There are 2 ways to create an iSCSI LUN
To edit an iSCSI LUN
To remove an iSCSI LUN
Manage Hard Disks with Storage Manager
Enable Write Cache Support for Hard Disks
To enable write cache support for your disk
Quick Test Extended Test
Run S.M.A.R.T. Analysis
Check Disk Info
To eject or format an external disk
Manage External Disks
To attach an external disk
To get the information of the disk
To use the EZ-Internet wizard
Set Up Port Forwarding Rules for Router
Use the EZ-Internet Wizard
To set up your router
Set up Router
To test whether your rules are working or not
Give Synology DiskStation a Ddns Hostname
Add Port Forwarding Rules
To add port forwarding rules
Register a Ddns hostname for Synology DiskStation
Service Requirement
Method 2 Register a Ddns account at No-IP.com
To create a firewall rule
Prevent Unauthorized Connection with Firewall
To delete rules
Automatically Block Suspicious Login Attempts
To disable rules
To change the priorities of rules
To manage the blocked IP addresses
To enable auto block
Tick Enable auto block
Tick Enable Windows file service
Enable File Sharing Protocols for All Platforms
Manage Windows File Service
To enable Windows file service
Manage Mac File Service
Tick Enable NFS
Enable NFS Service for Linux Clients
To join a domain
Join a Windows ADS Domain or Workgroup
To join a workgroup
About advanced domain options
Manage Users and Groups
About DNS server
Click Create to open the User Creation Wizard
Create and Edit Users
To create a user account
To search for a user
To create a user account by importing users list
Go to Main Menu Control Panel User and click Import Users
To edit a user
To cancel password strength rules
Apply Password Strength Rules
To apply password strength rules
Click Password Strength Tick Apply password strength rules
Click User Home Uncheck Enable user home service
To enable user home service
Click User Home Tick Enable user home service
To disable user home service
Create Domain User’s Home Folder
Create and Edit Groups
Allow Users to Access Applications
System built-in shared folders include the following
Set Up Shared Folders
Built-in Shared Folders Created by the System
To create a new shared folder
Create a Shared Folder
To remove a shared folder
Allow Users or Groups to Access Shared Folders
To allow users or groups to access a shared folder
Remove a Shared Folder
To manage domain users’ access privileges
Allow Domain Users or Groups to Access Shared Folders
To allow Linux clients to access a shared folder
To encrypt a shared folder
To manage domain group’s access privileges
Encrypt a Shared Folder
Edit an Encrypted Folder
Click Shared Folder in Control Panel
To define Windows ACL settings for a shared folder
To edit Windows ACL settings
Define Windows ACL Privileges for Shared Folder
Index Shared Folder Contents
To index files in a shared folder
Tick Enable file indexing
Method 2 Use the Run window
Access Files within the Intranet
Access Shared Folders from Windows
Method 3 Use Window Explorer
Access Shared Folders from Linux
Access Shared Folders from Mac
Tick Enable FTP service
Access Files via FTP
To enable FTP service
Enable FTP file transfer log
Set up FTP Connection Restriction
Report external IP in Pasv mode
Enable UTF-8 filename support
To configure the privilege of anonymous user
Access Files via WebDAV
Manage FTP Security Settings
Connect to Synology DiskStation Using a FTP Application
Go to Main Menu File Browser to open a File Browser window
Access Files via File Browser
File Browser Requirement
File Browser Appearance
To perform advanced search
Search for Files or Folders
To search for files or folders in the current folder
Method
Set File Browser in Action
Download Files or Folders from Synology DiskStation
Upload Files or Folders to Synology DiskStation
Copy or Move Files or Folders on Synology DiskStation
Extract an Archive
Rename a File or Folder on Synology DiskStation
Create a Folder
Delete Files or Folders
Choose Open in New Window from the Action menu
Edit the Properties of Files and Subfolders
Open a File in a New Window
To open a file in a new window
100
Allow Users and Groups to Access Files and Subfolders
To allow users and groups to access files and subfolders
Obtain a File or Folder’s Download Link
To view or edit music information
Edit Music Information
101
To obtain a file or folders download link
102
View Documents, Photos, or Videos
View Documents in Google docs
103
Preview Photos
104
Play Videos
Go to Main Menu and click File Station
Access Files via File Station
Display Additional Attributes
105
106
Back Up Computer Data
Use Data Replicator for Windows
What Can Data Replicator Do?
Use Data Replicator
Install Data Replicator
Use Time Machine for Mac
Data Replicator Requirement
Ways to Back Up Synology DiskStation Data
Back Up Data on Synology DiskStation
Use rsync for Linux
Before you start, do the following first
Perform Backup Tasks on Synology DiskStation
Create a Backup Task
109
Back Up and Restore System Configuration
Sync Shared Folder Contents between DiskStations
112
Manage Sync Tasks
113
Backup DiskStation Data with Time Backup
To perform USBCopy
Use USBCopy to Back Up Data on USB Device
114
To perform SDCopy
Use SDCopy to Back Up Data on SD card
115
116
Enable Web Station
Tick Enable Web Station
Use Web Station to Host Websites
117
Enable Virtual Host to Host Websites
Enable Personal Website
Tick Enable personal website and click OK
To turn on PHP configuration option registerglobals
Manage PHP Settings
Enable MySQL
To Enable MySQL
To customize PHP openbasedir
Install Featured Applications
To enable PHP cache
119
To add an additional Http port
Modify Http Service Options
Tick Enable web Https connection
120
121
To enable WebDAV
Manage WebDAV
Use WebDAV to Manage Files in Different Environments
Click Files Open
122
Click Places Connect to server
123
Set up Mail Server
Host Mail Server
Before you start
To connect to Mail Station
Install Mail Station to Enable Webmail Service
To install Mail Station
124
125
Set up Print Server on DiskStation
To set up print server on DiskStation
Set Synology DiskStation as Print Server
126
Access Print Server with iOS Devices
To access the print server with an iOS device
127
Set up Computer to Access Print Server
To set up print server access with Windows
To set up print server access with Mac OS
Click Release Printer
Release the Connection between Printer and Client
Manage Printer
128
129
This chapter explains how to do the following
130
Enable Photo Station
Tick Enable Photo Station
Support and Limitations
131
Enable Personal Photo Station
Enable DSM User’s Photo Station
Click Enable Personal Photo Station service
132
To enable DSM user’s Photo Station
Click Enable Personal Photo Station username and click OK
Manage Photo Station User Accounts
To edit existing user accounts
Upload Albums Using Photo Uploader Synology Assistant
Create Albums
133
134
Create Album Using Photo Station
Upload Using DS photo+ Mobile App
Upload via File Sharing Protocols or File Browser
135
Manage Albums
Edit Album Details
Upload Photos and Videos to an Album
To allow users to download albums
Download Album
Reorder Albums
136
Uncheck Set as public
Click Customize next to Access Permissions
Set as Private Album
137
138
Enable Virtual Album
To Enable Virtual Album
Move or Delete Album
To share photo or video’s link to social network
View and Edit Photos and Videos
139
To see photo or video’s details, click the following links
To customize album layout
Customize Album Layout
140
To add comments to photo or video
Personalize the Blog
Use the Blog
Add a New Post
Delete a Post
142
Find Old Posts
143
Play Music with Audio Station
144
Enable Audio Station
Click Enable Audio Station 3 and click OK
145
Choose Audio Source
Library
Personal and Shared Playlist
Media Server
Smart Playlist
IPod
Internet Radio
See Your Current Location
Organize Your Music
Browse Music
Change Views
To search music
Search Music
148
To create a smart playlist
Work with Playlist
149
To create a playlist, do any of the following
To remove songs from a playlist
Play Music
150
To rename or remove a playlist
151
About the Output Modes and the Queue Panel
Add Music to Queue
Add a Playlist to Queue
Click Play/Pause, Next, or Previous
Manage Songs in the Queue Panel
Play Music with Music Player
152
153
Enable Transcoder
Play Music with Mini Player
154
Go to Settings Transcoder
Tick Enable music download
Download Music
155
Enable Download Station
To enable Download Station
To connect to Download Station, do any of the following
Set up BT/HTTP/FTP/NZB
156
To set advanced schedule
Default Destination Folder
Download Schedule
157
158
Premium Account
BitTorrent
Torrent Search
159
Create BT/HTTP/FTP/NZB Download Tasks
To create download tasks by uploading files
Create by Uploading Files
Create by Entering URLs
160
To create download tasks via torrent search
Create via Torrent Search
161
162
What is RSS?
To view and update the list of RSS feeds
Create Download Tasks for RSS Feeds
To create download tasks by selecting RSS feeds
163
164
To create download tasks by setting download filter
165
Manage BT/HTTP/FTP/NZB Download Tasks
View BitTorrent/HTTP/FTP/NZB Tasks
Manage BitTorrent/HTTP/FTP/NZB Tasks
To change the list order of download tasks
166
To edit download tasks
To clear finished download tasks
167
Set up eMule
To manage server settings
To set the download destination folder for eMule
Connection
Location
168
169
Connect to ED2K Server/Kad
Bandwidth
To connect to a random ED2K server
Create eMule Download Tasks
170
To delete ED2K servers
To resume an eMule download task
171
To create download tasks by uploading a file
172
Create via eMule Search
To clear search results
173
To create download tasks via general search
To create download tasks via advanced search
174
Manage eMule Download Tasks
Manage Download Queue
175
Check Upload Queue
176
Enable Surveillance Station
To enable Surveillance Station
Tick Enable Surveillance Station
177
Choose Quick Setup or Complete Setup and click Next
Manage IP Cameras
Add a Camera
178
179
Edit Camera and Recording Settings
To edit camera settings
To edit motion detection settings
To remove cameras
To edit the guard settings
To disable cameras
180
To import camera configuration
Export or Import Camera Configuration
To enable cameras
To export camera configuration
182
Watch Live View
183
Configure Layout
184
Use PTZ Control
Use Other Functions
The green icon represents Motion Detection Recording
Play and Manage Events
About Events
185
To find events on the timeline
Play Events with Timeline
186
To select an event source
To use smart search
Search for Specific Situations with Smart Search
187
To view events with Image Enhancements
View Events with Image Enhancements
188
To lock events
Edit Events
189
To play an event with the Event Player
Choose Delete Delete this
Export Events
190
Choose Delete Delete all
191
Select Enable or Disable
Mount Events
192
Click Close to close the E-Map Configurations window
Use E-Map
193
Receive Email or SMS Notification
194
Manage Advanced Settings
Initial Page Setting1
Centralized Management1
195
VisualStation1
MPEG4 Streaming Port Range2
Video Output Module
To save the log
View Log
196
To delete the log
To authorize cameras
Assign Privilege
197
To change users privilege
198
To install a camera license
About Camera License
Use VisualStation
199
photo video music
Following shared folders will be accessed by DMA Devices
Manage Dlna Media Server
200
Re-index Media Files
Record Diagnostic Log
Tick Enable DLNA/UPnP media server and click OK
Determine the DMA Menu Language and Style
202
Manage Browsing Settings
Tick Show videos title using embedded information
Tick Enable Internet Radio
Play Multimedia Contents with DMA Devices
Use Smart Playlist
Manage iTunes Service
Enable iTunes Service
Tick Enable iTunes service and enter your Shared name
To delete a smart playlist
Re-index Audio Files
205
To edit a smart playlist
Systems general information includes the following
Check System Information
206
207
To check volume usage
Network
Storage
208
Log
To see the details of any of the resources
Monitor System Resources
209
System resources include the following
To check if the latest DSM is available for download
Update DSM
210
Manage Packages
To check for updates regularly
To perform manual DSM update
To install a new package
212
Click Uninstall
Receive Event Notification
Receive Email Notification
213
Tick Enable SMS notifications
Receive SMS Notification
There are three restore options
Reset admins Password
Restore Synology DiskStation to Factory Defaults
To reset admins password
215
Reinstall Synology DiskStation
Enable Snmp Service
Tick Enable Snmp service and enter a Community name
216
Enable Terminal Services
DS photo+
Use iOS and Android Apps
DS audio
DS cam
218
Use Other Mobile Devices
219
Appendix a Synology DiskStation Specifications
DS710+ DS211j DS211+
220
DS410 DS411slim DS411j DS411+II RS411 RS810+ RS810RP+
221
DS411j DS411+II RS411 RS810+ RS810RP+
222
‧日本語 ‧ 한국어 ‧繁體中文 ‧简体中文
223
‧日本語‧한국어‧繁體中文‧简体中文
224
225
Limitations
226
Appendix B LED Indication Tables
227
HDD1 & HDD2
228
229
DiskStations
230
RackStations
Alert
231
232
Troubleshooting
SYNOLOGY, INC END User License Agreement
Page
SYNOLOGY, INC Limited Product Warranty
Limitations of Liability