|
|
|
|
|
|
|
|
| PICTURE menu | |||
|
|
|
|
|
|
|
|
|
|
|
| |
|
|
| Adjusting the image in a split window |
|
|
|
| |||||
|
|
| ADVANCED MENU |
|
| |||||||
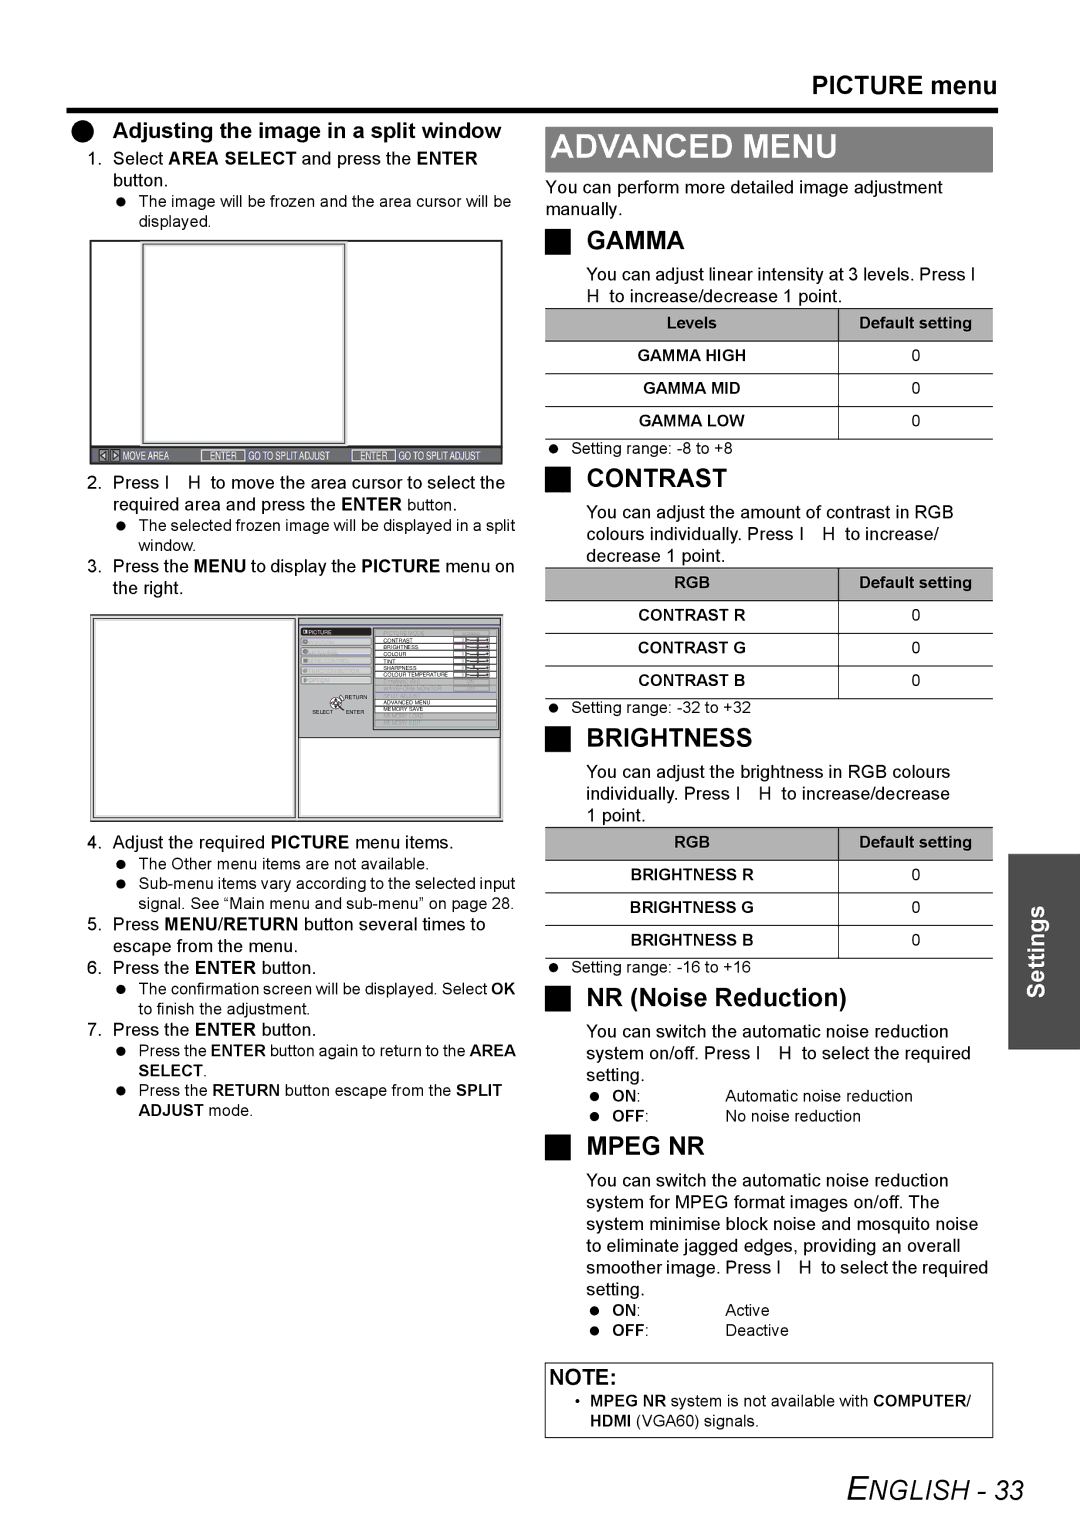
1. | Select AREA SELECT and press the ENTER |
|
| |||||||||
|
|
| button. |
|
|
| You can perform more detailed image adjustment | |||||
|
|
|
| The image will be frozen and the area cursor will be | ||||||||
|
|
|
| manually. |
|
| ||||||
|
|
|
| displayed. |
|
| ||||||
|
|
|
| GAMMA |
|
| ||||||
|
|
|
|
|
|
|
|
|
|
| ||
|
|
|
|
|
|
|
|
|
|
| ||
|
|
|
|
|
|
|
|
| You can adjust linear intensity at 3 levels. Press I | |||
|
|
|
|
|
|
|
|
| H to increase/decrease 1 point. |
|
| |
|
|
|
|
|
|
|
|
| Levels |
| Default setting |
|
|
|
|
|
|
|
|
|
|
|
|
|
|
|
|
|
|
|
|
|
|
| GAMMA HIGH |
| 0 |
|
|
|
|
|
|
|
|
|
|
|
|
|
|
|
|
|
|
|
|
|
|
| GAMMA MID |
| 0 |
|
|
|
|
|
|
|
|
|
|
|
|
|
|
|
|
|
|
|
|
|
|
| GAMMA LOW |
| 0 |
|
|
|
|
|
|
|
|
|
|
|
|
|
|
|
|
|
|
|
|
|
|
| Setting range: |
|
|
|
|
|
|
| MOVE AREA | ENTER GO TO SPLIT ADJUST ENTER GO TO SPLIT ADJUST |
|
|
| ||||
|
|
|
|
|
| CONTRAST |
|
| ||||
2. | Press I H to move the area cursor to select the |
|
| |||||||||
|
|
| required area and press the ENTER button. | You can adjust the amount of contrast in RGB | ||||||||
|
|
|
| The selected frozen image will be displayed in a split | ||||||||
|
|
|
| colours individually. Press I H to increase/ | ||||||||
|
|
|
| window. |
|
|
| |||||
|
|
|
|
|
|
| decrease 1 point. |
|
| |||
3. Press the MENU to display the PICTURE menu on |
|
| ||||||||||
RGB | Default setting |
| ||||||||||
|
|
| the right. |
|
|
|
| |||||
|
|
|
| CONTRAST R | 0 |
PICTURE |
| PICTURE MODE | NORMAL | CONTRAST G | 0 |
LANGUAGE |
| COLOUR |
| ||
POSITION |
| CONTRAST |
|
|
|
|
| BRIGHTNESS |
|
|
|
LENS CONTROL | TINT |
|
|
| |
FUNCTION BUTTON | SHARPNESS |
| CONTRAST B | 0 | |
WAVEFORM MONITOR | OFF | ||||
OPTION |
| COLOUR TEMPERATURE |
|
|
|
| DYNAMIC IRIS | ON |
|
| |
SELECT | RETURN | SPLIT ADJUST |
| Setting range: |
|
ENTER | MEMORY LOAD |
|
| ||
|
| ADVANCED MENU |
|
|
|
|
| MEMORY SAVE |
|
|
|
|
| MEMORY EDIT |
| BRIGHTNESS |
|
|
|
|
|
| |
You can adjust the brightness in RGB colours individually. Press I H to increase/decrease 1 point.
4.Adjust the required PICTURE menu items.
The Other menu items are not available.
5.Press MENU/RETURN button several times to escape from the menu.
6.Press the ENTER button.
The confirmation screen will be displayed. Select OK to finish the adjustment.
RGB | Default setting |
|
|
BRIGHTNESS R | 0 |
|
|
BRIGHTNESS G | 0 |
|
|
BRIGHTNESS B | 0 |
Setting range:
NR (Noise Reduction)
Settings
7. Press the ENTER button. | You can switch the automatic noise reduction | |
Press the ENTER button again to return to the AREA | system on/off. Press I H to select the required | |
SELECT. | setting. |
|
Press the RETURN button escape from the SPLIT | ON: | Automatic noise reduction |
ADJUST mode. | OFF: | No noise reduction |
MPEG NR
You can switch the automatic noise reduction system for MPEG format images on/off. The system minimise block noise and mosquito noise to eliminate jagged edges, providing an overall smoother image. Press I H to select the required setting.
ON: Active
OFF: Deactive
NOTE:
• MPEG NR system is not available with COMPUTER/ HDMI (VGA60) signals.
