Page
Checks Passports Drivers licenses
For users in the USA
Contents
User Settings
20 cm 10 cm
Important points when selecting an installation site
Do not install your machine in areas that are
Environmental Information
Software License
Trademark acknowledgements
For users in the USA
Safety Precautions
Online Manual on the accessory CD-ROM
Using the manual
Introduction
Conventions used in this manual and online manual
Enhanced copying features
Main Features
High-speed laser copying
High-quality digital image
Color scanner function
LCD panel displays messages
Laser printer function
Part Names
Preparations
STUDIO203S
Operation panel
100% 5x11
Display
Power on
Power on and OFF
Power save modes
Power off
Preheat mode
Auto power shut-off mode
For best results, use only Toshiba recommended paper
Loading Paper
Paper
Special papers
Follow these guidelines when using special papers
Loading the Paper Tray
Gently push the paper tray back into the machine
Envelopes
Important points when inserting paper in the bypass tray
Open the bypass tray and extend the tray
Loading paper in the bypass tray
Press the Tray Select key to select the bypass tray
Print face
Follow these steps to change a trays paper size setting
Changing a Trays Paper Size Setting
Select the tray, and then press
Press the Menu key
Normal Copying
Using the document glass
Making Copies
Using the Radf Option
Setting a large original
Document feeder tray without trying
Place the originals face up
To force them
Originals that cannot be used in the Radf
Selecting the Tray
Setting the number of copies
Paper output tray extension
Paper holder arm
Making a Copy Darker or Lighter
Fine adjustment of the ratio
Selecting a preset ratio
REDUCTION/ENLARGEMENT/ZOOM
Copy will be delivered to the paper output tray
STUDIO203SD only
Convenient Copy Functions
Automatic TWO-SIDED Copying
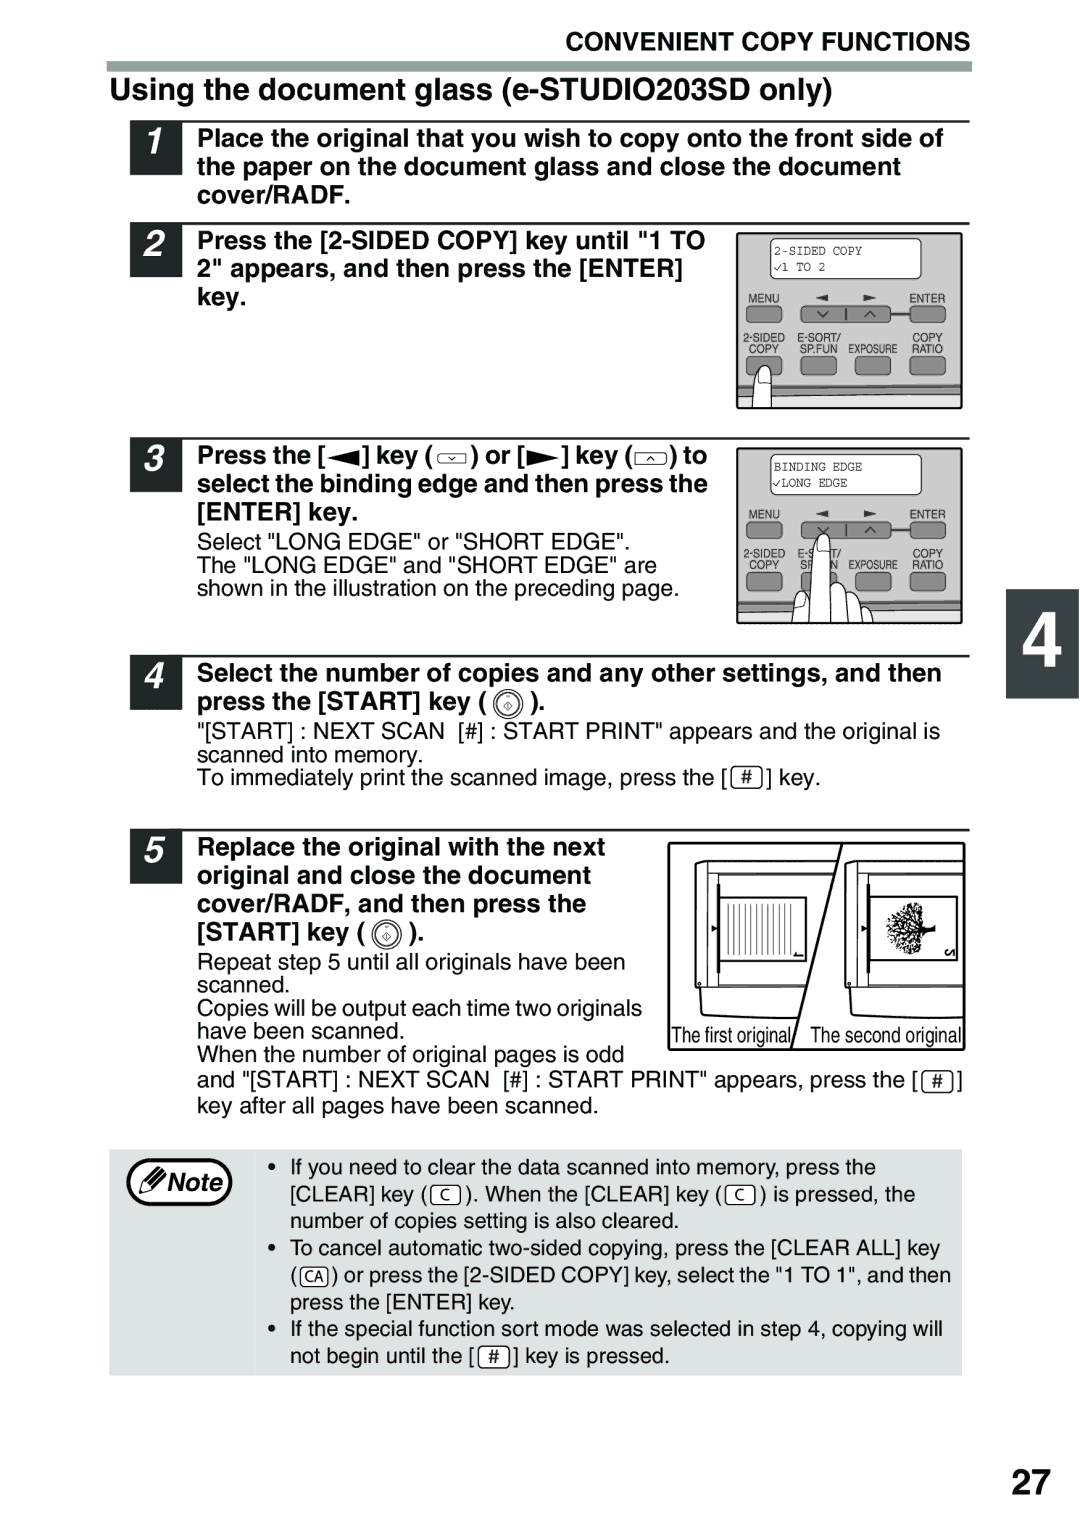
Using the document glass e-STUDIO203SD only
To 1 One-sided copies from two-sided originals
Place the originals in the RADF. p.21
Press the Enter key
Sort appears and then press
When all originals have been scanned, press the key
Sort Copy
Offset function during sort copy
Place the originals. p.21
If the memory becomes full
1 copy
Copying Multiple Originals Onto a Single Sheet of Paper
ORIG. Size Enter
Copy is delivered to the paper output tray
Place the originals. p.21 Press the E-SORT/SP.FUN key until
Margin shift
Creating Margins When Copying
Place the originals Press the E-SORT/SP.FUN key until
Margin Shift appears and then press
Margin Shift on OFF
Software
Installing the Software
MFP driver
Desktop Document Manager
Hardware and software requirements
Before Installation
Windows 98, Windows Me, Windows 2000 Professional*5
Windows XP*5, Windows Vista*5
Double-click the setup icon
Installing the Software
Follow the on-screen instructions
Select Connected to this computer and click the Next button
Installing the Software
This completes the installation of the software
When installing is finished, click the Close button
Connecting a USB cable
Select Connected via the network and click the Next button
Using the machine as a shared printer
Windows Vista, the Add Network Port button does not appear
Click the Add Network Port button
You will return to the window of . Click the Close button
Windows Vista, select Properties from the Organize menu
Setting UP Button Manager
Windows XP/Vista
Installing the Software
Select Toshiba e-STUDIOXXXX and click the Properties button
Windows 98/Me/2000
Select Toshiba Button Manager T in Send to this application
User programs p.58
System requirements for USB 2.0 Hi-Speed mode
Basic Procedure for Printing
Using the Printer Mode
Canceling a print job
Make sure that paper is loaded in the tray
Scanning from the operation panel of the machine
Using the Scanner Mode
Scanning Using the Keys on the Machine
Button Manager scan menu
Scanning from Your Computer
Operation in COPY, PRINTER, and Scanner Modes
Click to read the online manual
HOW to USE the Online Manual
Viewing the online manual
User Programs
User Settings
Copy mode
Power shut-off mode, no keys
Than preheat mode if the set
Can be used Use this setting to select
Layout patterns When enabled, this function
Use this setting to set
Speed is selected to enable
Used for printer mode
Or increase when held down
Be adjusted separately for
This is used to adjust
Factory default setting for
To the factory default settings
OFF
Print mode
Press the Menu key and then press the Enter key
Selecting a Setting for a User Program
Change the setting of the selected item
Base setting beep
Base settings
One beep
Invalid key beep
Display Messages
Troubleshooting and Maintenance
Indication Cause and remedy Lamp indicator Display
Correctly. Reinstall the toner cartridge
Toner cartridge is not installed
Replacement of toner cartridge will be Error
Indicator Steadily
Troubleshooting the Machine
Paper
Paper is outside of the specified Size and weight range
Problem Cause and solution Misfeed occur
Paper is not loaded properly
Paper misfeed
Memory FULL, Press Start to
Machine is in auto power shut-off
MFP driver cannot be installed Windows 2000/XP
Problems During Setup of the Software
Click Performance and Maintenance, and then click System
Click the start button and then click Control Panel
Click Icon beside Universal Serial Bus controllers
Plug and play screen does not appear
Removing the software
Install the software as explained in Installing
Click Icon beside Other devices
Click Add or Remove Programs
Misfeed Removal
Misfeed in the paper feed area
Misfeed in the fusing area
See B Misfeed in the fusing area p.71
Lower the fusing unit release lever
Misfeed in the transport area
Open the front cover
Document feeder cover Radf jam release lever
Misfeed in the Radf Option
Toner Cartridge Replacement
Cartridge out while pressing the lock release lever
Gently pull the toner
Toner cartridge lock release lever
Or 5 times Shutter Toner seal
LockUnlock
Scan Head Locking Switch
Press the key or key to display the count of each function
Maintenance Required
Checking the Total Count
Wipe the cabinet with a soft, clean cloth
Cleaning the Machine
Cabinet
Document glass and the back side of the document cover
Transfer charger
Optional Equipment
Sheet Paper Feed Unit MY-1034
Using the MY-1034 with the printer function
Interface cable
USB interface cable
Appendix
Specifications
Resolution
Fusing system
Power supply
Power consumption
Printer Function
Scanner Function
Sheet paper feed unit MY-1034
Reversing automatic document feeder MR-2019
Numerics
Symbols
Index
Power off Power on
Misfeed removal Fusing area
Power switch Preheat mode
Problems during setup of the software
User programs
Tray Select key
Connecting the computer
Using convenient copy functions
Troubleshooting and maintenance
Preparations
Luokan 1 Laserlaite Klass 1 Laser Apparat
Page
For users in the USA
TINSE1889QSZZ R080520F8400-TTEC