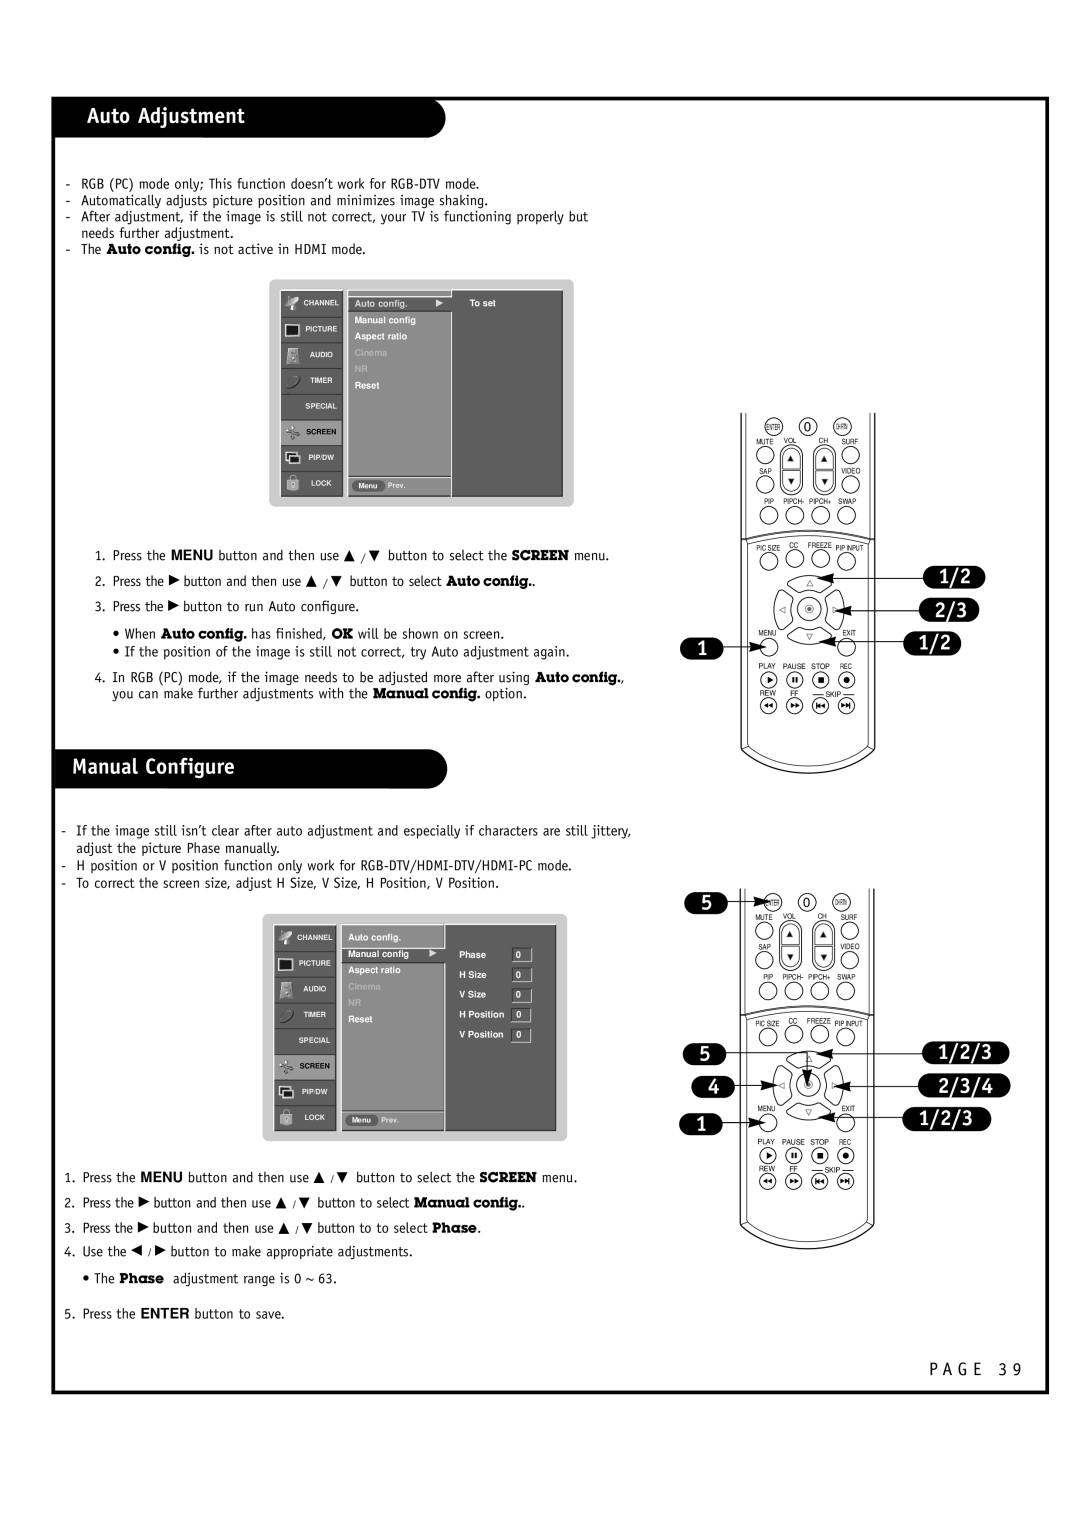
Auto Adjustment
-RGB (PC) mode only; This function doesn’t work for
-Automatically adjusts picture position and minimizes image shaking.
-After adjustment, if the image is still not correct, your TV is functioning properly but needs further adjustment.
-The Auto config. is not active in HDMI mode.
![]() CHANNEL
CHANNEL
PICTURE
AUDIO
TIMER
![]() SPECIAL
SPECIAL
![]() SCREEN
SCREEN
PIP/DW
LOCK
Auto config. | G | To set |
Manual config
Aspect ratio
Cinema
NR
Reset
Menu Prev.
ENTER | 0 | CH RTN |
MUTE | VOL | CH SURF |
SAPVIDEO
|
| PIP | PIPCH- PIPCH+ | SWAP | |
1. | Press the MENU button and then use D / E button to select the SCREEN menu. | PIC SIZE | CC | FREEZE PIP INPUT | |
|
|
|
| ||
2. | Press the G button and then use D / E button to select Auto config.. |
|
|
|
|
3. | Press the G button to run Auto configure. |
|
|
|
|
| • When Auto config. has finished, OK will be shown on screen. | MENU |
|
| EXIT |
| • If the position of the image is still not correct, try Auto adjustment again. | 1 |
|
|
|
4. | In RGB (PC) mode, if the image needs to be adjusted more after using Auto config., | PLAY | PAUSE STOP | REC | |
|
|
|
| ||
| you can make further adjustments with the Manual config. option. | REW | FF | SKIP | |
Manual Configure
1/2
2/3
1/2
-If the image still isn’t clear after auto adjustment and especially if characters are still jittery, adjust the picture Phase manually.
-H position or V position function only work for
-To correct the screen size, adjust H Size, V Size, H Position, V Position.
5
ENTER | 0 | CH RTN |
MUTE | VOL | CH SURF |
![]() CHANNEL
CHANNEL
PICTURE
AUDIO
TIMER
![]() SPECIAL
SPECIAL
![]() SCREEN
SCREEN
Auto config.
Manual config | G |
Aspect ratio
Cinema
NR
Reset
Phase | 0 |
|
|
H Size | 0 |
|
|
V Size | 0 |
|
|
H Position | 0 |
|
|
V Position | 0 |
5
4
SAP |
|
| VIDEO |
PIP | PIPCH- | PIPCH+ | SWAP |
PIC SIZE | CC | FREEZE | PIP INPUT |
1/2/3
2/3/4
PIP/DW |
|
|
LOCK | Menu | Prev. |
|
1.Press the MENU button and then use D / E button to select the SCREEN menu.
2.Press the G button and then use D / E button to select Manual config..
3.Press the G button and then use D / E button to to select Phase.
4.Use the F / G button to make appropriate adjustments.
• The Phase adjustment range is 0 ~ 63.
5.Press the ENTER button to save.
1
MENUEXIT
PLAY PAUSE STOP REC
REW FF ![]() SKIP
SKIP ![]()
1/2/3
