Toshiba
Tuneinto Safety
Safety Precautions
REFERSERViCiNG to Gualfied Service
Newproduct,pleasekeepthesesafetytipsin mind
Installation
ImportantSafety instructions
AdditionalSafetyPrecautions
InstaflaUon,Care, and Service
Consumed. oric,d
Care
With a sharp or heavy Never strike the screen object
To Display yourLCDTV using a Wall
Choosinga location for your Lcdtv
To Display yourLCDTV on the included Pedestal Stand
Removingthe Pedestal Stand
55 TV
FCCDeclarationof Conformity
Installation,Care, and Service
UsingtheTVsadvancedfeatures
Features of yournew TV
Setting up, and using your new TV
Overview of steps for installing
Green LED
TV front and side panel controlsand connections
Left side panel TV front
TV top Control panel
TV back pane connections
Agdr
About the connection illustrations
Overview of cable types
Unauthorizedrecording,use,distribution,or
Connectinga VCRand antenna, CableTV or Camcorder
Coaxial cables StandardA/V cables
Standardaudio cablesIf you have a mono VCR
Component video connections
A sateJJJte receiver
TV backpanel Fromantenna StereoVCR
To view the DVD player
Connecting an Hdni or DVI Device to the HDN input
Hmr
HDMldevice
RERZA-LINKconnection
Playbackdevice REGZA-LINRDVDplayer,etc
Hrnr
TVbackpanel IA2
Connectinga digital audio system
Connectinga personalcomputerPC
DolbyDigitaldecoderor
SDA
Remote control effective range
Instaflingthe remote control batteries
Buttons used for operating the TV only are described here
Learning about the remote controJ
Setup
Preferences
Locks
Opens Nput
Setup/InstaRaUonmenulayout
Navigatingthe menusystem
Terrestrial Nput
Initial Setup
$elecUng the menulanguage
Programmingchannels into the TVschannel memory
Setting channelskip
ProgrammingchanneJsautomatically
To program channels automatically
To assign channel labels
Labelingchannels
To create and assign a custom label
Toadd a channel to the channel memory
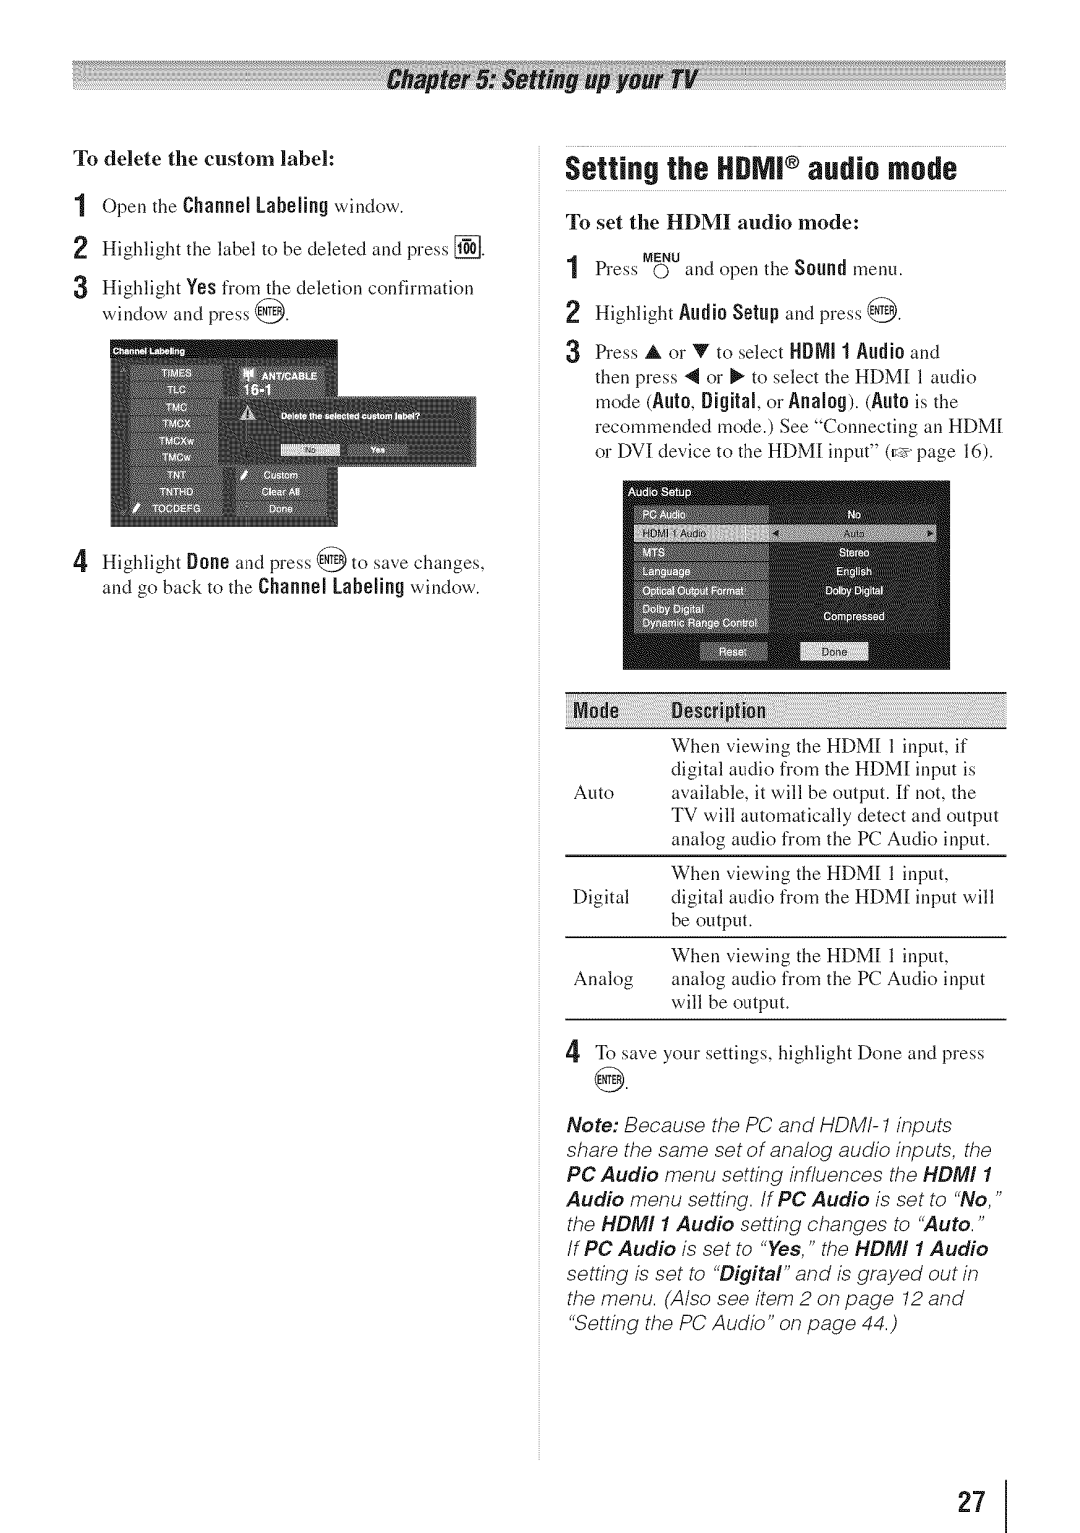
To delete the custom label
Setting the HDN! audio mode
Viewing the systemstatus
Viewing the digital signal meter
Reset FactoryDefaults
Factory Defaults
@mlr label
SelecUngthe video input source
Labelingthe video input sources
To view
Favorites Browser
Tuning channels Tuningchannelsusingthe ChannelBrowserTM
No to
Elementsof the ChannelBrowser
Addingand clearing channels and inputs in the History List
Setting the ChannelTuningNode
Switchingbetween two channels usingSurfLockTM
Tuningto the next programmed channel
Tuningto a specific channel programmedor unprogrammeO
Switchingbetweentwo channels usingChannelReturn
TheaterWide2
TheaterWide1
For 43 formatprograms
ANT/CABLEinput
Usingthe auto aspectratio feature
Dot by Dot For VGA, SVGA, RGA, WXGA,and SXGAsources only
Scrolling the TheaterWide picture
To turn on the auto aspect ratio feature
Usingthe FREEZEfeature
Adjustingthe picture
SelecUngthe picture mode
To view captions
Using the closed caption mode Baseclosed captions
Adjusting the picture quality
To adjust the picture quality
Adjustingthe audio
Digital CCSettings
CCSelector
Adjustingthe audio quaIRy
Selecting stereo/SAPbroadcasts
Selecting the optical audio output format
Changingyour PiN code
Using the Locks menu
Using the Doiby DigRal Dynamic Range Control feature
Enteringthe PiN code
Movies
BlockingTV programsand movies by rating V-CNp
PO-13 material may be inappropriate for
Lockingchannels
Independentrating system for movies
To lock channels
To cancel the GameTimer
Usingthe GameTimer
Usingthe control panel lock feature
Using the input lock feature
Setting the PC Audio
Usingthe PCsettings feature
To select the Auto Start function
Usingthe Media Player
Usingthe Media Playerwith USB
To openthe Nedia Player
Playingmusic es
Viewing photoes
SingleView
Siideshow
See
Duringplayback
Viewing photofiles with playing music files at same time
Ncreasing order
Setting the sleep timer
Sorting Only USBstorage device
Playback
REGZA-LINK Player Control menu functions
Available remote control key functions
REGZA-LiRRplayback deviceDVD player, etc. control
REGZA-LIR inputsource seiecUon
Other REGZA-LIHRfunctions
Volume and Mute controls of Audio Receiver
Understandingthe auto poweroff
Understandingthe last mode memory feature
If the power is cut off while you are viewing
Usingthe advanced picture settings features
UsingDynamicContrast
Selecting the colortemperature
UsingCableClear digital noise reduction
Selecting the cinema mode
Usingthe CiearFrameTM feature
Usingthe Film Stabilization feature
Usingthe QSound soundfeature
Settings features
UsingNPEGnoisereduction
Usingthe GameNode feature
TV stops respondingto controls
Generaltroubleshooting
Other problems
Picture problems
Closedcaption problems
Soundproblems
Remote control problems
Channeltuning proNems
Specifications
Channel Coverage
ColorStream component video HD Input
AcceptaNe signal formats for PC iN and HDN! terminals
PC in signal formats
Hdmi signa formats
Limited One 1 Year Warranty on Parts and Labor
Limited United States Warranty for LCDTelevisions
ToshibaBrand Flat Panel Televisions
Limited CanadianWarrantyfor
Critical Applications
Page
Page
TEL 514
Toshiba America Consumer