5. Scanning-specific Adjustments

(2) When scanning the original, press the [COMMON SETTING] button on the Control Panel. Select a higher resolution in the resolution option.

*"200 (dpi)" is selected from among the resolution options by default. If noise occurs in a resolution of 200 dpi, select a higher resolution (300 dpi, 400 dpi or 600 dpi).

After changing the resolution, scan the original and check the scanned-in image quality.

If further image quality adjustments are still necessary, use procedure (1).

(3) Enter the setting mode [08]. Change the value for the code [8304] to change the JPEG compression ratio.

Compression


[08] code


Subcode


Recommended

Acceptable


Default


ratio


value

range value


High quality


0


Set a value smaller


than 128 for higher


08-8304


compression ratio.


Standard


1


0 to 255

128


Set a value larger


Low quality


2


than 128 for lower


compression ratio.


‰Caution after the adjustment

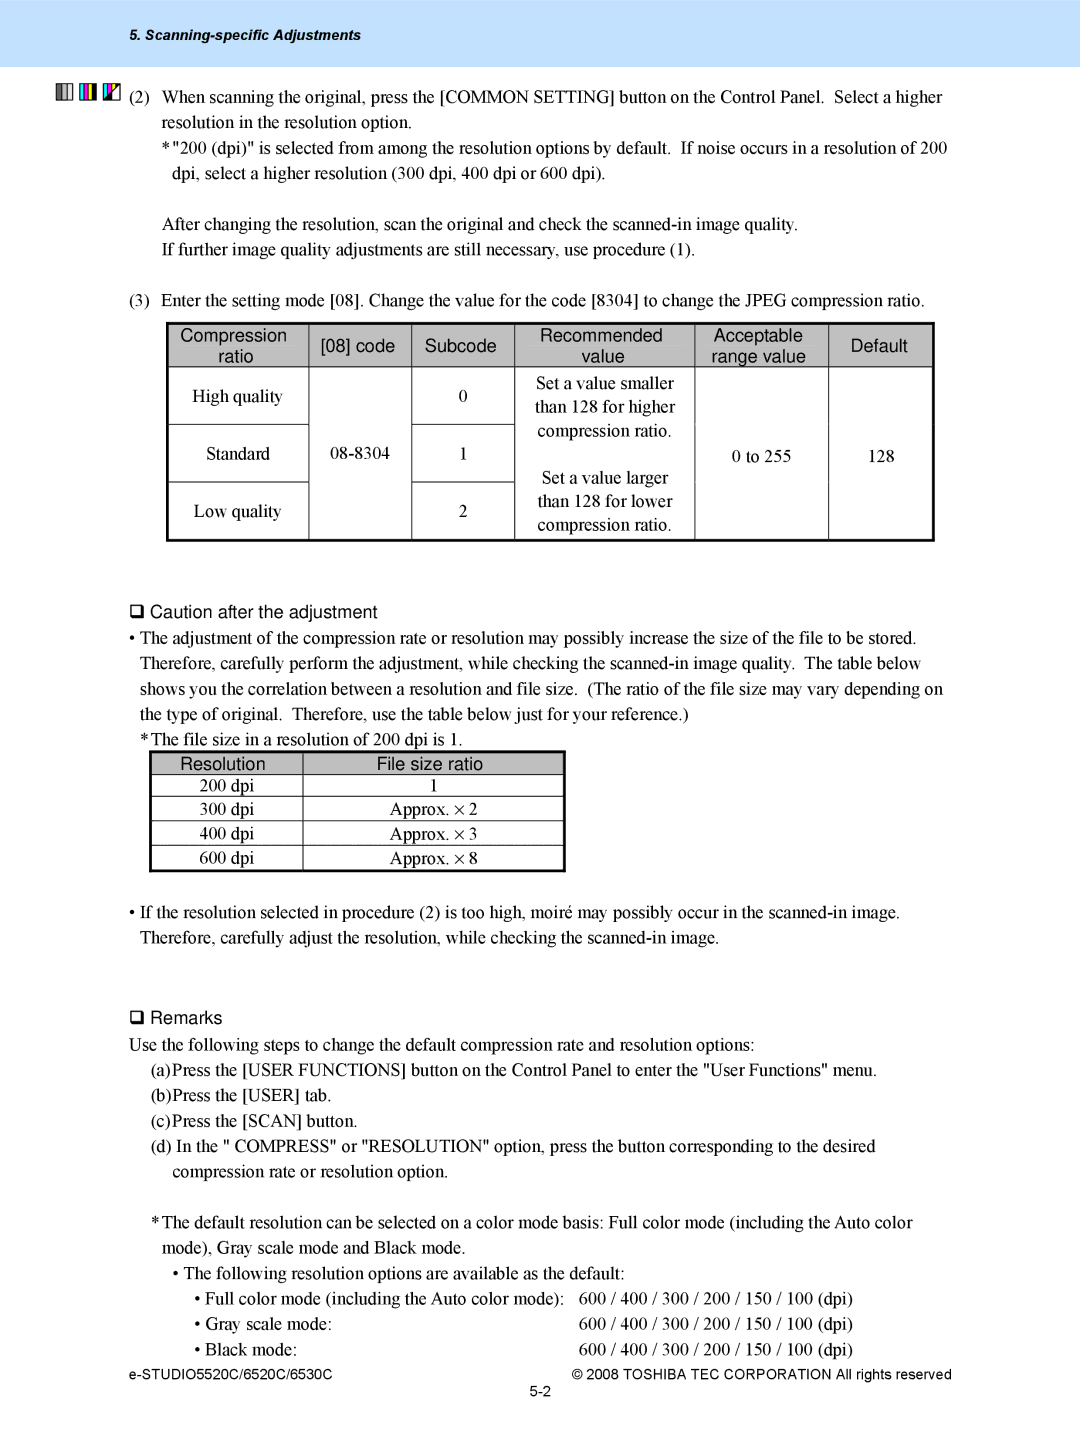
• The adjustment of the compression rate or resolution may possibly increase the size of the file to be stored. Therefore, carefully perform the adjustment, while checking the scanned-in image quality. The table below shows you the correlation between a resolution and file size. (The ratio of the file size may vary depending on the type of original. Therefore, use the table below just for your reference.)

*The file size in a resolution of 200 dpi is 1.

Resolution

File size ratio

200 dpi

1

300 dpi

Approx. ⋅ 2

400 dpi

Approx. ⋅ 3

600 dpi

Approx. ⋅ 8

• If the resolution selected in procedure (2) is too high, moiré may possibly occur in the scanned-in image. Therefore, carefully adjust the resolution, while checking the scanned-in image.

‰Remarks

Use the following steps to change the default compression rate and resolution options:

(a)Press the [USER FUNCTIONS] button on the Control Panel to enter the "User Functions" menu.

(b)Press the [USER] tab.

(c)Press the [SCAN] button.

(d)In the " COMPRESS" or "RESOLUTION" option, press the button corresponding to the desired compression rate or resolution option.

*The default resolution can be selected on a color mode basis: Full color mode (including the Auto color mode), Gray scale mode and Black mode.

The following resolution options are available as the default:

• Full color mode (including the Auto color mode):

600 / 400 / 300 / 200 / 150 / 100 (dpi)

• Gray scale mode:

600 / 400 / 300 / 200 / 150 / 100 (dpi)

• Black mode:

600 / 400 / 300 / 200 / 150 / 100 (dpi)

e-STUDIO5520C/6520C/6530C

© 2008 TOSHIBA TEC CORPORATION All rights reserved

5-2


Page 268
Image 268
Toshiba 6520c, 5520c manual ‰ Caution after the adjustment, Resolution File size ratio

6520c, 5520c specifications

The Toshiba e-STUDIO5520c and e-STUDIO6520c are advanced color multifunction printers designed for businesses looking to enhance productivity and efficiency in their document handling. These models combine printing, copying, scanning, and faxing functionalities into a single device, making them an ideal solution for busy office environments.

One of the standout features of the e-STUDIO5520c and e-STUDIO6520c is their impressive printing speed. The e-STUDIO5520c is capable of printing up to 55 pages per minute, while the e-STUDIO6520c can reach speeds of up to 65 pages per minute. This high-speed performance ensures that large print jobs are completed quickly, allowing businesses to maintain workflow without unnecessary delays.

Both models also feature a high-quality color printing capability with a resolution of up to 1200 x 1200 dpi. This ensures that documents, presentations, and marketing materials are produced with crisp text and vibrant colors, helping to create a professional image for any organization.

Another key characteristic of these printers is their versatile paper handling options. They are equipped with multiple paper trays, allowing users to accommodate various paper sizes and types, including envelopes and heavy stock paper. An optional high-capacity feeder can be added to increase the maximum paper capacity to suit larger print volumes.

The Toshiba e-STUDIO5520c and e-STUDIO6520c also incorporate advanced scanning technologies. With the capability to scan at speeds of up to 160 images per minute, these models streamline document management processes. Features such as duplex scanning and optional OCR (Optical Character Recognition) ensure that scanned documents are easily searchable and can be converted into editable formats.

Security is paramount in today’s business environment, and these multifunction printers come equipped with robust security features to protect sensitive information. They support secure printing, user authentication, and encrypted data transfer, providing peace of mind for organizations that handle confidential materials.

In terms of user experience, both models feature an intuitive touchscreen interface, making navigation and operation straightforward. Additionally, they support mobile printing solutions, allowing users to print documents directly from their smartphones or tablets.

Overall, the Toshiba e-STUDIO5520c and e-STUDIO6520c multifunction printers are designed to meet the diverse needs of modern offices. With their high-speed printing, top-quality output, robust security measures, and user-friendly features, they present a comprehensive solution for businesses aiming to optimize their document workflows and productivity.