Toshiba Personal Computer Satellite P30 Maintenance Manual
Copyright
Safety Precautions
Preface
Satellite P30 Maintenance Manual
Conventions
Acronyms
Satellite P30 Maintenance Manual
Table of Contents
Tests and Diagnostics
Replacement Procedures
HDD
Appendices
Hardware Overview
Hardware Overview
Chapter Contents
Hardware Overview
Features
Features Hardware Overview
Hardware Overview Features
‰ Bios
Features Hardware Overview
Hardware Overview Features
System Unit
System Unit Hardware Overview
Hardware Overview System Unit
System Unit Hardware Overview
Hardware Overview System Unit
2.5-inch Hard Disk Drive
Removable Drives Hardware Overview
Removable Drives
Hardware Overview Removable Drives
DVD-R/-RW Drive
Applicable
DVD-ROM Drive
Matsushita SR-8177 256 Kbytes Max Toshiba SD-C2612
CD-RW/DVD-ROM Drive
CD-RW
Hardware Overview Power Supply
4 DVD±R/±RW Drive
Power Supply Hardware Overview
DVD Super Multi Drive
Power Supply
LB0
Main Battery
Batteries
Hardware Overview Batteries
RTC battery
Status Time
Hardware Overview Batteries
Chapter Troubleshooting Procedures
Aug 2004 released
Troubleshooting Procedures
Chapter Contents
Tables
Troubleshooting
Troubleshooting Flowchart
Troubleshooting Troubleshooting Procedures
Troubleshooting Procedures Power Supply Troubleshooting
Power Supply Troubleshooting Troubleshooting Procedures
Troubleshooting flowchart 1/2
Troubleshooting flowchart 2/2
Power Supply Troubleshooting Troubleshooting Procedures
Troubleshooting Procedures Power Supply Troubleshooting
Power Supply Troubleshooting
Power Supply Troubleshooting Process
Procedure 1 Power Status Check
Battery LED
Procedure 2 Adaptor / battery replacement
AC-IN LED
Battery
Procedure 3 Power supply connection check
Procedure 4 Diagnostic check
Procedure 5 Replacement check
Display Troubleshooting
Troubleshooting Procedures Display Troubleshooting
Display Troubleshooting Troubleshooting Procedures
Procedure 1 External display check
Procedure 2 Diagnostic check
Procedure 3 Connector and replacement check
FDD Troubleshooting
FDD Troubleshooting Troubleshooting Procedures
Troubleshooting Procedures FDD Troubleshooting
Procedure 1 FDD head cleaning check
Procedure 3 Connector check and replacement check
Keyboard Troubleshooting
Keyboard Troubleshooting Troubleshooting Procedures
Troubleshooting Procedures Keyboard Troubleshooting
Procedure 1 External keyboard check
Procedure 3 Connector and replacement check
External USB Devices Troubleshooting
External USB device troubleshooting process
Procedure 1 External device and connection check
Procedure 2 Replace system board
TV-Out Failure Troubleshooting
Troubleshooting Procedures TV-Out Failure Troubleshooting
TV-Out Failure Troubleshooting Troubleshooting Procedures
Procedure 1 TV connection check
Procedure 2 TV set check
5IN1 XD, SD, MS, SM, MMC Failure Troubleshooting
5 in 1 card troubleshooting process
Printer Port Troubleshooting Troubleshooting Procedures
Procedure 1 5IN1 XD, SD, MS, SM, MMC test
Touch Pad Troubleshooting
Troubleshooting Procedures Touch Pad Troubleshooting
Touch Pad Troubleshooting Troubleshooting Procedures
Procedure 1 Touch Pad connection check
Procedure 2 Touch Pad replacement check
Speaker Troubleshooting
Troubleshooting Procedures Speaker Troubleshooting
Procedure 2 Earphone test
Speaker Troubleshooting Troubleshooting Procedures
Procedure 1 Audio source test
Procedure 3 Connection check
DVD-ROM and Multi-Drive Troubleshooting
11 DVD-ROM / Multi-Drive troubleshooting process
Procedure
Procedure 1 Audio CD check
Procedure 2 Drive cleaning check
Procedure Diagnostic test
Procedure 5 Connection check and replacement check
Modem Troubleshooting
12 Modem troubleshooting process
Procedure 1 Telephone line connection check
Procedure 2 Modem card connection check
Procedure 3 Modem replacement check
Pcmcia Troubleshooting
13 Pcmcia troubleshooting process
Procedure 1 Sycard test
Procedure 2 Pcmcia socket replacement check
Ieee 1394 Troubleshooting
14 Ieee 1394 troubleshooting process
Procedure 1 Ieee 1394 device check
Procedure 3 Connection and replacement check
Wireless LAN Troubleshooting
15 Wireless LAN troubleshooting process
Procedure 2 Connector and replacement check
Bluetooth Troubleshooting
16 Bluetooth troubleshooting process
Procedure Diagnostic test
Chapter Test and Diagnostic Operation Handbook
Contents
Diagnostic Test
Executing the Diagnostic Test
Tests and Diagnostics Operation
Test and Diagnostic Operation
Tests and Diagnostics Operation
Test and Diagnostic Operation
Config Check Test
Tests and Diagnostics
DMI Check Test
Speaker Audio Test
Fan ON/OFF Test
Main Battery Charge Test
FDD Test
CD-ROM Test
Keyboard Test
Test and Diagnostic Operation
Test and Diagnostic Operation
Mouse Pad Test
Test and Diagnostic Operation
LCD Pixels Mode Test
Tests and Diagnostics Battery Test
Lid Switch Test
Display Test Tests and Diagnostics
HDD R/W Test
Test and Diagnostic Operation
LAN Test
Test and Diagnostic Operation
RTC Test
CD Control Button Test
Chapter Replacement Procedures
Replacement Procedures
Chapter Contents
Figures
26 Removing the speakers
General
ODD
Satellite P30 Series Maintenance Manual
Safety Precautions
Before You Begin
Disassembly Procedures
Assembly Procedures
Tools and Equipment
Battery
Removing the Battery Pack
Installing the Battery Pack
PC Card
Removing a PC Card
Installing the PC Card
Installing the PC card
HDD
Removing the HDD Module
Installing the HDD
Disassembling the HDD
Installing the Optical Drive Module
Optical Drive Module
Removing the Optical Drive Module
Optical Drive
Disassembling the Optical Drive
Reassembling the Optical Drive
Wireless LAN Unit
Removing the Wireless LAN Unit
10 Removing the wireless LAN unit
Installing the Wireless LAN Unit
Expansion Memory
Removing the Expansion Memory
Installing the Expansion Memory
12 Removing the expansion memory cover
13 Installing the expansion memory
Keyboard
Removing the Keyboard
15 Removing the keyboard
16 Disconnecting the keyboard cable
Installing the Keyboard
Modem
Removing the Modem
Installing the Modem
Display Assembly
Removing the Display Assembly
19 Removing the display assembly screws
20 Removing the LCD display cable
Installing the Display Assembly
Top & Bottom Cover
Removing the Covers
Installing the Top Cover
23 Removing the top cover-2
Touch Pad
Removing the Cover
Installing the Touch Pad
25 Removing the touch pad
Installing the Speakers
Speakers
Removing the Speakers
System Board
Removing the System Board
Installing the System Board
16 Fan, Heat Sink, & CPU
Removing the Fan, Heat Sink & CPU
30 Removing the fan module
Installing the CPU
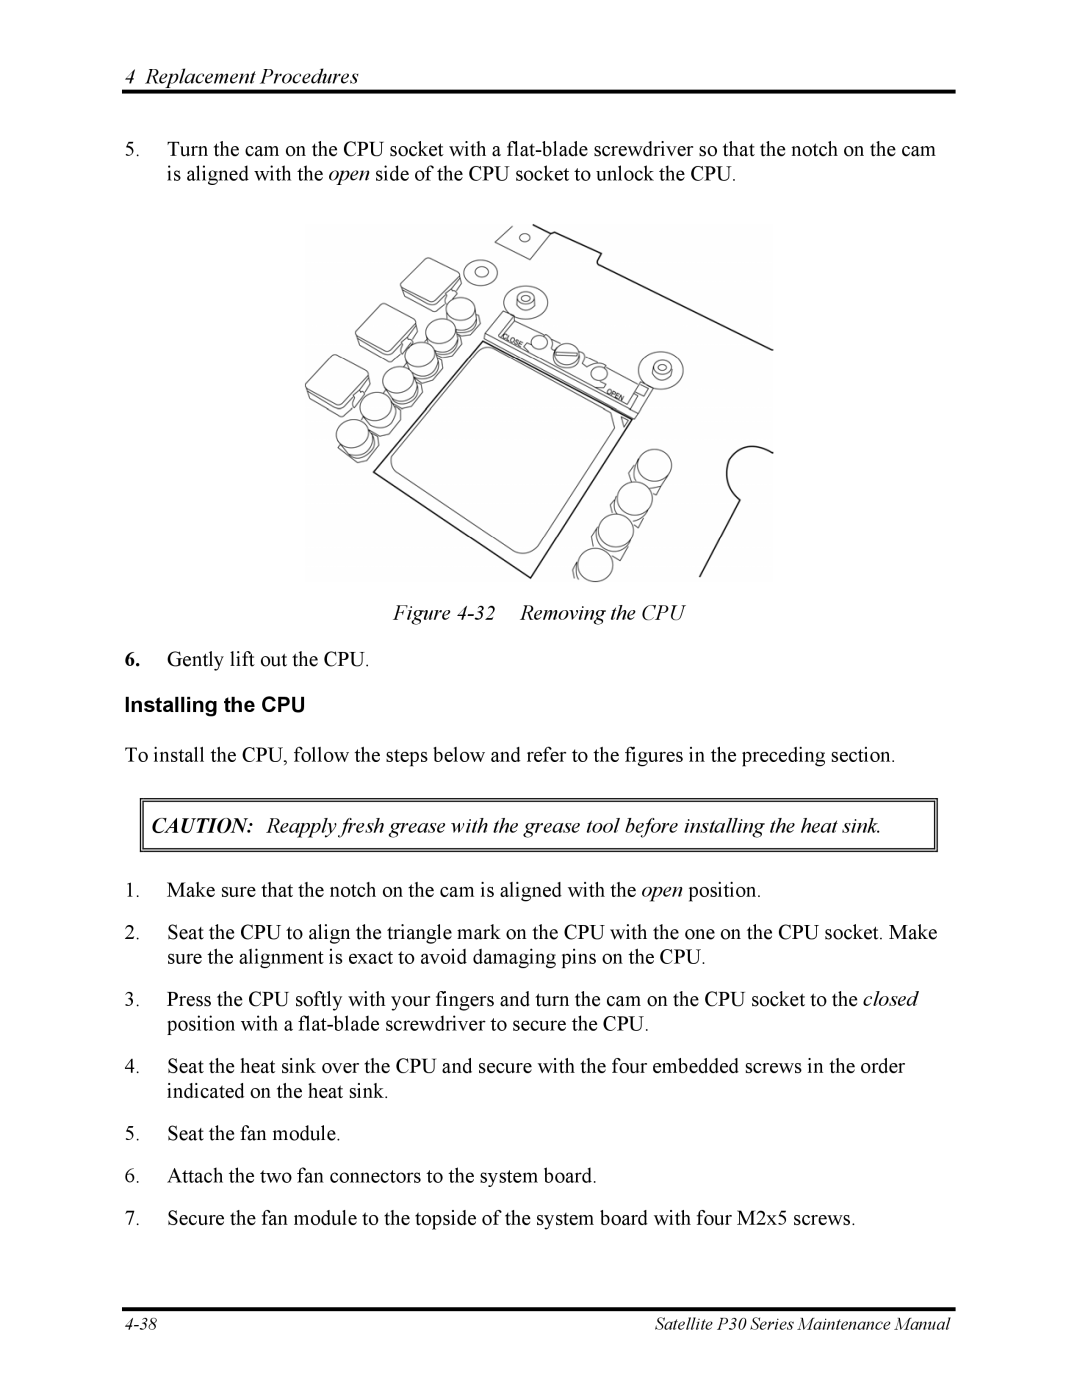
32 Removing the CPU
Display Mask
Removing the Display Mask
Installing the Display Mask
LCD Module
Removing the LCD Module
Installing the LCD Module
35 Removing the LCD module-2
Installing the FL Inverter Board
FL Inverter Board
Removing the FL Inverter Board
Appendices
Appendices
Appendix Contents
Figure B-1 System board FRDSY* layout Bottom
Table D-7
Precautions for handling the LCD module
Appendix a Handling the LCD Module
Satellite A70 Series Maintenance Manual
Satellite A70 Series Maintenance Manual
Satellite A70 Series Maintenance Manual
Satellite A70 Series Maintenance Manual
Satellite A70 Series Maintenance Manual
System Board FRDSY* Bottom View
Figure B-1 System board FRDSY* layout Bottom
System Board FRDSY* Top View
Figure B-2 System board FRDSY* layout Top
Table B-1 System board ICs top and bottom
Mark Number Name
Touch Pad board
Table B-2 System board connectors top and bottom
Lvds for EFQ00
Keyboard
PJP2
Satellite P30 Series Maintenance Manual
System Board JP24,JP26
Table C-1 Sodimm I/F pin assignments 200-PIN 1/4
Table C-1 Sodimm I/F pin assignments 200-PIN 2/4
Table C-1 Sodimm I/F pin assignments 200-PIN 3/4
Table C-1 Sodimm I/F pin assignments 200-PIN 4/4
JP12
Table C-2 RGB I/F pin assignments 15-pin
JP29
Table C-3 HDD I/F pin assignments 44-pin
JP18
Table C-4 ODD I/F pin assignments 50-pin
Satellite P30 Series Maintenance Manual
JP9
Table C-5 PC Card I/F pin assignments 84-pin 1/2
Table C-5 PC Card I/F pin assignments 84-pin 2/2
JP23
Table C-6 Mini PCI I/F pin assignments 124-pin 1/2
Table C-6 Mini PCI I/F pin assignments 124-pin2/2
Pin No Signal name Function
JP1
JP32
Pin No
10 PJP1
Table C-10 AC Adaptor Connector pin assignments 3-pin
JP21 JP30
Table C-9-1 JP21 Fan I/F pin assignments 3-pin
12 JP20
Table C-12 Headphone Connector pin assignments 6-pin
11 JP19
Table C-11 Microphone I/F pin assignments 6-pin
Appendix D Keyboard Scan/Character Codes
Table D-1 Scan codes set 1 and set 2 1/4
Table D-1 Scan codes set 1 and set 2 2/4
Table D-1 Scan codes set 1 and set 2 3/4
ALT R
Table D-1 Scan codes set 1 and set 2 4/4
Table D-2 Scan codes with left Shift key
Table D-3 Scan codes in Numlock mode
Table D-4 Scan codes with Fn key
Table D-5 Scan codes in overlay mode
Table D-6 No.124 key scan code
Table D-7 No.126 key scan code
United States US Keyboard
United Kingdom UK Keyboard
Spanish SP Keyboard
Japanese JA Keyboard
Korean KO Keyboard
Korean CF Keyboard
Portuguese-ALPS Keyboard
US-INTEALPS Keyboard
GreeceGR Keyboard
France FR Keyboard
Chinese CH Keyboard
Swissc-Darfon Keyboard
IT new Keyboard
Figure E-13 IT new keyboard
Satellite A70 Series Maintenance Manual
Appendix F Series Screw Torque List
Table F-1 Series Screw Torque List
LL to LU Bottom Side
Appendix G Reliability
Table G-1 Mtbf
Satellite P30 Series Maintenance Manual