Cover1,2/PDRM11-EFG 01.6.21, 913 PM
Cover1,2/PDRM11-EFG 01.6.21, 913 PM
PDR-M11
00Tobira PDRM11-E 01.6.21, 556 PM
FCC Statement
For customers in the U.S.A
For customers in Canada
About OS Abbreviations
Before Reading This Manual
Trademark Information
Contents
Contents
Graphic symbol d
Safety Precautions
Exemption Clauses
Safety Precautions
Do not use the camera in the bath or shower
Do not touch power cords during a thunderstorm
Before you move the camera, disconnect cords and cables
Do not look at the sun through the camera viewfinder
Do not expose the camera to sand
Using Your Camera Correctly
Avoid using or storing the camera in the following places
Carrying Out Maintenance on Your Camera
Using Your Camera Correctly
Using Your Camera Correctly
Compatibility
Features
Function Map
AC adapter
Accessories
Viewfinder window Lens Connect cover P
Names of Parts
Image Quality button P
Erase button P Menu button
Names of Parts
LCD monitor P Viewfinder lamp P Tripod mount Enter button
Cross pad button
Mode dial
Status display
Slip the small loop at the end of the hand strap
Attaching the Strap
This camera uses four 4 size AA batteries
Installing the Batteries
Loading the Batteries
Installing the Batteries
Removing the Batteries
Installing the Batteries
Battery Wear
Using the Power Outlet
About SmartMedia
Loading SmartMedia
About SmartMedia
Before you use a new SmartMedia, be sure to format
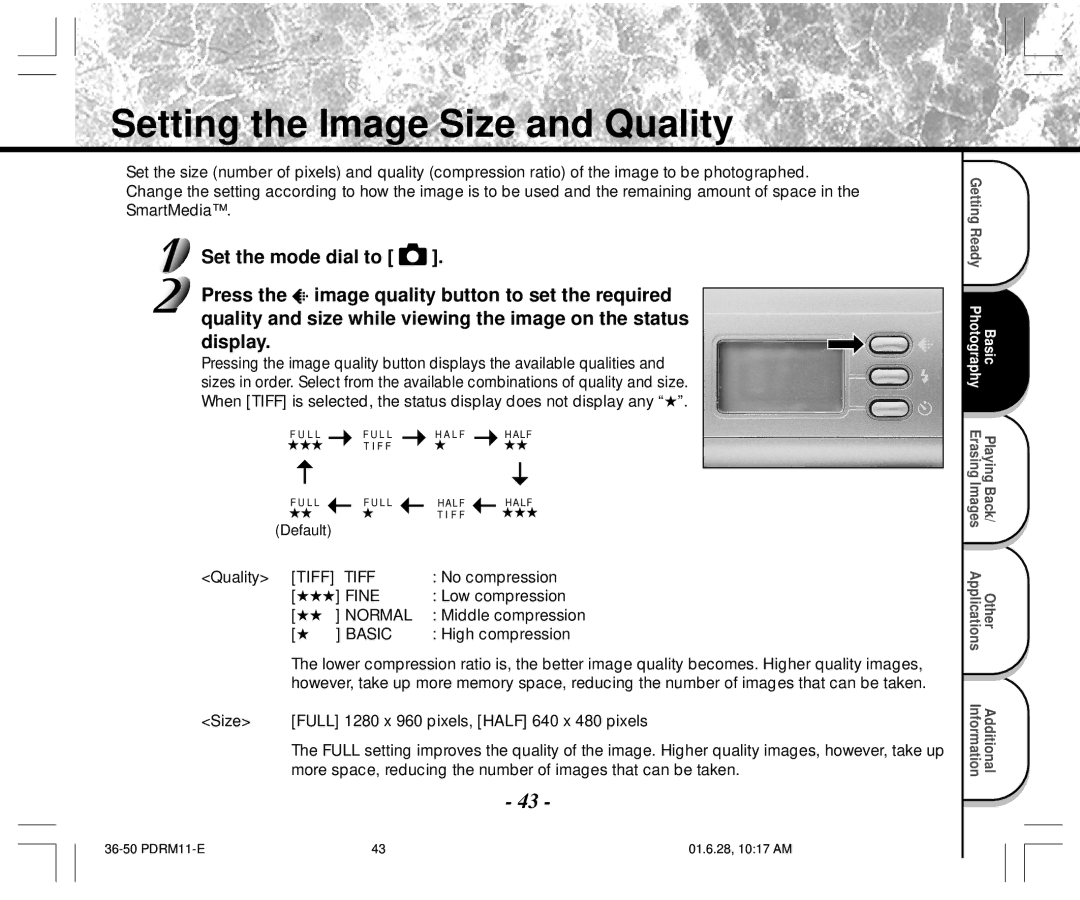
Set the mode dial to
Removing SmartMedia
About SmartMedia
Write Protection
Turning the Power OFF
Turning the Power ON/OFF
Turning the Power on
LCD Monitor Display
Photography Mode
Zoom playback P
Playback Mode
LCD Monitor Display
Firmly held against the sides of your chest
How to Hold Your Camera
Camera held with both hands with your arms
Press and hold the shutter button down fully
How to Press the Shutter Button
Press the shutter button down halfway
How to Press the Shutter Button
Strobe is in charging
About the Viewfinder Lamp
Get ready to take the photograph
Using the Viewfinder
Photography Auto Photography
Photography Auto Photography
Picture
Using the LCD Monitor
High compression
Setting the Image Size and Quality
Take the photograph
Setting the Image Size and Quality
For details on how to take photographs
Look at the image on the LCD monitor to compose the picture
Using the LCD Monitor
Digital Zoom Photography
Press the button
Digital Zoom Photography
To cancel digital zoom photography, press the button
Is displayed on the LCD monitor and the status display
Photography Using the Self-timer Self-timer Photography
Halfway 1, and press it down fully
Photography Using the Flash Flash Photography
Compose the picture. Press the shutter button down
Forced Flash
Photography Using the Flash Flash photography
Auto
Suppressed Flash
Memo
Shutter is opened and closed 4 times
Sequential Image Photography Burst Mode
Set the mode dial to Set the REC. mode to Burst
To quit the REC MENU, press the Menu button
Changing the Preset Conditions REC Menu
Set the mode dial to Press the Menu button
Auto REC . Mode Auto E . X . P
Flash Possible
Changing the Preset Conditions REC Menu
Photography Mode and Functions
White Balance W.B
Effective Subjects and Set Values
P. Exposure Compensation
Color
Sets the color mode at which the image is to be recorded
Frame reverse/ Frame forward
Press the or buttons to move forward and reverse
Play back photographed images one image at a time
Last image frame appears on the LCD monitor
Enlarge the image by using the button
Use the or buttons to select the frame you want to enlarge
Selected image is displayed at its regular size
Displaying a List of Images Thumbnail Display
Press the Enter button
Nine images are displayed simultaneously
Use the or buttons to select the desired image to protect
This feature prevents images from being erased
Protecting Images
Protecting an image
Enter button
Protecting Images
Use Or buttons to select Protect Press Button
Use the or buttons to select YES, and press
Protect menu is displayed
Removing the Protection
Use the or buttons to select Protect and press the button
Use the or buttons to select NO, and press
Automatically play back one image at a time in order
Auto Playback Slideshow
To quit the slideshow, press the Enter button
Auto Playback Slideshow
Erases one image at a time
Set the mode dial to or
When is selected, the last image is selected
Erasing Images Erase Frame
Erases all images within the SmartMediaTM
Erasing All Images
Use the or buttons to select DEL. ALL and press the button
Use the or buttons to select YES, and press the Enter button
Erasing All Images
Use the or buttons to select Format and press the button
Formatting the SmartMedia
Use the or buttons to select EXEC, and press
Formatting the SmartMedia
Press Button
Changing the Display Setting in Playback Mode
This setting allows you to switch the on-screen display
Use Or buttons to select Display
Use the or buttons to select the item you want to set
Basic Photographic Settings SET-UP mode
Setup Menu appears
Language Sound AUTO-OFF Timer Reset Setting item
To cancel changing of settings, press the button
Basic Photographic Settings SET-UP mode
To quit the Setup MENU, change the mode dial setting
Tab menu is displayed How to set the time
AUTO-OFF
Select SET and press the Enter button
To quit setting, select Cancel
Format the SmartMedia only on your camera
Using SmartMedia on a PC
Transferring Images to a PC
Click English Click Install PDR-M11 driver
Installing the USB Driver
Separately Sold Accessories
PDR-M11
Connecting to Other Devices
Specifications
Specifications
USB
DC in terminal DC 5
Specifications
SmartMedia is damaged
No more space on the SmartMedia
Recording is not possible
Nothing is recorded to the SmartMedia
Troubleshooting
Troubleshooting
Are removed with the power still on PDRM11-E 01.6.21, 631 PM
AF/AE
Glossary
For customers in the United States and Canada
Global Contacts
PDRM11-E 01.6.21, 631 PM
A N Ç a I S
00Tobira PDRM11-F 01.6.22, 334 PM
Déclaration de la FCC
Pour la clientèle aux États-Unis
Pour la clientèle du Canada
Informations sur les marques
Avant de lire ce mode d’emploi
Mise en place des accumulateurs
En mode de prise de vues
Table des matières
Lecture/effacement des images
Table des matières suite
Hages
Précautions de sécurité
Limites de responsabilité
Précautions de sécurité suite
Avertissement
Avertissement suite
Considérablement augmenter, comme dans
Si vous voulez utiliser l’appareil photo dans
Ne pas utiliser le flash près des yeux
Remarques sur la condensation
Utilisation correcte de l’appareil photo
Remarques sur le maniement de l’appareil photo
Ne pas exposer votre appareil photo au sable
Nettoyage de votre appareil photo
Utilisation correcte de l’appareil photo suite
Remarques sur le maniement de l’adaptateur secteur
Taille 1280 x 960 ou 640 x 480 pixels
Caractéristiques
Diagramme des fonctions
Mo, 3,3 V Logiciel
Accessoires
De format AA Alcaline Carte SmartMedia Cédérom
Nomenclature
Touche multipression
Nomenclature suite
Lecture/effacement des images
Molette de modes
Afficheur de statut
Mise en place de la courroie
Mise en place des accumulateurs
Installation des accumulateurs
Installation des accumulateurs suite
Retrait des accumulateurs
Déchargement de l’accumulateur
Utilisation d’une prise secteur
Remarques sur les cartes SmartMedia
Propos de la carte SmartMedia
Mise en place de la carte SmartMedia
Propos de la carte SmartMedia suite
Réglez la molette de modes sur
Retrait de la carte SmartMedia
De base Photographie Des images Lecture/effacement
Protection contre l’écriture
Mise hors tension
Mise sous/hors tension
Mise sous tension
Affichage du moniteur LCD
En mode de prise de vues
Affichage du moniteur LCD suite
En mode de lecture
Serrés contre les flancs
Comment tenir l’appareil photo
’appareil photo est tenu à deux mains avec les bras Les
’appareil photo prend la photo
Comment appuyer sur le déclencheur
Appuyez sur le déclencheur à mi-course
Et la lampe du viseur s’éteindra
Comment appuyer sur le déclencheur suite
Clignotant Le flash est en train d’être chargé
Réglez la molette de modes sur le mode désiré
Propos de la lampe du viseur
Ne réglez pas la molette de modes sur
Préparez-vous à prendre la photo
Prise de vues Prise de vues automatique
Utilisation du viseur
Appuyez sur le déclencheur à mi-course 1, puis à fond
Prise de vues Prise de vues automatique suite
Préparez-vous à prendre une photo
Utilisation du moniteur LCD
Fine Compression basse Normal
Réglage de la taille et de la qualité de l’image
Qualité Tiff
Sans compression
Pour des détails sur la façon de prendre des photos
Réglage de la taille et de la qualité de l’image suite
Prenez la photo
Utilisation du moniteur LCD
Prise de vues avec zoom numérique
Appuyez sur la touche
Appuyez sur le déclencheur à mi-course, puis à fond.
Prise de vues avec zoom numérique suite
Est affiché sur le moniteur LCD et l’afficheur de statut
Prise de vues avec le retardateur
Cadrez Appuyez sur le déclencheur à mi-course, puis à fond.
Puis à fond
Prise de vues au flash
Cadrez. Appuyez sur le déclencheur à mi-course
Anti-yeux rouges
Prise de vues au flash suite
Flash débrayé
Flash forcé
PDRM11-F 01.6.22, 339 PM
’obturateur s’ouvre et se ferme 4 fois
Cadrez, appuyez sur le déclencheur à mi-course, puis à fond.
Pour quitter Menu ENREG., appuyez sur la touche Menu
Changement des préréglages Menu Enreg
Réglez la molette de modes sur Appuyez sur la touche Menu
BAL.BLAN Balance des blancs
Mode de prise de vues et fonctions
Changement des préréglages Menu ENREG. suite
Sujets et valeurs de réglage effectifs
Correction de l’exposition
Couleur
Retour en arrière /Avance
Lecture des images photographiées Lecture vue par vue
La dernière image apparaît sur le moniteur LCD
Agrandissement d’images photographiées Lecture avec zoom
Agrandissez l’image avec la touche
’image sélectionnée est affichée à la taille normale
Appuyez sur la touche Enter
Neuf images sont affichées simultanément
Le curseur s’arrête sur l’image entourée d’un cadre
Le menu Menu Lecture est affiché
Protection des images
Protection d’une image
Cette fonction protège les images contre l’effacement
Execut et appuyez sur la touche Enter
Protection des images suite
Ann
Appuyez sur la touche Ou pour sélectionner
Abando et appuyez sur la touche Enter
Annulation de la protection
Appuyez sur la touche Pour sélectionner
Lecture automatique Diaporama
Pour quitter le diaporama, appuyez sur la touche Enter
Lecture automatique Diaporama suite
Procédure ci-dessus à partir de l’étape
Effacement des images effacement d’une image
Réglez la molette de modes sur ou
Pour continuer à effacer des images, répétez la
Images
Effacement de toutes les images
Que la carte SmartMedia contienne des images protégées
Effacement des images effacement d’une image suite
Pour annuler l’effacement des données d’image, sélectionnez
Formatage de la carte SmartMedia
Formatage de la carte SmartMedia suite
Pour afficher l’image uniquement
Display et appuyez sur la touche
Ce réglage vous permet de changer l’affichage sur écran
Pour afficher l’affichage complet sur écran
Arret AU Retarda Heure
Le menu Reglage apparaît
Reinitia
La valeur de réglage dans le menu d’onglets et
Réglages de prise de vue de base mode Reglage suite
MIN. défaut 2 MIN
Retarda retardateur
Pour quitter le réglage, sélectionner Abando
Sélectionnez Regler et appuyez sur la touche Enter
Utilisation de la carte SmartMedia sur un PC
Transfert des images à un PC
’écran de sélection de la langue des affichages apparaît
Installation du pilote USB
Avant d’installer Image Expert, installez le pilote USB
Installez ce pilote quand le câble USB fourni est utilisé
Accessoires vendus séparément
Raccordement à d’autres appareils
Fiche technique
Portée effective Approx ,9 m 3,0 pieds 3 m 10 pieds
Fiche technique suite
Automatique
Température 0 C +32 F à + 40 C +104 F
Prise DC CC 5 Prise Digital
AA accumulateurs alcalins, d’hydride du métal du nickel ou
Lithium *2 ou adaptateur secteur vendu séparément
49,5mm 1,9 po. x 66,5 mm 2,6 po. x 76 mm 3,0 po. L x H x P
Protégée
Aucune icône affichée Pas de carte SmartMedia en place
Enregistrement impossible
La carte SmartMedia est endommagée
Réglage de la molette de modes
Guide de dépannage
’objectif est sale Nettoyez l’objectif
Guide de dépannage suite
’appareil photo est en mode PC
AF/AE
Glossaire
Pour la clientèle des États-Unis et du Canada
Contacts mondiaux
PDRM11 F nosaveas 01.6.22, 342 PM
U T S C H
00Tobira PDRM11-G 01.6.22, 441 PM
Über die Betriebssystem-Abkürzungen
Bevor Sie diese Anleitung lesen
Warenzeichen
Im Fotografie-Modus
Inhalt
Hinweise zum Umgang mit der Kamera
Hinweise zu SmartMedia
Wiedergabe/Löschen
Inhalt Fortsetzung
Sicherheitsmaßregeln
AnzeigedefinitionenSymboldefinitionen
Haftungsausschluß
Sicherheitsmaßregeln Fortsetzung
Warnung
Nicht Netzleitungen bei Gewittern berüh- ren
Vorsicht
Den Blitz nicht auf Personen in der Nähe richten
Hinweise zur Kondensation
Richtige Verwendung der Kamera
Hinweise zum Umgang mit der Kamera
Die Kamera vor Sand schützen
Pflege der Kamera
Richtige Verwendung der Kamera Fortsetzung
Empfohlene Batterie für die bestmögliche Leistung
Hinweise zum Umgang mit dem Netzteil
Kompatibilität
Leistungsmerkmale
Verwendung der verschiedenen Fotografie-Betriebsarten
Kennenlernen der grundlegenden Funktionen
Schreibschutzaufkleber Netzteil
Zubehör
SmartMedia CD-ROM
Indexetiketten
Bezeichnung der Teile
Eingabekreuz-Taste
Bezeichnung der Teile Fortsetzung
Grundlegende Fotografie
Statusanzeige
Gurtes durch die Gurtaufhängung
Befestigung des Tragegurts
Ziehen Sie die kleine Schleife am Ende des Hand
Diese Kamera arbeitet mit vier 4 Größe AA Batterien
Vorbereiten der Batterien
Einlegen der Batterien
Vorbereiten der Batterien Fortsetzung
Entfernen der Batterien
Batterieverbrauch
Betrieb mit Netzstrom
Hinweise zu SmartMedia
Über SmartMedia
Einsetzen von SmartMedia
Über SmartMedia Fortsetzung
Stellen Sie das Modus-Wählrad auf
Entfernen von SmartMedia
Fotografie Grundlegende Löschen Wiedergabe
Schreibschutz
Ausschalten
Ein- und Ausschalten
Einschalten
Im Fotografie-Modus
LCD-Monitordisplay
Diaschau S Ordnernummer Bildnummer Datum S Monat/Tag/Jahr
LCD-Monitordisplay Fortsetzung
Im Wiedergabemodus
Zoom-Wiedergabe S Mode-Wählrad
Die Arme werden am Oberkörper abgestützt
Halten der Kamera
Die Kamera wird mit beiden Händen gehalten, und
Die Kamera macht eine Aufnahme
Drücken des Auslösers
Drücken Sie den Auslöser halb ein
Den Auslöser voll drücken und halten
Drücken des Auslösers Fortsetzung
Modus
Wird Power on Schreiben auf SmartMedia läuft ab
Über die Sucher-Lampe
Stellen Sie das Modus-Wählrad auf dem gewünschte
Bereiten Sie die Aufnahme vor
Fotografieren Auto-Fotomodus
Verwendung des Suchers
Drücken Sie den Auslöser halb 1 und anschließend ganz 2 ein
Fotografieren Auto-Fotomodus Fortsetzung
Verwendung des LCD-Monitors
Normal Mittlere Kompression
Einstellen von Bildformat und Qualität
Qualität Tiff
Keine Kompression
Einzelheiten zum Fotografieren S
Einstellen von Bildformat und Qualität Fortsetzung
Machen Sie die Aufnahme
Verwendung des LCD-Monitors S
Digital-Zoomfotografie
Drücken Sie die Taste
Drücken Sie den Auslöser halb und anschließend voll. S
Digital-Zoomfotografie Fortsetzung
Erscheint im LCD-Monitor und im Statusdisplay
Aufnahmen mit Selbstauslöser
Auslöser halb 1 und anschließend voll
Aufnahmen mit Blitz
Wählen Sie den Bildausschnitt. Drücken Sie den
Rote-Augen-Effekt-Verringerung
Aufnahmen mit Blitz Fortsetzung
Unterdrückter Blitz
Erzwungener Blitz
PDRM11-G 01.6.22, 448 PM
Der Verschluß öffnet und schließt sich 4 Mal
Sequentielle Fotografie Serienaufnahme-Modus
Die Kamera ist jetzt bereit, Fotos zu machen
Ändern der Voreinstellungen Aufnahmemenü
Das Menü Aufnahmemenü erscheint
Tab-Menü
Fotomodus und Funktionen
Ändern der Voreinstellungen Aufnahmemenü Fortsetzung
Weissabgl Weißabgleich
Aufn MOD Aufnahmemodus
Besondere Motive und Einstellwerte
Belichtungskorrektur
Farbe
Bild rückwärts / Bild vorwärts
Wiedergabe aufgenommener Bilder
Das letzte Bild erscheint auf dem LCD-Monitor
Das Bild mit der Taste vergrößern
Das gewählte Bild erscheint in normaler Größe
Abrufen der Bilderliste Miniaturbildanzeige
Drücken Sie die ENTER-Taste
Neun Bilder erscheinen gleichzeitig
Die letzte Bildmarkierung erscheint im LCD-Monitor
Bilder vor Löschen schützen
Schützen eines Bildes
Dieses Merkmal schützt Bilder vor Löschen
Das SCHÜTZEN-Menü erscheint
Bilder vor Löschen schützen Fortsetzung
Die Taste
Aufheben des Schreibschutzes
Verwenden Sie die Taste Oder
Das Menü Wiedergabemenü erscheint
Automatische Wiedergabe Diaschau
Zeigt automatisch ein Bild nach dem anderen der Reihe nach
Zum Beenden der Diaschau drücken Sie die ENTER-Taste
Automatische Wiedergabe Diaschau Fortsetzung
Bei Einstellung auf wird das letzte Bild ausgewählt
Löschen von Bildern Einzelbild-Löschung
Stellen Sie das Modus-Wählrad auf oder
Drücken Sie die Löschen-Taste
Das letzte Bild erscheint im LCD-Monitor
Löschen aller Bilder
Löschen aller Bilder Fortsetzung
Formatieren von SmartMedia
Formatieren von SmartMedia Fortsetzung
AUS Nur das Bild anzeigen
Verwenden Sie die Taste oder Um Display zu
Dieses Merkmal erlaubt es, das OSD-Display zu wechseln
Den ganzen Bildschirm anzeigen
Um den einzustel
Das SETUP-Menü erscheint
Verwenden Sie die Taste oder lenden Punkt zu wählen
FRN Französisch GER Deutsch Japanisch SPN Spanisch
Grundlegende Kameraeinstellungen SETUP-Modus Fortsetzung
Das Tab-Menü erscheint Einstellen der Uhrzeit Seite
Stellt die Displaysprache für Menüs im LCD-Monitor ein ENG
Drücken. S 1 MIN. Vorgabe 2 MIN
Auto AUS Automatisches Ausschalten
Selbsta Selbstauslöser
Zum Beenden der Einstellung wählen Sie die Taste Abbrec
Wählen Sie mit der Taste Oder
Wählen Sie Einste und drücken Sie die ENTER-Taste
SmartMedia nur in der Kamera formatieren
Übertragen von Bildern zu einem PC
Verwendung von SmartMedia in einem PC
Das Feld zum Wählen der gewünschten Sprache erscheint
Installation des USB-Treibers
Deutsch anklicken Install PDR-M11 driver anklicken
Sonderzubehör
Drucker Software-Applikation CD-ROM mitgeliefert
Anschluß an andere Geräte
Technische Daten
Technische Daten Fortsetzung
Aufkleber
DC-IN-Anschluß Gleichstrom 5
Getrennt erhältlich
Bis 80% bei Betrieb, keine Kondensation
Technische Daten Fortsetzung
Warnungen und Meldungen im LCD-Monitor
Fehlersuche
Fehlersuche Fortsetzung
Fehlersuche Fortsetzung
Glossar
Globale Kontakte
PDRM11 F nosaveas 01.6.22, 342 PM
Cover3,4/PDRM11-EFG 01.6.21, 913 PM
PDRM111?
PDR-M11