Digital Still Camera PDR-M60
PDR-M60
For customers in the U.S.A
FCC Statement
Toshiba America Information SYSTEMS, INC
For customers in Canada
Before Reading This Manual
Trademark Information
Conventions Used In This Manual
About OS Abbreviations
Contents
Adjusting the LCD Monitor Brightness
Separately Sold Accessories
Connecting to Other Devices
Auto Playback Slideshow
Safety Precautions
Indication definitions
Safety Precautions
Exemption Clauses
Do not use the camera in the bath or shower
Do not touch power or TV antenna cords during a thunderstorm
Before you move the camera, disconnect cords and cables
Do not look at the sun through the camera viewfinder
Avoid using or storing the camera in the following places
Using Your Camera Correctly
Do not expose the camera to sand
Using Your Camera Correctly
Carrying Out Maintenance on Your Camera
Using Your Camera Correctly
Features
Compatibility
Function Map
Accessories
CD-ROM
Names of Parts
Names of Parts
Mode dial
Status display
Photography Basic
Attaching the Strap
Pass the leading end of the strap through the strap
Installing the Batteries
Pull open the battery door as shown
Loading the Batteries
This camera uses four 4 size AA alkaline batteries
Installing the Batteries
Make sure that the battery door is firmly closed
Removing the Batteries
Battery Wear
Blinks twice Replace with new batteries
Using the Power Outlet
About SmartMedia
About SmartMedia
Loading SmartMedia
Set the mode dial to
Removing SmartMedia
About SmartMedia
Write Protection
Turning the Power on
Turning the Power ON/OFF
Turning the Power OFF
Photography Mode or
LCD Monitor Display
Playback Mode
LCD Monitor Display
Camera held with both hands with your arms
How to Hold Your Camera
Firmly held against the sides of your chest
Press the shutter button down half way
How to Press the Shutter Button
Press and hold the shutter button down fully
How to Press the Shutter Button
Self-timer in operation
Power on Writing to SmartMedia in progress
About the Color of the Viewfinder LED
Viewfinder LED Meaning Color State
Photography Auto Photography
Using the Viewfinder
Get ready to take the photograph
Using the LCD Monitor
Photography Auto Photography
To adjust the brightness of the LCD monitor
Quality Fine
Setting the Image Size and Quality
Normal 1/8 Jpeg compression
For details on how to take photographs Photograph
Setting the Image Size and Quality
Take the photograph
Zoom Photography
Using the LCD Monitor
Set the mode dial to or Press the button
Digital Zoom Photography
Close-up Photography Macro Photography
Set the mode dial to or Press the macro button
Is displayed on the LCD monitor and the status display
Photography Using the Self-timer Self-timer Photography
Set the mode dial to or Press the self-timer button
Photography Using the Flash Flash Photography
Photography Using the Flash Flash photography
Memo
Multi Image Photography Multi Photography
Set the mode dial to or Set the photography mode to Multi
Shutter is opened and closed 16 times
Set the mode dial to or Set the photography mode to Bulb
Long Exposure Photography Bulb Photography
Setting items
White balance Exposure compensation Page 56 valuesSet
This fixes the setting Camera is ready to take photographs
Taking Photographs Manually Manual Photography
Press the Enter button
Camera takes the picture
White Balance
Exposure Compensation
Effective Subjects and Set Values
Changing the Preset Conditions REC Menu
REC Menu REC. Mode Shot
Set the mode dial to or Press the Menu button
REC Menu is displayed
Changing the Preset Conditions REC Menu
Photography Mode and Functions
To quit the REC MENU, press the Menu button
Camera is now ready to take photographs
Preview
Bulb
Press the or buttons to move forward and reverse
Play back photographed still images one image at a time
Enlarge the image by using the Zoom key
Use the or buttons to select the frame you want to enlarge
Use the , , or buttons to select the area to enlarge
To return to the regular display, press the Enter button
Nine images are displayed simultaneously
Selected image is displayed at its regular size
Auto Playback Slideshow
Play Menu
Slide SET
Use Or buttons to select Slide Press Button
Reducing the Image Size Resize
Resize SET
Reducing the Image Size Resize
Resize
Compressing Images Quality
Compressing Images Quality
Quality SET
Use Or buttons to select QUALITY, Press Button
Quality menu is displayed
Selecting the Folder to Play Back
Use Or buttons to select FOLDER, Press Button
Selecting the Folder to Play Back
About Folder Names
Erasing Images Erase Frame
Set the mode dial to , or
Press the erase button
Erasing Images Erase Frame
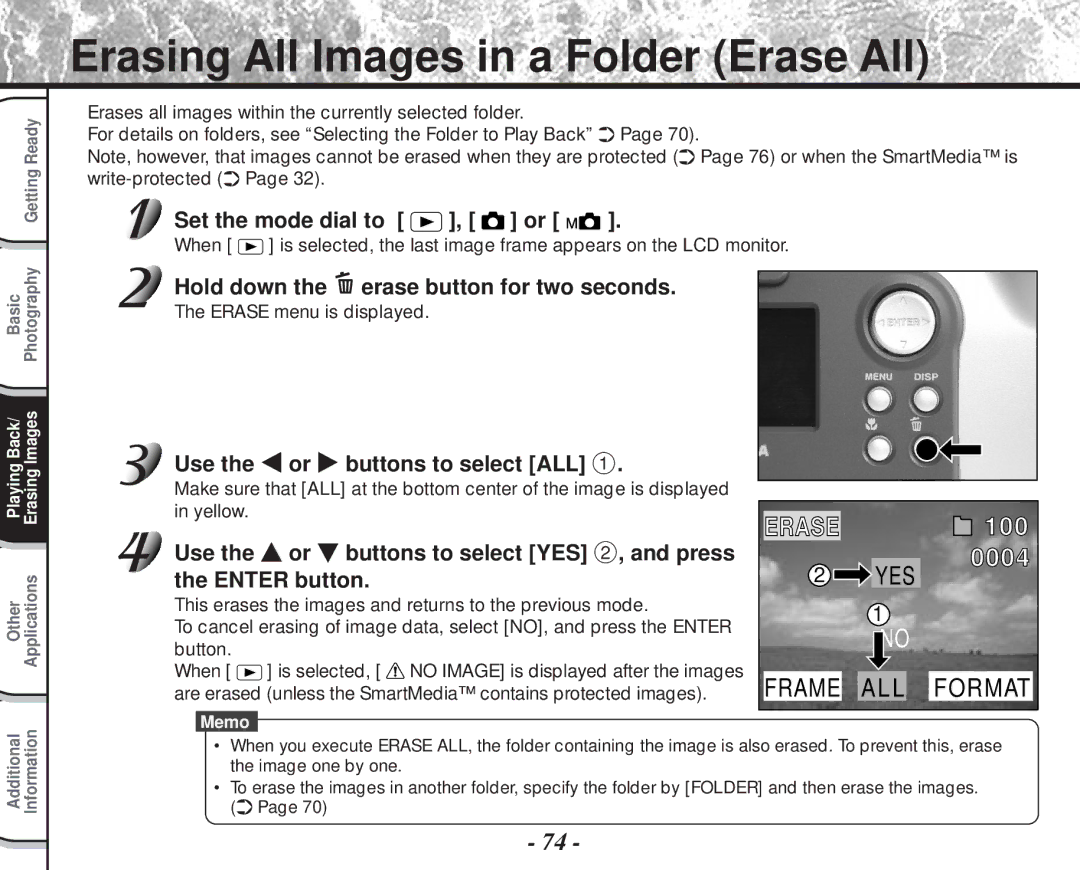
Erasing All Images in a Folder Erase All
Hold down the erase button for two seconds
Use the or buttons to select ALL
Erase menu is displayed
Formatting the SmartMedia
To cancel formatting, select NO, and press the Enter button
Use the or buttons to select Format
Protecting Images
This feature prevents images from being erased
Protecting an Image
To cancel the selection, press the Enter button again
Protecting Images
Use the or buttons to select Protect and press the button
Protect menu is displayed
Removing the Protection
Carry out in Protecting An Image
SET-UP Language
Basic Photographic Settings SET-UP mode
Use the or buttons to select the item you want to set
To quit the SET-UP menu, change the mode dial setting
Basic Photographic Settings SET-UP mode
SET-UP
To quit setting, select Cancel
Time
Select SET and press the Enter button
Sets the date and time Seconds cannot be set
Image No
About Still Image Numbers and Folder Numbers
Default
Returns settings to their defaults
Adjusting the LCD Monitor Brightness
Set the mode dial to , or Press the Menu button
Use the or buttons to adjust the brightness
Use the or buttons to select LCD and press the button
Disp Button and LCD Monitor Display
Taking and Playing Back Photographs on a TV
Taking and Playing Back Photographs on a TV
Take photographs or play them back
Transferring Images to a PC
Using SmartMedia on a PC
Format the SmartMedia only on your camera
For Windows 98 or Windows
Installing the USB Driver
Click the Next button
Installing the USB Driver
Next screen appears
Installing the USB Driver
Separately Sold Accessories
Connecting to Other Devices
PDR-M60
Specifications
Auto selected
Specifications
Fluorescent light, incandescent light
Video terminal Ntsc or PAL system
AA or AC adapter optional
Specifications
Nothing is recorded to the SmartMedia
SmartMedia is not formatted. a
Message prompting you to format
SmartMedia is displayed
Troubleshooting
Troubleshooting
101
Glossary
AF/AE
Contact Numbers
103
Toshiba Digital Still Camera
A N Ç a I S
Pour la clientèle aux États-Unis
Déclaration de la FCC
Préparation
Conventions utilisées dans ce mode d’emploi
Avant de lire ce mode d’emploi
Informations sur les marques
Table des matières
Table des matières suite
Lecture/effacement des images Autres applications
Précautions de sécurité
Définition des affich a ges
Précautions de sécurité suite
Limites de responsabilité
Avertissement suite
Avertissement suite
Etc
Ne pas utiliser le flash près des yeux
Utilisation correcte de l’appareil photo
Remarques sur le maniement de l’appareil photo
Ne pas exposer votre appareil photo au sable
Remarques sur la condensation
Utilisation correcte de l’appareil photo suite
Nettoyage de votre appareil photo
Remarques sur le maniement de l’adaptateur secteur
Caractéristiques
Taille images fixes 1792 x 1200/896 x 600 pixels
Diagramme des fonctions
Accessoires
De format AA Alkaline Carte SmartMedia Logiciel cédérom
Mo, 3,3 V
Étui antistatique Étiquettes
Nomenclature
Nomenclature suite
Touche multipression
Molette de modes
Afficheur de statut
Mise en place de la courroie
’arrêt et tirez complètement
Installation des accumulateurs
Mise en place des accumulateurs
Installation des accumulateurs suite
Assurez-vous que la porte est bien fermée
Retrait des accumulateurs
Remplacez les accumulateurs par des neufs
Déchargement de l’accumulateur
’accumulateur est complètement déchargé la
Utilisation d’une prise secteur
Propos de la carte SmartMedia
Remarques sur les cartes SmartMedia
Propos de la carte SmartMedia suite
Mise en place de la carte SmartMedia
Retrait de la carte SmartMedia
Réglez la molette de modes sur
Propos de la carte SmartMedia suite
Protection contre l’écriture
Mise sous tension
Mise sous/hors tension
Mise hors tension
En mode de prise de vues ou
Affichage du moniteur LCD
En mode de lecture
Affichage du moniteur LCD suite
’appareil photo est tenu à deux mains avec les bras Les
Comment tenir l’appareil photo
Serrés contre les flancs
Appuyez sur le déclencheur à mi-course
Comment appuyer sur le déclencheur
’appareil photo prend la photo
Comment appuyer sur le déclencheur suite
Propos de la couleur du témoin du viseur
Utilisation du viseur
Prise de vues Prise de vues automatique
Préparez-vous à prendre la photo
Prise de vues Prise de vues automatique suite
Utilisation du moniteur LCD
Regardez dans le viseur pour cadrer votre vue
Appuyez sur le déclencheur à mi-course 1, puis à fond
Pour ajuster la luminosité du moniteur LCD
Réglage de la taille et de la qualité de l’image
Réglage de la taille et de la qualité de l’image suite
Prenez la photo
Prise de vues avec zoom
Appuyez sur le déclencheur à mi-course, puis à fond.
Réglez la molette de modes sur ou Appuyez sur la touche
Prise de vues avec zoom numérique
Utilisation du moniteur LCD
Prise de vues rapprochée Prise de vues macro
Est affiché sur le moniteur LCD et l’afficheur de statut
Prise de vues avec le retardateur
Cadrez Appuyez sur le déclencheur à mi-course, puis à fond.
Prise de vues au flash
Auto
Prise de vues au flash suite
Anti-yeux rouges
Flash forcé
Flash débrayé
Mémo
Prise de vues multiples
’obturateur s’ouvre et se ferme 16 fois
Prise de vues avec exposition lente Pause B
La prise de vues au flash est impossible
Prise de vues manuelle
’écran de réglage manuel est affiché
Si le moniteur LCD est difficile à voir
Valeurs de réglage
Appuyez sur la touche Enter
Prise de vues manuelle suite
’appareil prend la photo
Balance des blancs
Correction de l’exposition
Sujets et valeurs de réglage effectifs
Menu ENR Mode ENR Prise
Changement des préréglages Menu ENR
Changement des préréglages Menu ENR suite
Mode de prise de vues et fonctions
Pour quitter Menu ENR, appuyez sur la touche Menu
Aperçu prévisualisation
Exposit pause B
Retardat retardateur
Lecture des images photographiées Lecture vue par vue
La dernière image apparaît sur le moniteur LCD
Agrandissement d’images photographiées Lecture avec zoom
Agrandissez l’image avec la touche de zoom
Actuelle de
La zone
Neuf images sont affichées simultanément
’image sélectionnée est affichée à la taille normale
Lecture automatique Diaporama
Menu Lect
Pour quitter le diaporama, appuyez sur la touche Enter
Le menu Menu Lect est affiché
Réduction de la taille de l’image Changement de taille
Le menu Taille est affiché
Taille
Pour quitter Menu LECT, appuyez sur la touche Menu
Compression des images Qualité
Compression des images Qualité suite
Qualite Definir
Qualite
Si vous souhaitez comprimer deux images ou plus, répétez la
Choix du dossier à lire
Dossier Definir
Choix du dossier à lire suite
Propos des noms de dossier
Réglez la molette de modes sur , ou
Appuyez sur la touche d’effacement
Cette fonction permet d’effacer les images une par une
Trame ou Dernier est affiché en bas et à gauche de l’écran
Effacement des images effacement d’une image suite
Appuyez sur la touche ou pour sélectionner Tout
Le menu Effacer est affiché
Formatage de la carte SmartMedia
Appuyez sur la touche ou pour sélectionner Format
Protection d’une image
Protection des images
Cette fonction protège les images contre l’effacement
Proteger
Protection des images suite
Le menu Proteger est affiché
Effectuez l’étape 5 de Protection d’une image
Le menu Config apparaît
Config Langue
Paramètre
Réglages de prise de vue de base mode Config suite
Config
Le menu d’onglets est affiché Comment régler le temps
Français Español
Sélectionnez Definir et appuyez sur la touche Enter
Heure
Pour quitter le réglage, sélectionner Annul
Nb Images
Propos des numéros d’image fixe et de dossier
Defaut
’appareil photo revient au mode précédent
Réglage de la luminosité du moniteur LCD
Appuyez sur la touche ou pour ajuster la luminosité
’image et le menu LCD sont affichés
Touche Disp et affichage du moniteur LCD
Prise de vues et lecture sur un téléviseur
Prise de vues et lecture sur un téléviseur suite
Prenez des photos ou reproduisez-les
Transfert des images à un PC
Utilisation de la carte SmartMedia sur un PC
Installation du pilote USB
Réglez la molette de mode sur
Pour Windows 98 ou Windows
Cliquez sur le bouton Suivant
Installation du pilote USB suite
’écran suivant apparaît
Installation du pilote USB suite
Accessoires vendus séparément
Raccordement à d’autres appareils
Logiciel Cédérom fourni
Fiche technique
Fiche technique suite
Fluorescente normale/blanche, lampe incandescente
Automatique
Portée effective Approx ,5 m 1,7 pied 3,0 m 10 pieds
Date/heure
Ajusté automatiquement jusqu’en
Prise Digital
Prise Video Système Ntsc ou PAL
49,5mm 1,9 po. x 66,5 mm 2,6 po. x 76 mm 3,0 po. L x H x P
Pas de carte SmartMedia en place
Enregistrement impossible
La carte SmartMedia n’est pas formatée. Un
Message vous demandant de formater la carte
Guide de dépannage
Réglez la molette de modes sur la position Correctement
Guide de dépannage suite
Retirez la protection contre l’écriture Contre l’écriture
Encore sous tension
Glossaire
AF/AE
Numéros à appeler
Appareil Photo Numérique Toshiba
U T S C H
Für Kunden in den U.S.A
Aufmerksamkeit
FCC-Hinweis
Aufmerksamkeit Fortsetzung
Für Kunden in Kanada
Bevor Sie diese Anleitung lesen
Warenzeichen
Konventionen in dieser Anleitung
Über die Betriebssystem-Abkürzungen
Inhalt
AUTO-AUS Automatisches Ausschalten
Standard Vorgabe
Anzeigedefinitionen Symboldefinitionen
Sicherheitsmaßregeln
Sicherheitsmaßregeln Fortsetzung
Haftungsausschluß
Warnung
Nicht Netz- oder Antennenleitungen bei Gewittern berühren
Vorsicht
Den Blitz nicht auf Personen in der Nähe richten
Richtige Verwendung der Kamera
Hinweise zum Umgang mit der Kamera
Die Kamera vor Sand schützen
Hinweise zur Kondensation
Richtige Verwendung der Kamera Fortsetzung
Pflege der Kamera
Hinweise zum Umgang mit dem Netzteil
Leistungsmerkmale
Leichte Wahl von Bildformat und Qualität
Zusammenfassung der Funktionen
Kennenlernen der grundlegenden Funktionen
Verwendung der verschiedenen Fotografie-Betriebsarten
Wiedergabe der aufgenommenen Bilder
Zubehör
SmartMedia Software CD-ROM
MB, 3,3 V
Garantiekarte für die USA und Kanada Netzteil
Bezeichnung der Teile
Bezeichnung der Teile Fortsetzung
Eingabekreuz-Taste
Modus-Wählrad
Statusanzeige
Fotografie Grundlegende
Befestigung des Tragegurts
Das Gurtende zuerst durch die Gurtaufhängung
Und danach durch beide Enden des Gurtlängenvers
Tellers 2 führen
Einlegen der Batterien
Vorbereiten der Batterien
Den Batteriefachdeckel wie gezeigt ziehen und öffnen
Vorbereiten der Batterien Fortsetzung
Entfernen der Batterien
Batterieverbrauch
Betrieb mit Netzstrom
Über SmartMedia
Hinweise zu SmartMedia
Über SmartMedia Fortsetzung
Einsetzen von SmartMedia
Die SmartMedia-Abdeckung schließen
Entfernen von SmartMedia
Stellen Sie das Modus-Wählrad auf
Über SmartMedia Fortsetzung
Schreibschutz
Einschalten
Ein- und Ausschalten
Ausschalten
LCD-Monitordisplay
Im Fotografie-Modus oder
LCD-Monitordisplay Fortsetzung
Im Wiedergabemodus
Die Kamera wird mit beiden Händen gehalten, und
Halten der Kamera
Die Arme werden am Oberkörper abgestützt
Drücken des Auslösers
Drücken Sie den Auslöser halb ein
Den Auslöser voll drücken und halten
Die Kamera macht eine Aufnahme
Drücken des Auslösers Fortsetzung
Über die Farbe der Sucher-LED
Verwendung des Suchers
Fotografieren Auto-Fotomodus
Bereiten Sie die Aufnahme vor
Fotografieren Auto-Fotomodus Fortsetzung
Verwendung des LCD-Monitors
Drücken Sie den Auslöser halb 1 und anschließend ganz 2 ein
Zum Einstellen der Helligkeit des LCD-Monitors S
Einstellen von Bildformat und Qualität
Qualität Fine schön Jpeg Kompression
Machen Sie die Aufnahme
Einstellen von Bildformat und Qualität Fortsetzung
Einzelheiten zum Fotografieren Fotografieren S
Zoom-Fotografie
Die Zoom-Fotografie ermöglicht Zoom-Aufnahmen mit Weitwinkel
Digital-Zoomfotografie
Verwendung des LCD-Monitors S
Nahaufnahme Makrofotografie
Erscheint im LCD-Monitor und im Statusdisplay
Aufnahmen mit Selbstauslöser
Aufnahmen mit Blitz
Aufnahmen mit Blitz Fortsetzung
Rote-Augen-Verringerung
Gezwungener Blitz
Unterdrückter Blitz
Zur Beachtung
Multibild-Aufnahmen
Der Verschluß öffnet und schließt sich 16 Mal
Langzeitbelichtung Fotografieren im B-Modus
Blitzfotografie ist nicht möglich
Weißabgleich S Belichtungskompensation S Einstellwerte
Manuelles Fotografieren
Einstellpunkte
Die Taste Enter drücken
Manuelles Fotografieren Fortsetzung
Die Aufnahme wird gemacht
Weißabgleich
Belichtungskompensation
Weißabgleich Zusätzliche Information, Glossar S.102
Fotografie in kühlweißem Leuchtstofflicht
Effektive Motive und Einstellwerte
Aufn Aufn MOD
Ändern der Voreinstellungen Aufn
Aufn
Ändern der Voreinstellungen AUFN. Fortsetzung
Aufn MOD Aufnahmemodus
Zum Beenden von AUFN. drücken Sie die MENU-Taste
Fotomodus und Funktionen
VORANS. Vorschau
BELICHT. Belichtung
VERÖG. Selbstauslöser
Wiedergabe aufgenommener Bilder
Der folgende Text beschreibt die Wiedergabe einzelner Bilder
Das Bild mit der Zoom-Taste vergrößern
Vergrößern von Aufnahmen Zoom-Wiedergabe
Das letzte Bild erscheint auf dem LCD-Monitor
Abrufen der Bilderliste Miniaturbildanzeige
Drücken Sie die ENTER-Taste
Neun Bilder erscheinen gleichzeitig
Das gewählte Bild erscheint in normaler Größe
Automatische Wiedergabe Diashow
Wiederg
DIA
Zum Beenden der Diashow drücken Sie die ENTER- Taste
Verringern der Bildgröße Bildformat ändern
Verringern der Bildgröße Bildformat ändern Fortsetzung
GRÖ SSE
Bilder komprimieren Qualität
Bilder komprimieren Qualität Fortsetzung
Qualität Fest
Qualitä T
Sie das Verfahren für jedes Bild
Ordner zur Wiedergabe wählen
Ordner zur Wiedergabe wählen Fortsetzung
Über Ordner-Namen
Löschen von Bildern Einzelbild-Löschung
Stellen Sie das Modus-Wählrad auf , oder
Drücken Sie die Löschen-Taste
Wenn oder gewählt ist, wird das letzte Bild gewählt
Löschen von Bildern Einzelbild-Löschung Fortsetzung
Halten Sie die Löschen-Taste zwei Sekunden lang gedrückt
Verwenden Sie die Taste oder , um Alle 1 zu wählen
Wenn gewählt ist, erscheint das letzte Bild im LCD-Monitor
Das LÖSCHEN-Menü erscheint
Halten Sie die Löschen -Taste zwei Sekunden lang gedrückt
Formatieren von SmartMedia
Verwenden Sie die Taste oder , um Format 1 zu wählen
Bilder vor Löschen schützen
Schützen eines Bildes
Dieses Merkmal schützt Bilder vor Löschen
Die letzte Bildmarkierung erscheint im LCD-Monitor
Bilder vor Löschen schützen Fortsetzung
Schutz Fest
Das SCHUTZ-Menü erscheint
Um den Schreibschutz aufzuheben, wählen Sie Abbr
Führen Sie Schritte 1 bis 3 in Schützen eines Bildes aus
Aufheben des Schreibschutzes
Führen Sie Schritt 5 in Schützen eines Bildes aus
Setup Sprache
Das SETUP-Menü erscheint
Verwenden Sie die Taste oder lenden Punkt zu wählen
Um den einzustel
Grundlegende Kameraeinstellungen Setup-Modus Fortsetzung
Sprache
Das Tab-Menü erscheint Einstellen der Zeit Seite
Español Spanisch
AUTO-AUS Automatisches Ausschalten
Zeit
Wählen Sie Fest und drücken Sie die ENTER-Taste
Zum Beenden der Einstellung wählen Sie die Taste Abbr
Bildnr
Bildnummern und Ordnernummern
Standard Vorgabe
Einstellung auf Vorgabewerte zurückstellen
Das Bild und das LCD-Menü erscheinen
Einstellung der LCD-Monitor-Helligkeit
Damit wird die Kamera zum vorherigen Modus zurückgestellt
DISP-Taste und LCD-Monitordisplay
Auf gestellt, ist der LCD-Monitor leer
Aufnehmen und Wiedergeben von Bildern auf einem Fernsehgerät
Bilder aufnehmen und wiedergeben
Verwendung von SmartMedia in einem PC
Übertragen von Bildern zu einem PC
SmartMedia nur in der Kamera formatieren
Installation des USB-Treibers
Für Windows 98 oder Windows
Die Moduswahlscheibe auf stellen
Die Schaltfläche Weiter anklicken
Installation des USB-Treibers Fortsetzung
Das nächste Bild erscheint
Installation des USB-Treibers Fortsetzung
Sonderzubehör
Anschluß an andere Geräte
Technische Daten
Technische Daten Fortsetzung
Datum/Zeit Simultane Aufzeichnung in Bilddaten Exif-Datei
Automatisch korrigiert bis
VIDEO-Anschluß NTSC-oder PAL-System
AA Batteries oder Netzteil getrennt erhältlich
Technische Daten Fortsetzung
Warnungen und Meldungen im LCD-Monitor
Fehlersuche
Fehlersuche Fortsetzung
101
Glossar
Weißabgleich
Wie Sie uns erreichen können
 ], [
], [  ] or [
 ].
]. erase button for two seconds.
 or
or  buttons to select [ALL] 1.