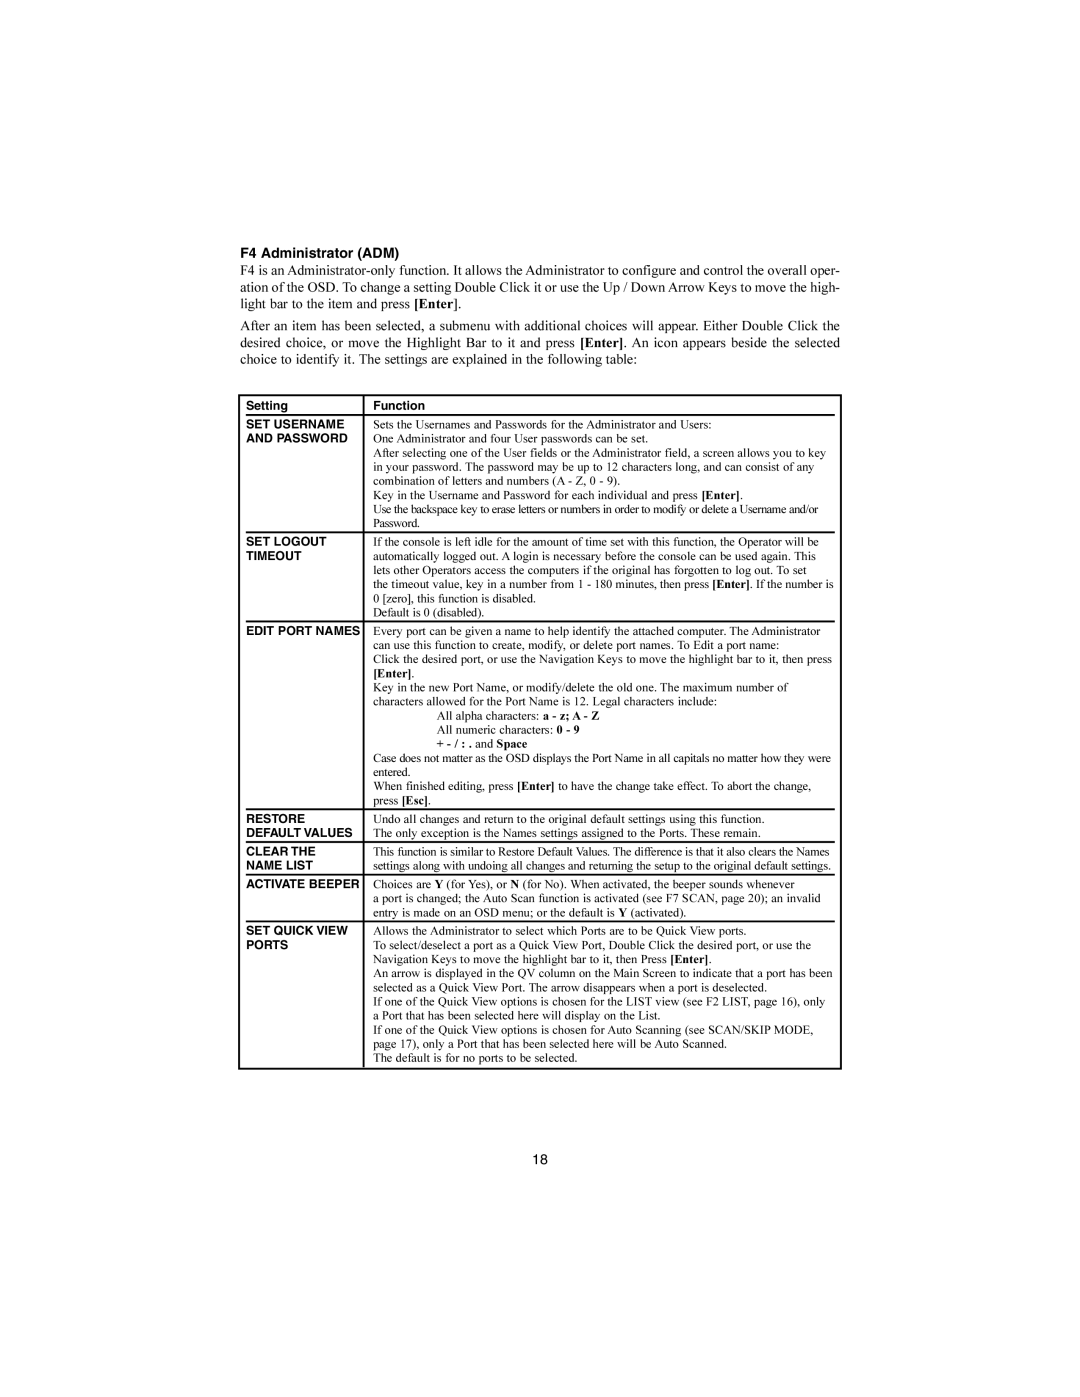
F4 Administrator (ADM)
F4 is an
After an item has been selected, a submenu with additional choices will appear. Either Double Click the desired choice, or move the Highlight Bar to it and press [Enter]. An icon appears beside the selected choice to identify it. The settings are explained in the following table:
| Setting | Function |
|
| SET USERNAME | Sets the Usernames and Passwords for the Administrator and Users: | |
| AND PASSWORD | One Administrator and four User passwords can be set. | |
|
| After selecting one of the User fields or the Administrator field, a screen allows you to key | |
|
| in your password. The password may be up to 12 characters long, and can consist of any | |
|
| combination of letters and numbers (A - Z, 0 - 9). | |
|
| Key in the Username and Password for each individual and press [Enter]. | |
|
| Use the backspace key to erase letters or numbers in order to modify or delete a Username and/or | |
|
| Password. |
|
| SET LOGOUT | If the console is left idle for the amount of time set with this function, the Operator will be | |
| TIMEOUT | automatically logged out. A login is necessary before the console can be used again. This | |
|
| lets other Operators access the computers if the original has forgotten to log out. To set | |
|
| the timeout value, key in a number from 1 - 180 minutes, then press [Enter]. If the number is | |
|
| 0 [zero], this function is disabled. | |
|
| Default is 0 (disabled). |
|
| EDIT PORT NAMES | Every port can be given a name to help identify the attached computer. The Administrator | |
|
| can use this function to create, modify, or delete port names. To Edit a port name: | |
|
| Click the desired port, or use the Navigation Keys to move the highlight bar to it, then press | |
|
| [Enter]. | |
|
| Key in the new Port Name, or modify/delete the old one. The maximum number of | |
|
| characters allowed for the Port Name is 12. Legal characters include: | |
|
| All alpha characters: a - z; A - Z | |
|
| All numeric characters: 0 - 9 | |
|
| + | |
|
| Case does not matter as the OSD displays the Port Name in all capitals no matter how they were | |
|
| entered. | |
|
| When finished editing, press [Enter] to have the change take effect. To abort the change, | |
|
| press [Esc]. |
|
| RESTORE | Undo all changes and return to the original default settings using this function. | |
| DEFAULT VALUES | The only exception is the Names settings assigned to the Ports. These remain. |
|
| CLEAR THE | This function is similar to Restore Default Values. The difference is that it also clears the Names | |
| NAME LIST | settings along with undoing all changes and returning the setup to the original default settings. |
|
| ACTIVATE BEEPER | Choices are Y (for Yes), or N (for No). When activated, the beeper sounds whenever | |
|
| a port is changed; the Auto Scan function is activated (see F7 SCAN, page 20); an invalid | |
|
| entry is made on an OSD menu; or the default is Y (activated). |
|
| SET QUICK VIEW | Allows the Administrator to select which Ports are to be Quick View ports. | |
| PORTS | To select/deselect a port as a Quick View Port, Double Click the desired port, or use the | |
|
| Navigation Keys to move the highlight bar to it, then Press [Enter]. | |
|
| An arrow is displayed in the QV column on the Main Screen to indicate that a port has been | |
|
| selected as a Quick View Port. The arrow disappears when a port is deselected. | |
|
| If one of the Quick View options is chosen for the LIST view (see F2 LIST, page 16), only | |
|
| a Port that has been selected here will display on the List. | |
|
| If one of the Quick View options is chosen for Auto Scanning (see SCAN/SKIP MODE, | |
|
| page 17), only a Port that has been selected here will be Auto Scanned. | |
|
| The default is for no ports to be selected. | |
|
|
|
|
18
