Section 4: Operation
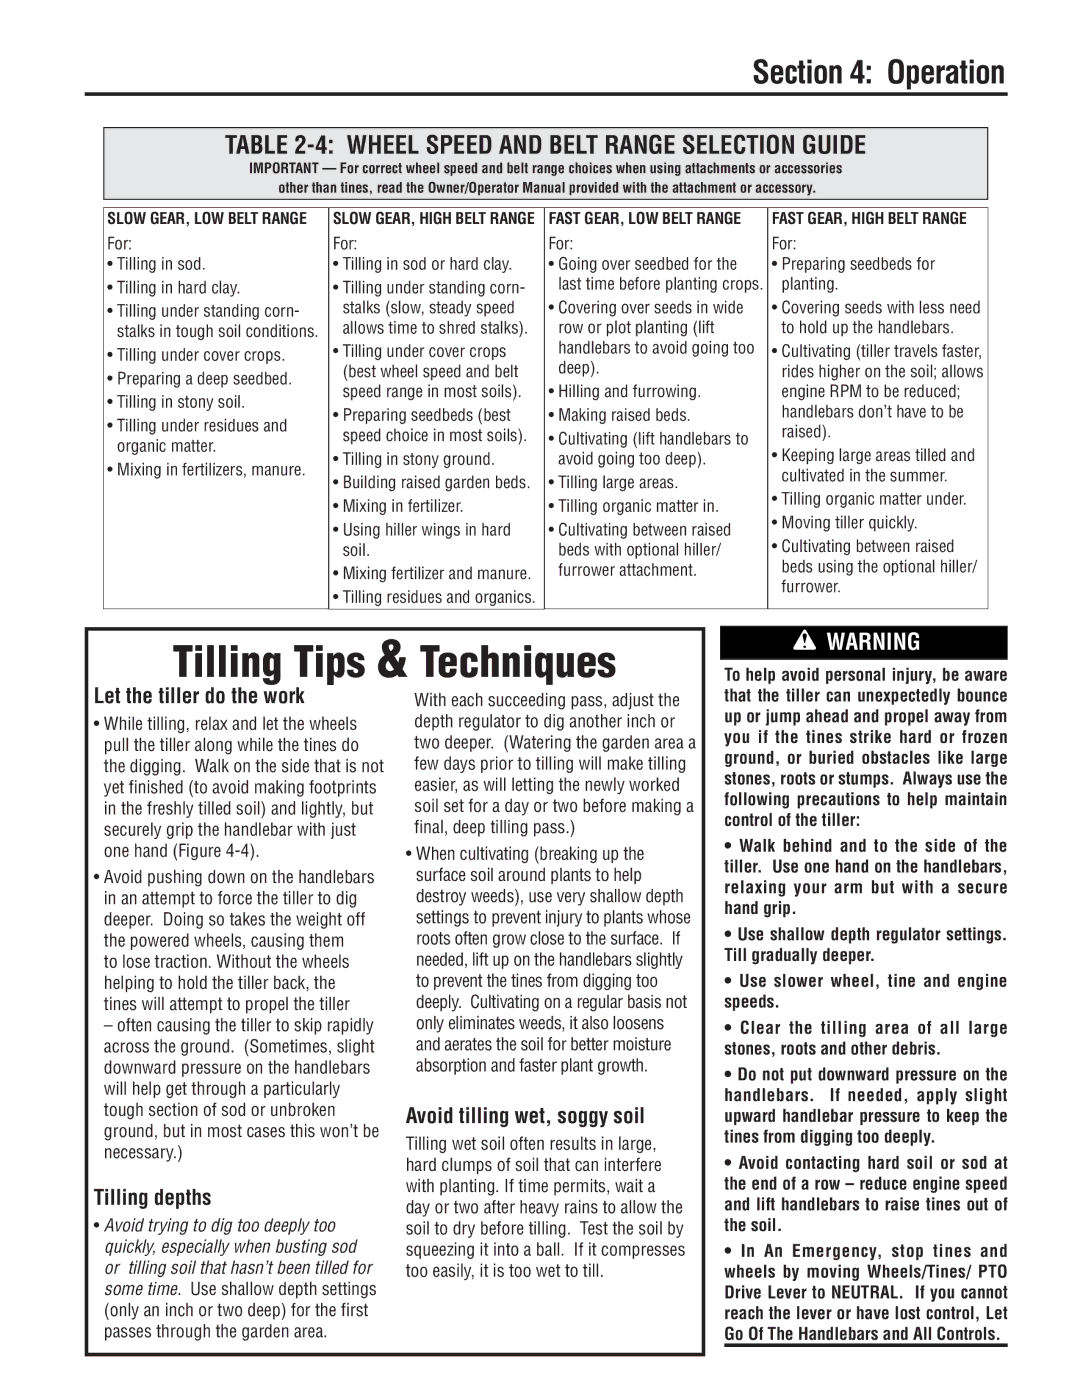
TABLE 2-4: WHEEL SPEED AND BELT RANGE SELECTION GUIDE
IMPORTANT — For correct wheel speed and belt range choices when using attachments or accessories other than tines, read the Owner/Operator Manual provided with the attachment or accessory.
SLOW GEAR, LOW BELT RANGE
For:
•Tilling in sod.
•Tilling in hard clay.
•Tilling under standing corn- stalks in tough soil conditions.
•Tilling under cover crops.
•Preparing a deep seedbed.
•Tilling in stony soil.
•Tilling under residues and organic matter.
•Mixing in fertilizers, manure.
SLOW GEAR, HIGH BELT RANGE | FAST GEAR, LOW BELT RANGE |
For: | For: |
• Tilling in sod or hard clay. | • Going over seedbed for the |
• Tilling under standing corn- | last time before planting crops. |
stalks (slow, steady speed | • Covering over seeds in wide |
allows time to shred stalks). | row or plot planting (lift |
• Tilling under cover crops | handlebars to avoid going too |
(best wheel speed and belt | deep). |
speed range in most soils). | • Hilling and furrowing. |
• Preparing seedbeds (best | • Making raised beds. |
speed choice in most soils). | • Cultivating (lift handlebars to |
• Tilling in stony ground. | avoid going too deep). |
• Building raised garden beds. | • Tilling large areas. |
• Mixing in fertilizer. | • Tilling organic matter in. |
• Using hiller wings in hard | • Cultivating between raised |
soil. | beds with optional hiller/ |
• Mixing fertilizer and manure. | furrower attachment. |
• Tilling residues and organics. |
|
FAST GEAR, HIGH BELT RANGE
For:
•Preparing seedbeds for planting.
•Covering seeds with less need to hold up the handlebars.
•Cultivating (tiller travels faster, rides higher on the soil; allows engine RPM to be reduced; handlebars don’t have to be raised).
•Keeping large areas tilled and cultivated in the summer.
•Tilling organic matter under.
•Moving tiller quickly.
•Cultivating between raised beds using the optional hiller/ furrower.
Tilling Tips & Techniques
![]() WARNING
WARNING
To help avoid personal injury, be aware
Let the tiller do the work
•While tilling, relax and let the wheels pull the tiller along while the tines do the digging. Walk on the side that is not yet finished (to avoid making footprints in the freshly tilled soil) and lightly, but securely grip the handlebar with just one hand (Figure
•Avoid pushing down on the handlebars in an attempt to force the tiller to dig deeper. Doing so takes the weight off the powered wheels, causing them
to lose traction. Without the wheels helping to hold the tiller back, the tines will attempt to propel the tiller
– often causing the tiller to skip rapidly across the ground. (Sometimes, slight downward pressure on the handlebars will help get through a particularly tough section of sod or unbroken ground, but in most cases this won’t be necessary.)
Tilling depths
•Avoid trying to dig too deeply too quickly, especially when busting sod or tilling soil that hasn’t been tilled for some time. Use shallow depth settings (only an inch or two deep) for the first passes through the garden area.
With each succeeding pass, adjust the depth regulator to dig another inch or two deeper. (Watering the garden area a few days prior to tilling will make tilling easier, as will letting the newly worked soil set for a day or two before making a final, deep tilling pass.)
•When cultivating (breaking up the surface soil around plants to help destroy weeds), use very shallow depth settings to prevent injury to plants whose roots often grow close to the surface. If needed, lift up on the handlebars slightly to prevent the tines from digging too deeply. Cultivating on a regular basis not only eliminates weeds, it also loosens and aerates the soil for better moisture absorption and faster plant growth.
Avoid tilling wet, soggy soil
Tilling wet soil often results in large, hard clumps of soil that can interfere with planting. If time permits, wait a day or two after heavy rains to allow the soil to dry before tilling. Test the soil by squeezing it into a ball. If it compresses too easily, it is too wet to till.
that the tiller can unexpectedly bounce up or jump ahead and propel away from you if the tines strike hard or frozen ground, or buried obstacles like large stones, roots or stumps. Always use the following precautions to help maintain control of the tiller:
•Walk behind and to the side of the tiller. Use one hand on the handlebars, relaxing your arm but with a secure hand grip.
•Use shallow depth regulator settings. Till gradually deeper.
•Use slower wheel, tine and engine speeds.
•Clear the tilling area of all large stones, roots and other debris.
•Do not put downward pressure on the handlebars. If needed, apply slight upward handlebar pressure to keep the tines from digging too deeply.
•Avoid contacting hard soil or sod at the end of a row – reduce engine speed and lift handlebars to raise tines out of the soil.
•In An Emergency, stop tines and wheels by moving Wheels/Tines/ PTO Drive Lever to NEUTRAL. If you cannot reach the lever or have lost control, Let Go Of The Handlebars and All Controls.