17 |
|
|
|
|
|
|
| 18 |
YCustomizingour RF10 with AdvancedSpecialFeatures |
| Customizing Your RF10 with |
|
| CustomizingYourRF10with SpecialAdvancedFeatures | |||
| Customizing Component Names on the LCD Screen |
|
| |||||
|
| Special Advanced Features |
|
|
| |||
|
| After you’ve finished all your basic setup, you can choose |
|
|
| |||
|
| to make operation easier by customizing the RF10 just the |
|
|
| |||
|
| way you want, using the Special Advanced Setup Features |
|
|
| |||
|
| described in this section. |
|
|
|
|
|
|
|
| You can easily edit or change the name of any of the eight |
|
|
| |||
|
| COMPONENT buttons on the LCD screen. For example, you |
|
|
| |||
|
| can rename AUX to “LIGHTS” or SAT to “DISH”, etc. |
|
|
| |||
|
| Here’s how: |
|
|
|
|
|
|
|
|
|
|
|
|
|
|
|
|
| STEP 1: |
| STEP 2: | STEP 3: | STEP 4: |
| |
|
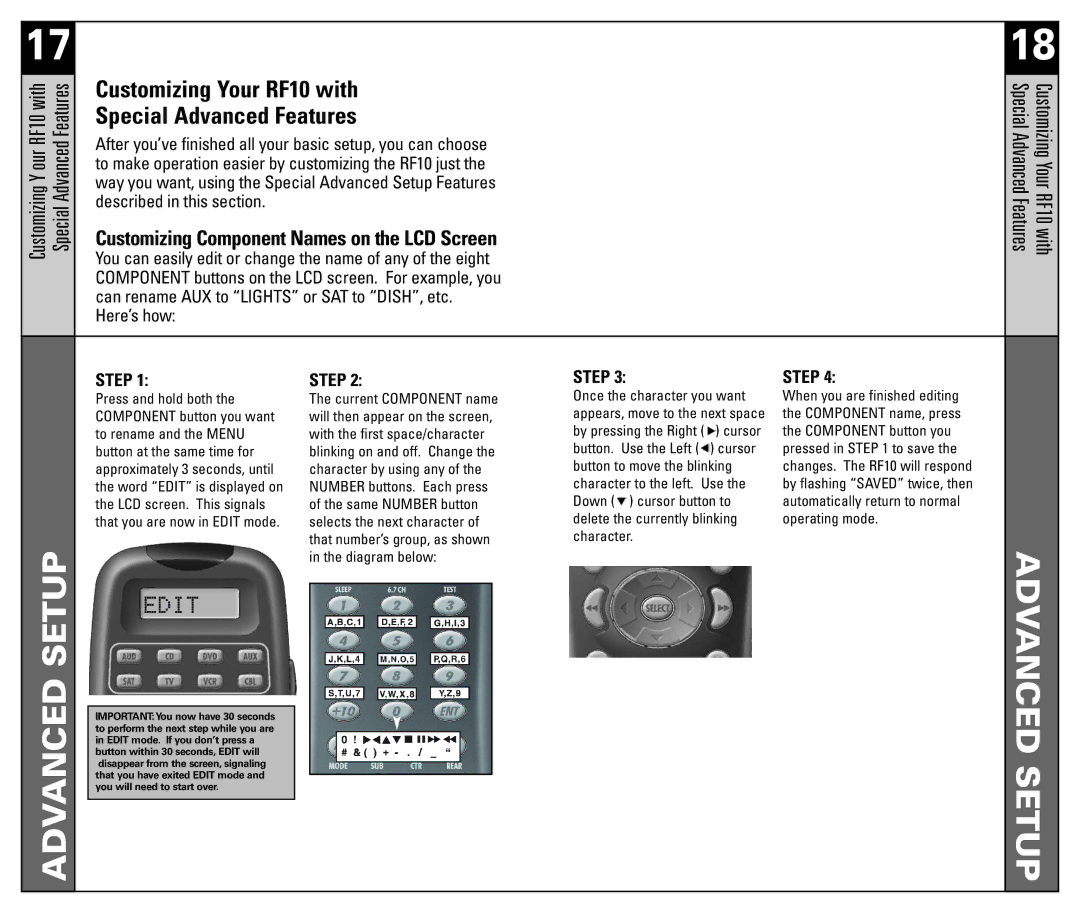
| Press and hold both the |
| The current COMPONENT name | Once the character you want | When you are finished editing |
| |
|
| COMPONENT button you want |
| will then appear on the screen, | appears, move to the next space | the COMPONENT name, press |
| |
|
| to rename and the MENU |
| with the first space/character | by pressing the Right ( ) cursor | the COMPONENT button you |
| |
|
| button at the same time for |
| blinking on and off. Change the | button. Use the Left ( ) cursor | pressed in STEP 1 to save the |
| |
|
| approximately 3 seconds, until |
| character by using any of the | button to move the blinking | changes. The RF10 will respond |
| |
|
| the word “EDIT” is displayed on |
| NUMBER buttons. Each press | character to the left. Use the | by flashing “SAVED” twice, then |
| |
|
| the LCD screen. This signals |
| of the same NUMBER button | Down ( ) cursor button to | automatically return to normal |
| |
|
| that you are now in EDIT mode. |
| selects the next character of | delete the currently blinking | operating mode. |
| |
SETUPADVANCED |
|
|
| that number’s group, as shown | character. |
| ADVANCEDSETUP | |
|
|
| in the diagram below: |
|
| |||
|
|
|
|
|
|
| ||
|
|
|
|
|
|
|
|
|
|
|
|
|
|
|
|
|
|
|
| IMPORTANT:You now have 30 seconds |
|
|
|
|
|
|
|
| to perform the next step while you are |
|
|
|
|
|
|
|
| in EDIT mode. If you don’t press a |
|
|
|
|
|
|
|
| button within 30 seconds, EDIT will |
|
|
|
|
|
|
|
| disappear from the screen, signaling |
|
|
|
|
|
|
|
| that you have exited EDIT mode and |
|
|
|
|
|
|
|
|
|
|
|
|
|
| |
|
| you will need to start over. |
|
|
|
|
|
|
|
|
|
|
|
|
|
|
|
|
|
|
|
|
|
|
|
|
