One or Two springs, One piece shaft |
| Right hand wound, |
NOTE: Center brackets and |
| red winding cone |
| (right hand side) | |
bearings may vary from those |
|
|
shown. |
|
|
| 1a. Center | Red cable drum |
| bearing bracket | |
| (right hand side) | |
|
|
Coupler | Coupler | Key | |
half | half |
| |
|
| (4) Set screws and | |
(6) Flat | (3) Lock | (2) Lock nuts | |
Key | |||
washers | washers | ||
| Torsion |
| |
| keyed |
| |
| shaft | Torsion | |
| (3) Hex head |
|
Left hand wound, |
|
black winding cone |
|
(left hand side) | 1b. Center |
| bearing |
| 1c. Oval |
| bearing |
Black cable drum |
|
(left hand side) |
|
Torsion shaft or
Torsion keyed shaft
Center
bracket
(3) Hex nuts | screws | Coupler | keyed |
| halves | shaft |
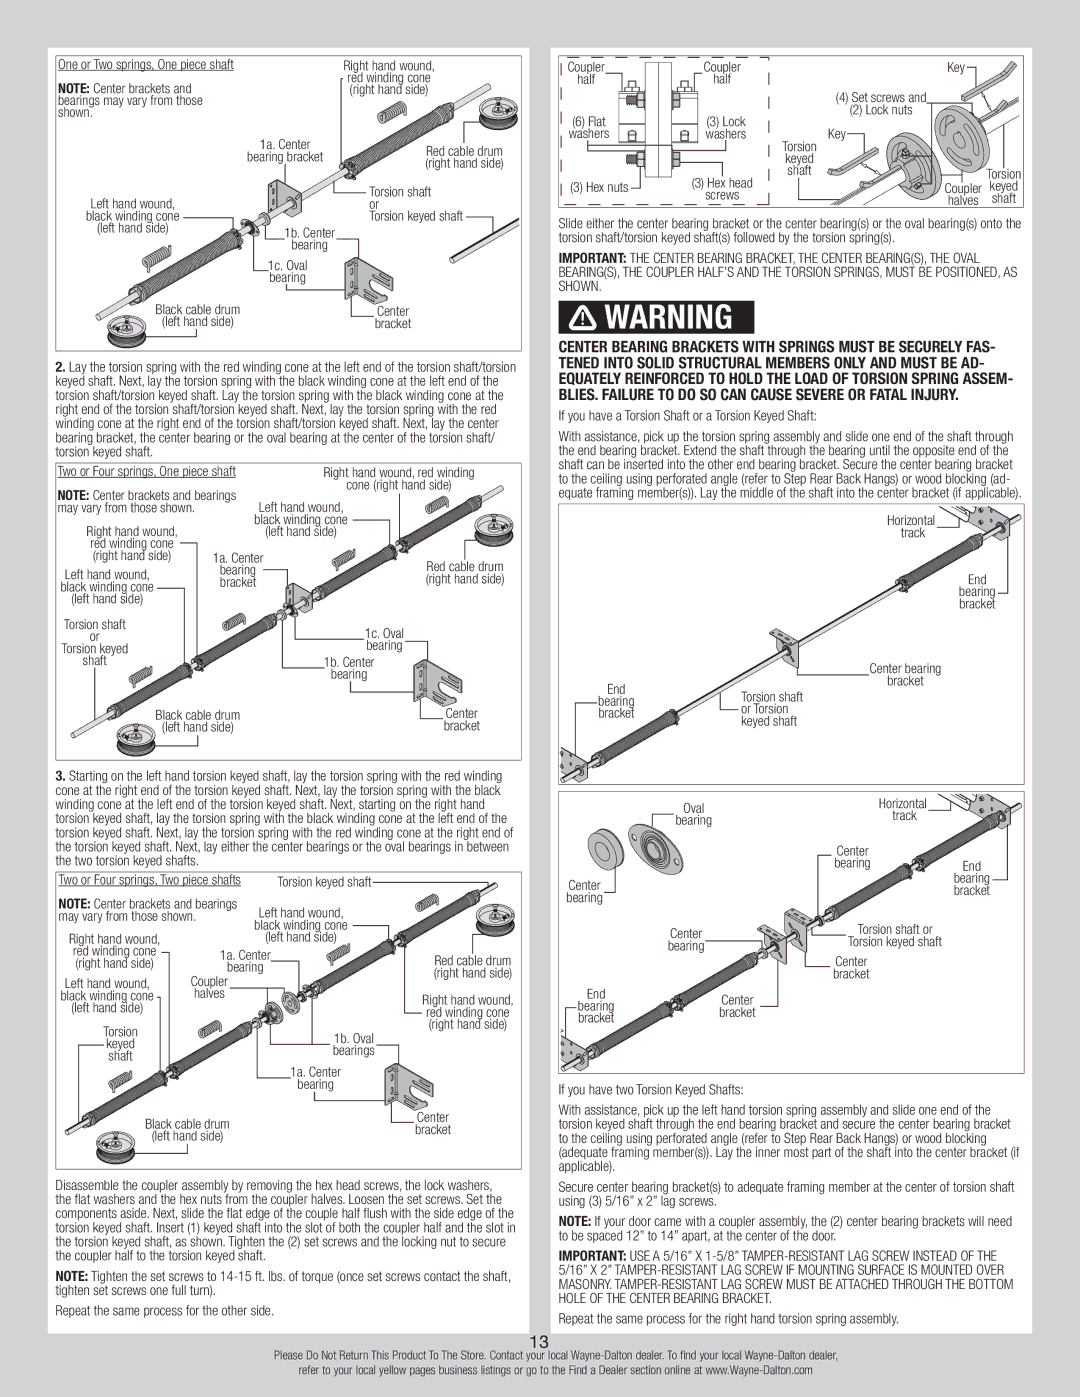
Slide either the center bearing bracket or the center bearing(s) or the oval bearing(s) onto the torsion shaft/torsion keyed shaft(s) followed by the torsion spring(s).
IMPORTANT: The center bearing bracket, the center bearing(s), the oval bearing(s), the coupler half’s and the torsion springs, must be positioned, as shown.
![]() WARNING
WARNING
Center bearing brackets with springs must be securely fas-
2.Lay the torsion spring with the red winding cone at the left end of the torsion shaft/torsion keyed shaft. Next, lay the torsion spring with the black winding cone at the left end of the torsion shaft/torsion keyed shaft. Lay the torsion spring with the black winding cone at the right end of the torsion shaft/torsion keyed shaft. Next, lay the torsion spring with the red winding cone at the right end of the torsion shaft/torsion keyed shaft. Next, lay the center bearing bracket, the center bearing or the oval bearing at the center of the torsion shaft/ torsion keyed shaft.
Two or Four springs, One piece shaft |
| Right hand wound, red winding | ||
NOTE: Center brackets and bearings |
| cone (right hand side) | ||
Left hand wound, | ||||
may vary from those shown. |
| |||
Right hand wound, | black winding cone | |||
|
| (left hand side) | ||
red winding cone |
|
|
| |
(right hand side) | 1a. Center | Red cable drum | ||
Left hand wound, | bearing |
| ||
bracket |
| (right hand side) | ||
black winding cone |
| |||
(left hand side) |
|
|
| |
Torsion shaft |
|
| 1c. Oval | |
or |
|
| ||
Torsion keyed |
|
| bearing | |
shaft |
|
| 1b. Center | |
|
|
| bearing | |
Black cable drum |
| Center | ||
(left hand side) |
| bracket | ||
3.Starting on the left hand torsion keyed shaft, lay the torsion spring with the red winding cone at the right end of the torsion keyed shaft. Next, lay the torsion spring with the black winding cone at the left end of the torsion keyed shaft. Next, starting on the right hand torsion keyed shaft, lay the torsion spring with the black winding cone at the left end of the torsion keyed shaft. Next, lay the torsion spring with the red winding cone at the right end of the torsion keyed shaft. Next, lay either the center bearings or the oval bearings in between the two torsion keyed shafts.
tened into solid structural members only and must be ad- equately reinforced to hold the load of torsion spring assem- blies. Failure to do so can cause severe or fatal injury.
If you have a Torsion Shaft or a Torsion Keyed Shaft:
With assistance, pick up the torsion spring assembly and slide one end of the shaft through the end bearing bracket. Extend the shaft through the bearing until the opposite end of the shaft can be inserted into the other end bearing bracket. Secure the center bearing bracket to the ceiling using perforated angle (refer to Step Rear Back Hangs) or wood blocking (ad- equate framing member(s)). Lay the middle of the shaft into the center bracket (if applicable).
|
| Horizontal |
|
|
| track |
|
|
|
| End |
|
|
| bearing |
|
|
| bracket |
|
| Center bearing |
|
End |
| bracket |
|
| Torsion shaft |
| |
bearing |
|
| |
| or Torsion |
| |
bracket |
|
| |
| keyed shaft |
| |
|
|
| |
| Oval | Horizontal |
|
| track |
| |
| bearing |
| |
|
|
| |
|
| Center |
|
|
| bearing | End |
Two or Four springs, Two piece shafts | Torsion keyed shaft | ||
NOTE: Center brackets and bearings | Left hand wound, | ||
may vary from those shown. | |||
|
| black winding cone | |
Right hand wound, |
| (left hand side) | |
red winding cone | 1a. Center | ||
(right hand side) | |||
bearing | |||
Left hand wound, | Coupler |
| |
black winding cone | halves |
| |
(left hand side) |
|
| |
Torsion |
| 1b. Oval | |
keyed |
| ||
| bearings | ||
shaft |
| ||
|
| ||
|
| 1a. Center | |
|
| bearing | |
Red cable drum (right hand side)
Right hand wound, red winding cone (right hand side)
Center | bearing | |
bracket | ||
bearing | ||
|
Center |
|
|
|
| Torsion shaft or |
| |||||
|
| Torsion keyed shaft | |||
bearing |
|
|
| ||
|
|
|
| ||
Center
bracket
End | Center | |
bearing | ||
bracket | ||
bracket | ||
|
If you have two Torsion Keyed Shafts:
Black cable drum |
| Center | |
| bracket | ||
(left hand side) |
| ||
|
| ||
|
|
|
|
Disassemble the coupler assembly by removing the hex head screws, the lock washers, the flat washers and the hex nuts from the coupler halves. Loosen the set screws. Set the components aside. Next, slide the flat edge of the couple half flush with the side edge of the torsion keyed shaft. Insert (1) keyed shaft into the slot of both the coupler half and the slot in the torsion keyed shaft, as shown. Tighten the (2) set screws and the locking nut to secure the coupler half to the torsion keyed shaft.
NOTE: Tighten the set screws to
Repeat the same process for the other side.
With assistance, pick up the left hand torsion spring assembly and slide one end of the torsion keyed shaft through the end bearing bracket and secure the center bearing bracket to the ceiling using perforated angle (refer to Step Rear Back Hangs) or wood blocking (adequate framing member(s)). Lay the inner most part of the shaft into the center bracket (if applicable).
Secure center bearing bracket(s) to adequate framing member at the center of torsion shaft using (3) 5/16” x 2” lag screws.
NOTE: If your door came with a coupler assembly, the (2) center bearing brackets will need to be spaced 12” to 14” apart, at the center of the door.
IMPORTANT: Use a 5/16” x
Repeat the same process for the right hand torsion spring assembly.
13
Please Do Not Return This Product To The Store. Contact your local
refer to your local yellow pages business listings or go to the Find a Dealer section online at