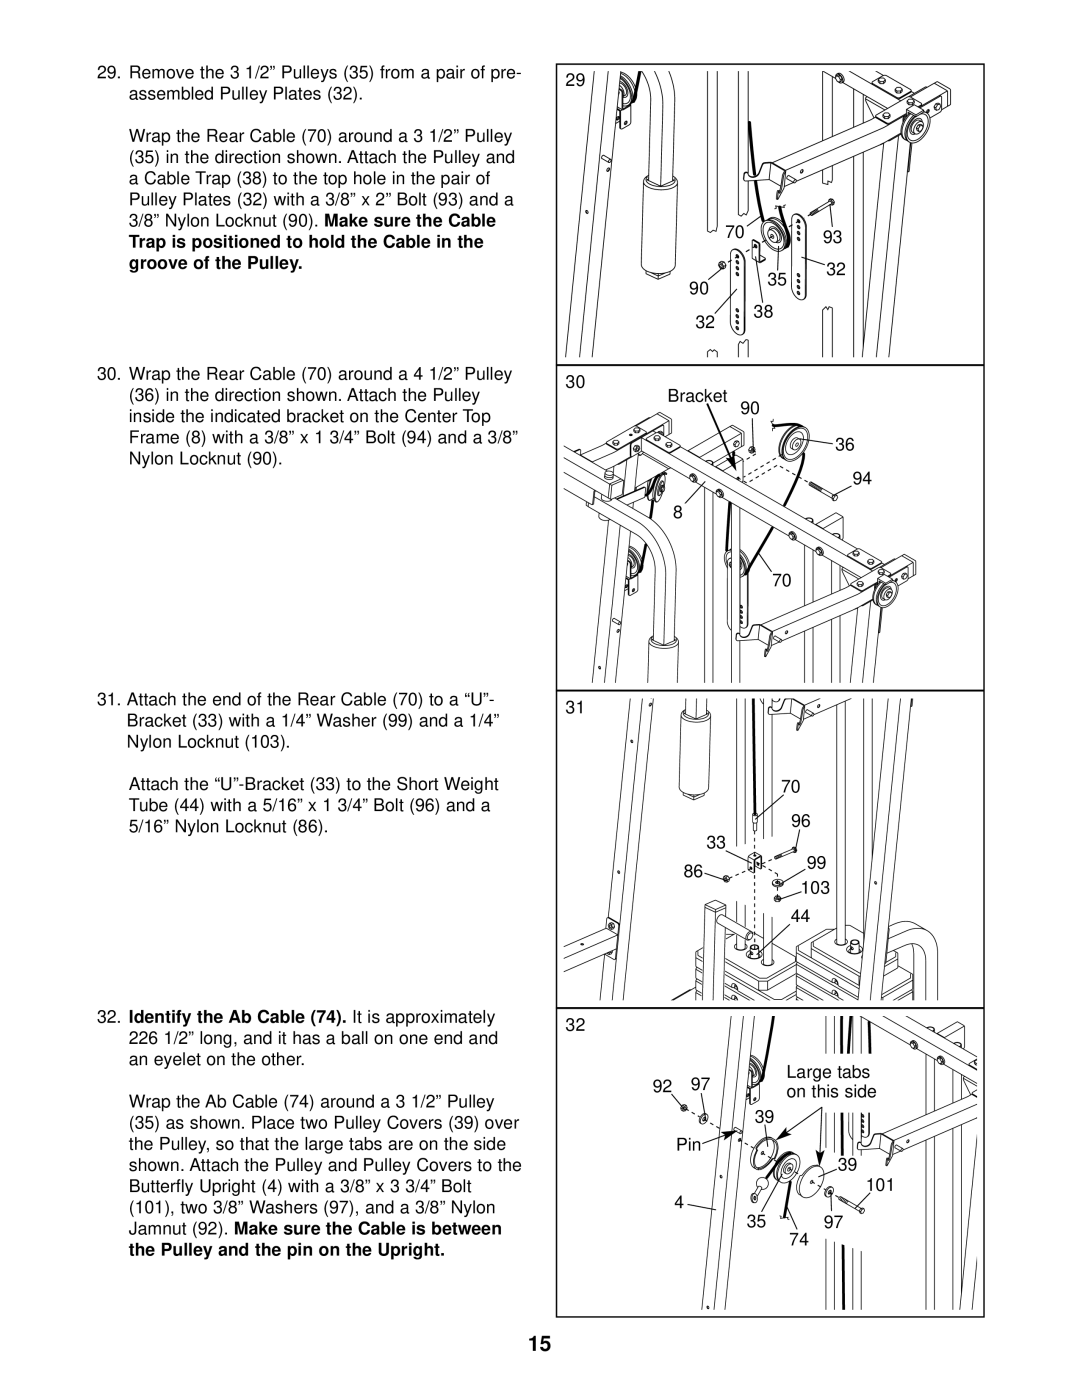
29.Remove the 3 1/2” Pulleys (35) from a pair of pre- assembled Pulley Plates (32).
Wrap the Rear Cable (70) around a 3 1/2” Pulley
(35)in the direction shown. Attach the Pulley and a Cable Trap (38) to the top hole in the pair of
Pulley Plates (32) with a 3/8” x 2” Bolt (93) and a 3/8” Nylon Locknut (90). Make sure the Cable
Trap is positioned to hold the Cable in the groove of the Pulley.
30.Wrap the Rear Cable (70) around a 4 1/2” Pulley
(36)in the direction shown. Attach the Pulley
inside the indicated bracket on the Center Top
Frame (8) with a 3/8” x 1 3/4” Bolt (94) and a 3/8” Nylon Locknut (90).
31. Attach the end of the Rear Cable (70) to a “U”- Bracket (33) with a 1/4” Washer (99) and a 1/4” Nylon Locknut (103).
Attach the
Tube (44) with a 5/16” x 1 3/4” Bolt (96) and a 5/16” Nylon Locknut (86).
32. Identify the Ab Cable (74). It is approximately
226 1/2” long, and it has a ball on one end and an eyelet on the other.
Wrap the Ab Cable (74) around a 3 1/2” Pulley
(35)as shown. Place two Pulley Covers (39) over the Pulley, so that the large tabs are on the side
shown. Attach the Pulley and Pulley Covers to the
Butterfly Upright (4) with a 3/8” x 3 3/4” Bolt (101), two 3/8” Washers (97), and a 3/8” Nylon Jamnut (92). Make sure the Cable is between
the Pulley and the pin on the Upright.
15
29 |
|
|
|
|
|
| 70 |
| 93 |
|
|
|
| |
| 90 |
| 35 | 32 |
|
|
| ||
|
|
|
| |
| 32 | 38 |
| |
|
|
|
| |
30 | Bracket |
|
|
|
| 90 |
|
| |
|
|
|
| |
|
|
|
| 36 |
|
|
|
| 94 |
| 8 |
|
|
|
|
|
| 70 |
|
31 |
|
|
|
|
|
|
| 70 |
|
|
|
| 96 | |
| 33 |
|
| |
| 86 |
|
| 99 |
|
| 103 | ||
|
|
| ||
|
|
| 44 |
|
32 |
|
|
|
|
92 | 97 |
| Large tabs | |
| on this side | |||
|
| 39 |
| |
| Pin |
|
| 39 |
|
|
|
| |
| 4 |
|
| 101 |
| 35 |
| 97 | |
|
| 74 | ||
|
|
|
| |
