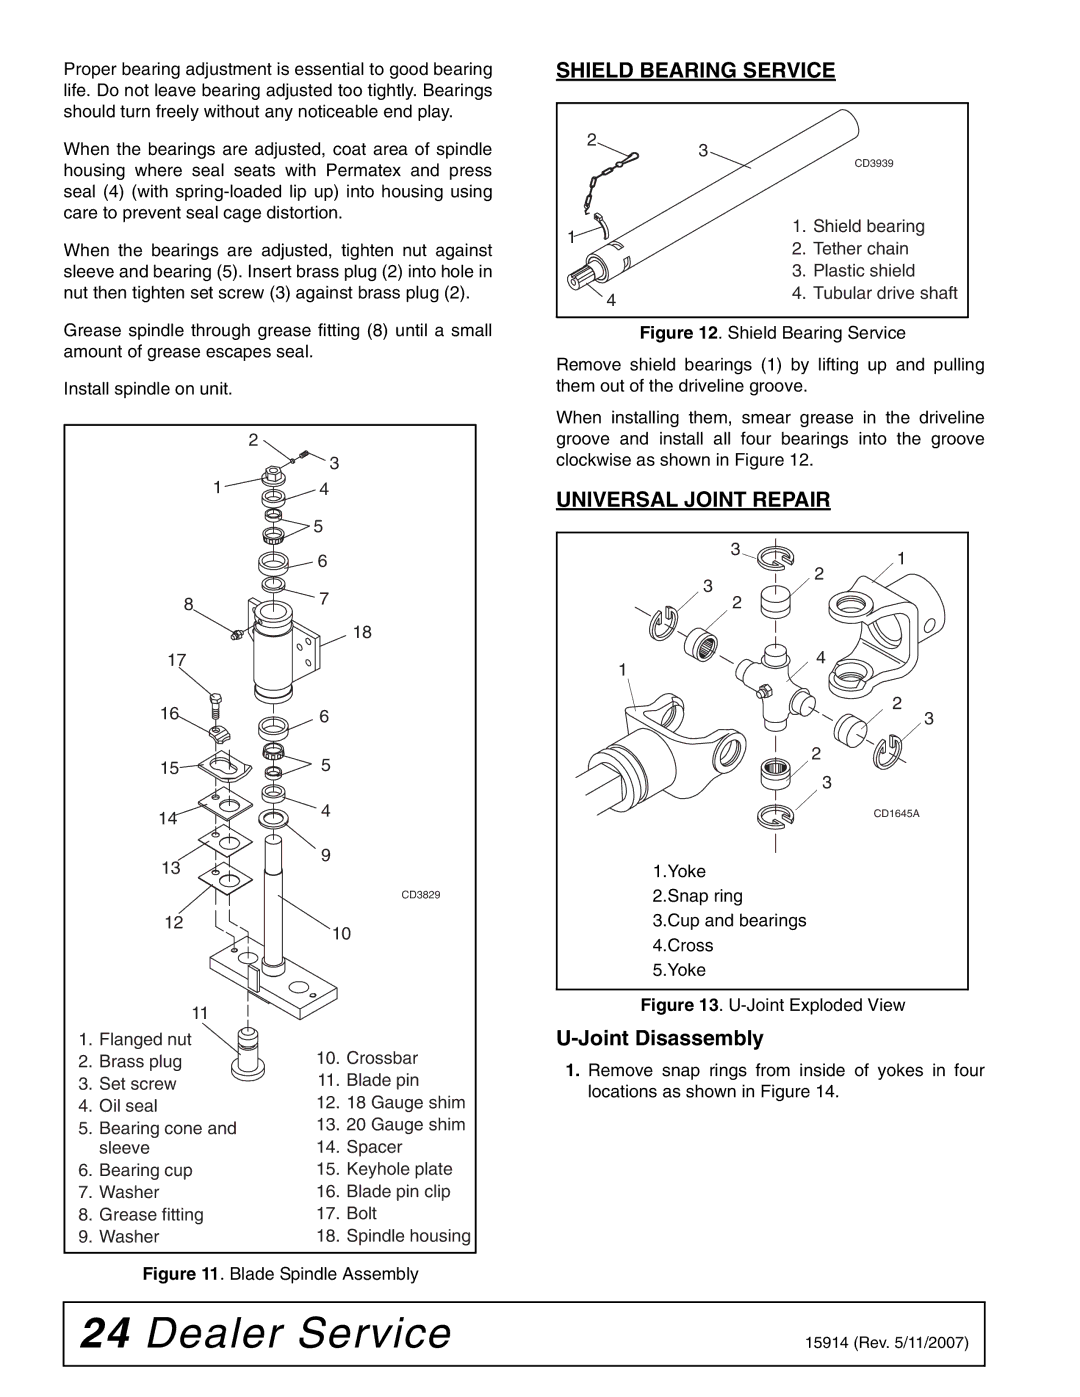
Proper bearing adjustment is essential to good bearing life. Do not leave bearing adjusted too tightly. Bearings should turn freely without any noticeable end play.
When the bearings are adjusted, coat area of spindle housing where seal seats with Permatex and press seal (4) (with
When the bearings are adjusted, tighten nut against sleeve and bearing (5). Insert brass plug (2) into hole in nut then tighten set screw (3) against brass plug (2).
Grease spindle through grease fitting (8) until a small amount of grease escapes seal.
Install spindle on unit.
| 2 |
| 3 |
1 | 4 |
| 5 |
| 6 |
SHIELD BEARING SERVICE
| 2 |
| 3 |
|
|
|
| CD3939 | |
|
|
|
| |
1 |
|
| 1. | Shield bearing |
|
| 2. | Tether chain | |
|
|
| ||
|
|
| 3. | Plastic shield |
|
| 4 | 4. | Tubular drive shaft |
|
|
|
|
Figure 12. Shield Bearing Service
Remove shield bearings (1) by lifting up and pulling them out of the driveline groove.
When installing them, smear grease in the driveline groove and install all four bearings into the groove clockwise as shown in Figure 12.
UNIVERSAL JOINT REPAIR
31
3
2
8 | 7 |
| |
| 18 |
2
17 |
|
16 | 6 |
1
4
2
3
| 15 | 5 |
|
| 14 | 4 |
|
|
|
| |
| 13 | 9 |
|
|
|
| |
|
|
| CD3829 |
| 12 | 10 | |
|
| ||
| 11 |
|
|
1. | Flanged nut | 10. | Crossbar |
2. | Brass plug | ||
3. | Set screw | 11. | Blade pin |
4. | Oil seal | 12. | 18 Gauge shim |
5. | Bearing cone and | 13. | 20 Gauge shim |
| sleeve | 14. | Spacer |
6. | Bearing cup | 15. | Keyhole plate |
7. | Washer | 16. | Blade pin clip |
8. Grease fitting | 17. | Bolt | |
9. | Washer | 18. | Spindle housing |
Figure 11. Blade Spindle Assembly
2
3
CD1645A
1.Yoke 2.Snap ring 3.Cup and bearings 4.Cross
5.Yoke
Figure 13. U-Joint Exploded View
U-Joint Disassembly
1.Remove snap rings from inside of yokes in four locations as shown in Figure 14.
24 Dealer Service | 15914 (Rev. 5/11/2007) |
|
|
